ColourPop “Going Coconuts” Collection | First Impression Review & Swatches

I really try to stay mindful about my makeup purchases and remember that I don’t “need” any of these new releases. Whenever I saw this new Going Coconuts Collection from ColourPop… I threw caution to the wind and purchased every single item! If you’ve followed my blog for awhile, you know that I tend to wear really natural, brown toned eyeshadows and nude lipsticks. This collection included a very wearable 9 pan eyeshadow palette with all neutral shades, 3 super shock shadows in all bronze tones, 2 bronzers, and 4 sheer lipsticks that are all natural flushes of color. It was a no brainer that I picked this entire set of products up on the day it launched! I also added their Lippie Balm and Scrub, and their Coconut Face Milk to my cart too! I needed to get the whole tropical vibes experience. I have only used these products for 2 days in a row, so this is definitely a “First Impression Review,” but with the holidays quickly approaching, I wanted to show you guys what I loved and what I liked from this ColourPop Coconut Collection for you to gift, or for you to treat yourself with!

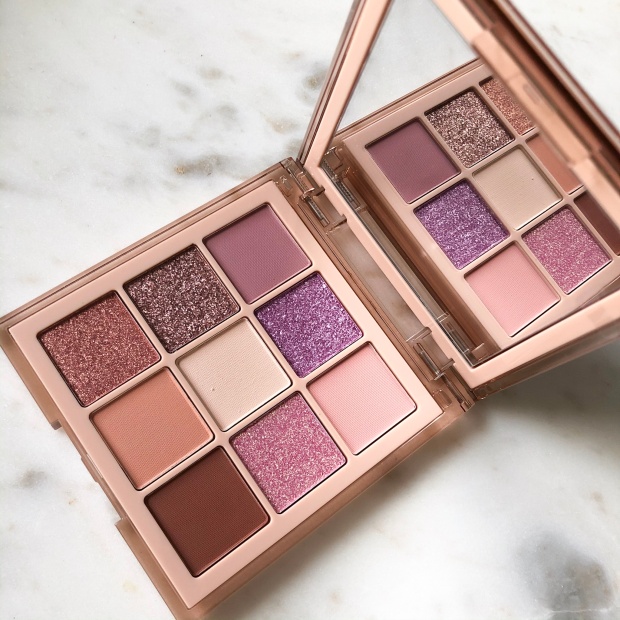
Going Coconuts Palette | $12 |

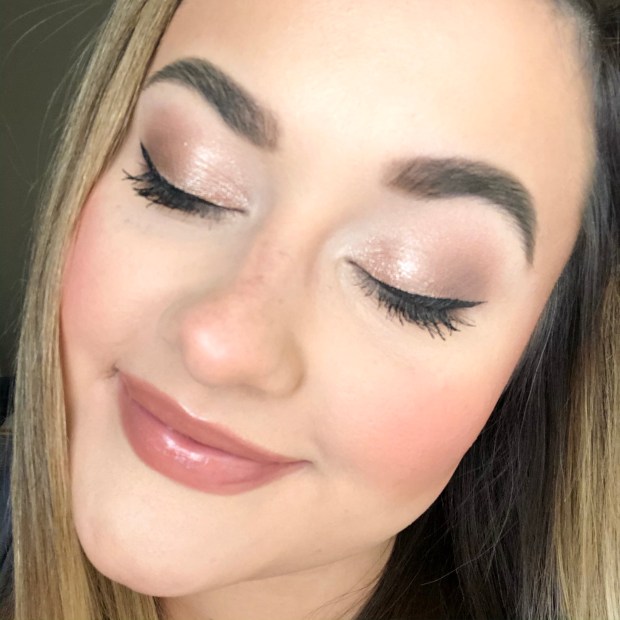
Whenever I first saw this palette, it actually stood out to me as being different from anything I’ve owned. Hear me out, it has a really good mix of cool tones and a few bright, shimmering shades that have silver and rose gold undertones. There isn’t anything that’s overly warm or golden, which I actually found refreshing from all the recent orange and red-tones palettes I’ve seen released. Not only is this super wearable for daily looks, but I think this would be a stunning special occasion palette. You could create the most beautiful wedding day, glam look using these shades! I love that the packaging is a hard plastic, as opposed to cardboard and it has a mirror inside. This is an ideal travel palette for me! The only con that I notice is that the metallic shades are crumbly, so you need to barely tap your finger into the pan to prevent them from smashing and breaking off into little pieces! I made the mistake of going full speed ahead into “Palm Reader” and had to gently pat it back into place after almost ruining it!

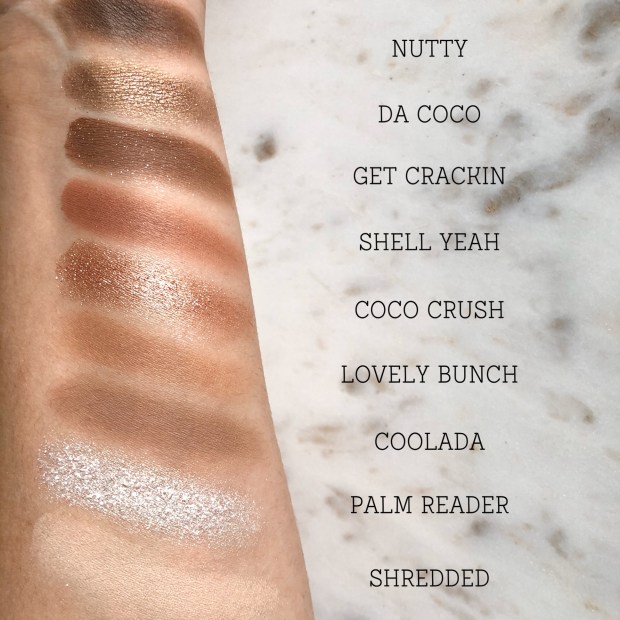
Shredded – satin matte cream

Palm Reader – metallic icy silver

Coolada – cool toned brown with gray undertones

Lovely Bunch – warm light brown

Coco Crush – metallic rose gold

Shell Yeah – satin matte terracotta

Get Crackin – cool toned dark brown with silver glitter

Da Coco – metallic taupe brown with silver and gold shimmer

Nutty – matte cool toned dark brown

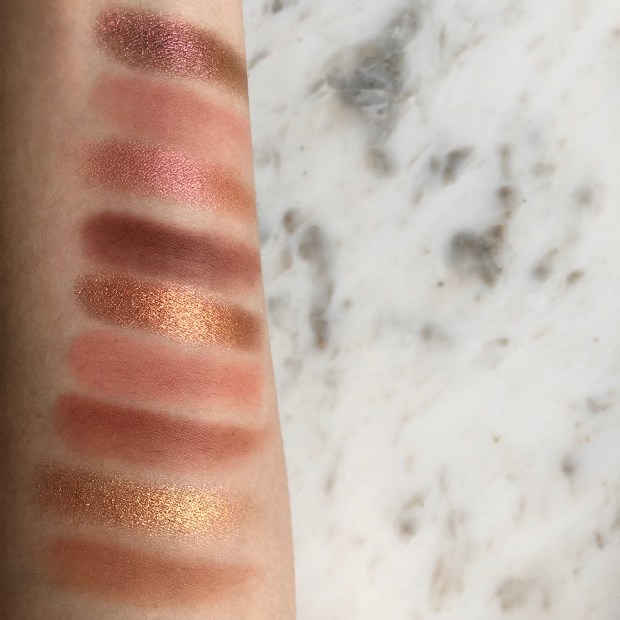
Call Me On My Shellphone Super Shock Shadow Trio

The ColourPop Super Shock Shadows are one of my favorite formulas! They’re a cream-to-powder finish and have a bouncy texture when you touch them. I always use my finger to apply these. I think you get maximum color payoff by patting them into your eyelid, rather than swiping with a brush. These shimmer shades are super pigmented and foiled on the kids! They catch the light so beautifully and I guarantee you will have people complimenting your eyeshadow when you use one these! You can buy these separately for $6, or all three in a trio for $15. I used the shade descriptions from the ColourPop website for the rest of the items in this collection because I think they’re pretty accurate and I’m terrible at trying to describe these things! 😂

Peekaboo | $6 | “metallic ivory with silver glitter”

A Little Quarky | $6 | “peachy gold with blue & silver glitter”

Deep Dive | $6 | “bronze with purple and gold glitter”

Just a Tint Lip

Okay, where has this lip product been my entire life?! Girls, this is such a comfortable, hydrating lip crayon that perfectly tints your lips with a natural hue and a lip balm finish! These are definitely not high pigment, full coverage lippies, but they will give you a healthy looking hydration and sheer wash of color in an instant! I love the crayon-like shape of these because you can so easily line your lips and fill them in using one product. I have a feeling I’m going to be using these a ton in the next few months!

Island Time | $7 | “a sheer pinky nude”

Shaka | $7 | “a sheer yellow toned nude”

Waikiki | $7 | “a sheer cool toned pink”

Nude Beach | $7 | “a sheer mahogany”

Bronzer

These are my first pressed bronzers from ColourPop and I was definitely not disappointed! I purchased both shades because I usually mix my bronzers anyway and wanted to check for consistency in the formula. So the bad news is, these are SUPER dusty, like I barely pressed my bronzer brush into the pan and had major kick-up and fallout. These kind of made a mess on my vanity and I didn’t like that at all… However, once applied, these are such a pretty, sheer-to-medium powder! They build up beautifully on the skin and gave such a natural bronze flush to my cheeks. If you’re light to medium skin tone, I think you’ll really love “Coconut Beach” and if you’re medium to dark, then “Talk to the Palm” will be your best friend. These are the very pigmented and you just need to barely tap your brush into the pan to get full color payoff. Just be careful with how powdery they are! I would recommend using a fluffy bronzer brush, rather than a densely packed contour brush because the bristles will be more whispy and light, allowing you to not disrupt this extremely, finely milled bronzer!

Coconut Beach | $8 | “a neutral golden bronze”

Talk to the Palm | $8 | “a neutral matte warm bronze”

Coco Loco Kit

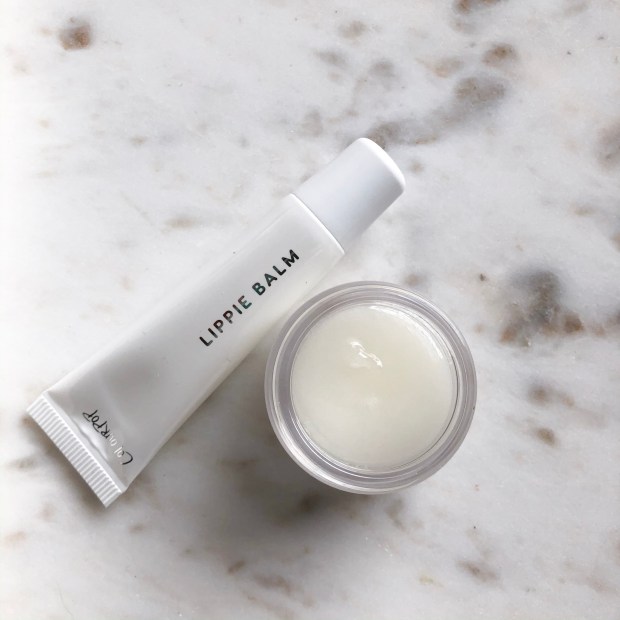
This kit seemed like such a good set for this time of year! I have a serious phobia about dry, cracking lips and I do everything in my power to keep them looking hydrated and smooth at all times! These items are sold separately, or you can purchase them both in a kit! I think the set would make such a perfect stocking stuffer for any age girl in your life!

Coco Loco Lippie Balm | $6 | “Clear Balm”

I love the squeeze tube of this lippie balm! These are so much more sanitary than the pots of balm that you constantly have to put your finger in. This formula contains shea butter, vitamin e, coconut and macadamia oil. This smells like a tropical paradise and gives such a shiny finish to my lips!

Coco Loco Lippie Scrub | $6 | “Clear Scrub”

I love how gentle this lippie scrub is! I can tell that it’s exfoliating dead skin off, but it still feels like it’s hydrating my lips at the same time. This is made with raw sugar, shea butter, cupuacu butter, sweet almond oil, and jojoba oil. I try to exfoliate my lips at least twice a week to make sure that they look smooth and fresh!
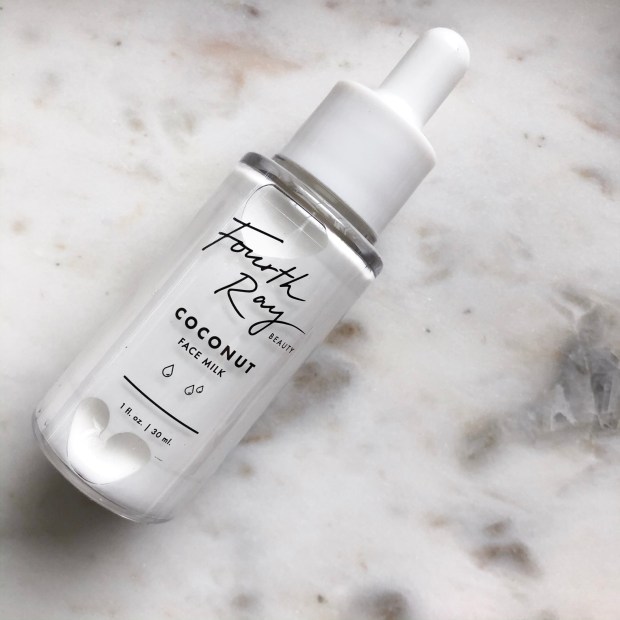
FOURTH RAY BEAUTY

Coconut Face Milk | $14 |

If you didn’t know already, ColourPop has a sister company called Fourth Ray Beauty, which primarily develops natural skincare products. They’re known for their face milks and setting sprays! This Coconut Face Milk is of course, formulated with Coconut Milk and Coconut Oil, but it’s also has Marshmallow Root, and Aloe for additional skin nourishment. I applied 2-3 drops of this on my bare face, before makeup application and let it sink in for about a minute. I felt like it kept my skin looking hydrated and set nicely underneath my makeup. I don’t think it replaces my use for a primer, but I liked it for a moisturizing first step to my makeup routine!

As you have read, I really loved this “Going Coconuts” makeup collection by ColourPop. I felt like it all looked so gorgeous once applied to the face and inspired me to create more looks. I think you can go natural or bold with this palette and the super shock shadows will add such a gorgeous, glossy layer of sparkle on top! If you only get one, I would say “A Little Quarky” was the most unique! The lip tints were another standout product because they felt so good and looked beautiful on my lips! I didn’t think they lasted for a long time, but I honestly didn’t expect them to! They’re a sheer, lightweight formula and sometimes you can’t have your cake and eat it too! On an every day basis, I don’t mind reapplying every other hour if I love the color and love the way it feels on my lips. My absolute favorite shade out of the bunch was “Shaka”! Have you been loving ColourPop’s weekly new releases? I actually enjoy seeing the new collections and look forward to their announcements, but I know some people feel like the brand is not as “exclusive” if they’re always promoting new things. If this a brand you really love, then please let me know, because I really love reviewing their things and their price point is wonderful! I hope you all have had a wonderful weekend. Only a few more days until Thanksgiving, yay! Thank you so much for reading!

Follow me on Instagram: @abigaillindsayblog


Email any business inquires to:

abigaillindsayblog@gmail.com  

Huda Beauty “Nude Obsessions” Eyeshadow Palette | First Impression Review and Swatches

Huda Beauty Nude Obsessions Eyeshadow PaletteHuda Beauty Nude Obsessions Eyeshadow Palette

I am so excited to bring you a full first impression review, swatches, and wear test on 2 of the new Huda Beauty “Nude Obsessions” eyeshadow palettes! I chose the Nude Light and Nude Medium versions because honestly, the Nude Rich had too many red-toned shades and sometimes my eyes can get really sensitive to that specific pigment in shadows. I can do mauves and even rose pink colors, but straight burgundy’s and brick reds can cause irritation on my eyelids from repetitive use. I also love the mix of lavender/cool tones in the light palette and the warm, gold colors in the medium one. It’s awesome the Huda did come out with 3 options for everyone to select what fits their needs/skin tone/preference best!

Huda Beauty Nude Obsessions Eyeshadow PaletteHuda Beauty Nude Obsessions Eyeshadow Palette

These palettes feature 9 eyeshadows, varying in texture and finish. Upon first swatches, the mattes are super rich and soft to the touch, the shimmer shades are ultra metallic, and the glitters are very smooth and pigmented! At $29 each, I do find these to be a great value and definitely worth the price point. I picked both of these up at Sephora. Their faux crocodile packaging is really eye catching, but not over the top. Although these are small in size, I wouldn’t suggest traveling with them because of their soft formulation. You may discover some broken shadows if you have experience a bumpy ride!

Huda Beauty Nude Light Eyeshadow PaletteHuda Beauty Nude Light Eyeshadow Palette
Huda Beauty Nude Light Eyeshadow Palette

Huda Beauty Nude Light Eyeshadow Palette

Huda Beauty Nude Light Eyeshadow Palette

Huda Beauty Nude Light Eyeshadow Palette

My first set of swatches belong to the Nude Light palette. This was the first one that really caught my eye because I don’t have anything else like it. All of these swatched so evenly. When applied with a brush, there was some fall out from the shadows. Because they’re so finely milled and soft, I did expect this from the beginning. I personally don’t have an issue with it, but thought it was important to share. The standout shade for me was the shimmering lilac with gold sparkle in the center row, all the way to the right. I wanted to incorporate my entire eye look around that shade because it’s such a fun pop! Purple is one of the few “bold” eyeshadow colors that I actually feel comfortable wearing during the daytime. Blues and greens can sometimes feel a little foreign for work makeup, but I always feel like “myself” in purple tones. I wore this shadow for about 8 hours until I noticed that some of the shimmer did transfer from my lid to my crease. I did wear my NARS eyeshadow primer underneath and usually shadows do hold pretty well with that as a base. I was surprised to notice that this transferred, but it wasn’t anything to significantly sway my favorable opinion of this palette. I love the matte formula a lot! Each shade I tried blended so well, with zero patchiness or uneven pigment. The shimmers were stunning too, but I feel like it’s a lot more rare to find good mattes in these multi-finish palettes. This is my first time trying Huda’s shadows and I was so impressed with her formulation!

Huda Beauty Nude Medium Eyeshadow PaletteHuda Beauty Nude Medium Eyeshadow Palette
Huda Beauty Nude Medium Eyeshadow Palette

Huda Beauty Nude Medium Eyeshadow Palette

Huda Beauty Nude Medium Eyeshadow Palette

Huda Beauty Nude Medium Eyeshadow Palette

The Medium Nude palette was equally as impressive. I was impressed that there was proven consistency spanning from palette to palette. I absolutely LOVE the look I created with this one. I don’t know if it’s because it’s suited for medium skin tones and these shades are naturally more complimentary to me; or if it’s because this is my most used (hence most comfortable) arrangement of color for my every day eye looks. I’m just very drawn to this color story! The only downside to this palette (for me personally) is that there isn’t a matte light highlight shade for underneath the brow bone. That is the only thing that could’ve made this palette a home run for me. I think this one features really thoughtful depth, so you can differentiate shades on your lid even after you’ve blended them. I’ve noticed that more and more brands are creating palettes with colors that are practically duplicates of one other. Then once you have them blended out, you can’t even tell which one you used! I think that’s such a cheap marketing ploy to sell large palettes that are a “better value” when practically half of the shades are nearly the same as the one next to it in the palette. I can tell that all 3 of these palettes were strategically curated and I really appreciate that! These shades wore just as great as the ones I tried in the Light palette. They stay pigmented and vibrant for 10 hours until slightly noticeable fading began.

If you are a neutrals girl and want to add another high quality palette to your collection, then I would definitely recommend the Huda Beauty Nude Obsessions eyeshadow palette to you! For me personally, I didn’t need another eyeshadow palette (or 2…to be exact) but I really wanted to test these for you and get my honest review out there for readers to make an educated buying decision. I’m so happy these worked out for me and I definitely want to try some other products from Huda! I have a sample sized lipliner and lip strobe from the line, but that’s it! Let me know if you enjoy these first impression reviews. I really like writing my initial thoughts on a product as soon as I’m finished testing, so these are really fun for me to write! Which palette did you prefer more? I don’t think I can pick one! I hope you’re all having a wonderful day and look forward to more reviews coming from yours truly! Thank you for reading!

Follow me on Instagram: @abigaillindsayblog


Email any business inquires to:

abigaillindsayblog@gmail.com  

Zoeva Limited Edition Melody Eyeshadow Palette | Review & Swatches

Zoeva Melody Eyeshadow Palette

Hello! With so many new eyeshadow palettes releasing at once, it can be a bit overwhelming to sort through the initial hype and find the real gems out there! I (like most people) am drawn to things that are in beautiful packaging. It’s one of the best marketing techniques to put something in appealing packaging on an attention grabbing display. I saw this Zoeva Melody palette online at Ulta. The outer covering is obviously gorgeous with the holographic butterflies and modern font, but the inside is what really got me. The shades range from basic matte neutrals to unique duo chrome shades. I had to have it! In this post, I’ll be explaining the pros and cons of this palette, what I like and don’t like, and whether or not I feel like it’s worth the $28 price tag. Let’s get started!

Zoeva Melody Eyeshadow Palette

Upon first glance, I was impressed that this palette seemed so well balanced. There is a good variety of everyday colors that I would feel comfortable wearing to work, mixed in with some fun pops of purple, green, that would be perfect for a night out! I liked the amount of mattes vs shimmers and felt that the range had enough depth to prevent the colors from blending out to one similar shade after application. Next, I began swatching these colors and realized that they were super buttery and pigmented! The duo chrome shades were so eye catching, as you can see below. Depending on the lighting, they would shift to a different color and create a really cool effect. I liked that this palette offered something different than a lot of my others.

Zoeva Melody Eyeshadow Palette

Shades: (from Ulta’s website description)

• Gowns Swirling (matte porcelain pink with glitter)

• Airy Dalliance (satin delicate apricot)

• Gentle Clasp (satin cool blue with glitter)

• Cocoon of Doubt (satin antique gold)

• Fly Solo (matte cool ash brown)

• From Heaven (duochrome rose satin base with icy blue shift)

• Whirled Above (matte sandy maple brown sugar)

• Crystal Wings (duochrome rust-red satin base with golden green shift)

• Soul Unheld (shimmer golden honey bronze)

• About to Leave (matte rich espresso brown)

In my swatches, you can see how richly pigmented and metallic these shades are. However, once applied to the eyes, they do lose that BAM, in your face, sparkle quality…which is unfortunate, because I personally love glitter! However, for some people, that may be exactly what they want! I don’t want to say that I don’t approve of this palette, because I am happy to have it in my collection and I know I will use it, but I’m not in love with it. Since the shimmers are so finely milled, they translate to more of a satin finish on the eyes. I tried using a dry brush, wet brush, and my fingertip. All tools produced the same effect. A soft, diffused wash of color that differed from the way the shadow appeared in the pressed pan and the way it looks with an arm swatch. It was disappointing only because I expected it to look one way, not because it’s an ugly palette. It did last on my eyes all day and I did get compliments on my makeup, but I just wanted it to be more of a true representation of the shades that were in each pan. I noticed the duo-chromes were the most sheer, which was sad because I was looking most forward to those when I purchased the palette. The mattes are actually a beautiful formula and couldn’t be more blendable. I would love to try a Zoeva palette full of mattes now that I’ve tested this one! If I had to give an actual ranking on this palette, I would say it’s a 6/10 just because it’s not my type. He’s not ugly, he’s just not my type! 😂 If you’re looking for something that’s mainly sheer satin shades with a few buttery mattes, then you would love this palette!

Looking back at the 2 eye looks I created, I think they look pretty and simple, even though I incorporated about 5 different shades in each picture. Again, I’m not blown away by the end result and I’m not telling anyone “You need this palette ASAP!” even though it is limited edition. I would love for every review I bring to you to be glowing and positive, but the reality is, not every product out there is a home fun. I rely heavily on these types of posts to make informed buying decisions and that’s why I wanted to publish this, even though it’s not my new favorite palette! For some, this may be what sways you not to get it and for others, you may see this palette and think “that’s exactly what I’ve been looking for!” It really is all preference and mine is to be full of glitter and high pigmentation at all times haha! Thank you so much for taking the time to read this review and check out my swatches/awkward makeup faces! I would love to know your opinion of this Melody Palette in the comments below. Let me know if there is a better application technique too! I learn from my readers every day, so all input is welcome and encouraged. 😌 Have a great week everyone! See you next Sunday! ❤️

Follow me on Instagram: @abigaillindsayblog


Email any business inquires to:

abigaillindsayblog@gmail.com  

ColourPop “You Had Me At Hello” Pressed Powder Eyeshadow Palette! Review and Swatches!

I have been a huge fan of all things ColourPop Cosmetics since they first launched their online store! Their Super Shock Shadows and Ultra Satin Lips are some of my holy grail makeup items! In the past year, I’ve seen the brand grow tremendously by expanding the variety of products they sell. They were also recently picked up by Sephora, so you can shop select items on Sephora.com and I’m pretty sure you can also buy the same items in store! The largest collection of products is definitely on their main website, which is where I purchased the Eyeshadow Palette that I am reviewing in this post! The “You Had Me At Hello” Pressed Powder Eyeshadow Palette is a bronze, mauve and plum toned beauty! If you have brown eyes, this is going to be your best friend! This is an awesome value, you get 12 eyeshadows for $18! This palette also comes with a mirror, which makes it perfect for traveling! Now let’s break down each shade in the palette!

  • The Knot – A pearly, champagne metallic shadow with rose gold and silver shimmer. I really love this for an inner corner shade to brighten and widen my eyes!
  • Moon Struck – This is my favorite all-over-the-lid shade! I love wearing warm gold colors with my skin tone on a daily basis. This one is a true light gold with a soft gold shimmer throughout!
  • Two Peas – A warm brown transitional shade that is super matte and creamy! This one has a peachy undertone, which is very complimentary to the gold and purple shades in the palette!
  • Candygram – Another one of my favorites in the palette, I know I’ll be getting a lot of wear out of this one! This is a pink with metallic gold shimmer!
  • Winning Ticket – A matte dusty rose color. I love this for blending out the crease! This would also be a gorgeous color to put on your lid with a flat shader brush, then blend out with a fluffy brush for a super easy, monochromatic eye look!
  • FBO – I’m a bad beauty blogger and completely forgot to swatch this shade on my arm! This is a very metallic, pinky plum shade with silver shimmer! It’s super beautiful, I’m so sorry I forgot to swatch this!
  • Look See – A matte plum with a cranberry undertone. I was really impressed with the even pigmentation of this shade! I think this is going to be so pretty blended on my outer crease and lower lash line!
  • Fool’s Rush – This is a bronze color with gold shimmer throughout! This is probably the shade I’ll use most often! I love these types of shades to compliment my brown eyes!
  • Pulling Strings – I love warm matte browns for crease colors and this one is so creamy and evenly pigmented!
  • Want U Back – A cool toned, matte brown with a mauve undertone! I’m really glad they put this one in the palette because it will easily tie in the gold colors and purple shades for a cohesive eyeshadow look!
  • DTR – I typically don’t purchase these shades, so I’m really happy I have one included in this palette to get me out of my comfort zone! It’s a gray, taupe color with silver shimmer. It has a slight lavender shift, which gives it a unique twist!
  • Sparks Fly – This was the only shade in the palette that looked a little patchy! I haven’t used it on the eyes, so take this with a grain of salt! Sometimes swatches can be super deceiving, but I did want to point that out! It is a dark brown matte color that has a plum undertone. This will make a great liner shade to give the eyes soft definition.

My final thoughts on this palette is that it’s awesome and I would highly recommend it to anyone that loves these types of shades! It actually feels like better quality than some of my more expensive, luxury brand eyeshadow palettes! The shimmer shades are metallic and the mattes are very creamy and evenly pigmented! I also love that it comes with a mirror as well! The packaging is super compact and I can definitely see myself traveling with this palette and not needing to bring any other shades to create a complete look. Do you own any of the ColourPop Pressed Eyeshadow Palettes? Do you prefer them over the Super Shock single eyeshadows? Leave me a comment below! Happy December to everyone and I hope you have a great week! Thank you so much for reading!

Shop the palette here!

Follow me on Instagram: @abigaillindsayblog

Email any business inquires to:

abigaillindsayblog@gmail.com

Stila Eye for Elegance Liquid Eye Shadow Set! Review and Swatches!

It can be so stressful trying to find the perfect gift. With the holidays approaching, I wanted to feature some makeup sets that would make great presents for friends and family members that love all things beauty! During the Sephora VIB Sale, I snagged this Stila “Eye for Elegance Liquid Eye Shadow Set” and I couldn’t wait to share my thoughts with you on how amazing it is! First we can talk about how great of a deal this is, you’re getting 6 deluxe size shadows for $45, for an overall value of $72! There are two different formulas in the set, “Glitter & Glow,” which is exactly as the name states, very glittery with noticeable sparkles. “Shimmer & Glow” is a shimmer, satin formula that doesn’t have any chunky glitter. The “Shimmer & Glow” shadows won’t be released until Spring, so I was very excited to try a product that you can only use if you buy this set!

What I love most about these liquid eyeshadows is their long lasting formulation and the very limited fallout I experience (if any) throughout the day! The “Glitter & Glow” will most likely drop a couple sparkles down from your eyelids, onto to your face, but it’s nothing horrible! I always use these before I do my face makeup, just so I can clean up any fallout before I do my foundation and concealer! The consistency of the formula is somewhat watery, but they do dry very quickly so you have to work fast to blend them out! Once they have set, they’re not going anywhere, so make sure you place it exactly where you want it!

I love that you can layer these liquid shadows, without them breaking up and separating on the lid. The applicator is perfect for placing the shadow down, but I like going in with my ring finger and softly blending out the edges of the shadow right after.

Shimmer & Glow Liquid Eyeshadows

  • Kitten – This is exactly like their award winning powder eyeshadow, a beautiful champagne shade with a bright peachy, pink shimmer throughout. I would use this shade all over the lid to create an easy, but gorgeous eye look that only takes about 30 seconds to look complete!
  • Grace – I’m not going to lie, I thought this color was a little too similar to Kitten and if I was personally curating the shades selected for this kit, I would’ve chosen something that was more golden to give some variety. With that said, this is a very beautiful taupe color with a champagne shimmer. It looks stunning on the eyes and I think I’ll be getting a lot of use out of it!
  • Twig – This is a warm, chestnut brown with golden shimmer. I’ve been using this on my outer corners to give added depth. This is also beautiful smudged on the lower lash line and looks less harsh than a traditional eye liner.

Glitter & Glow Liquid Eyeshadows

  • Peachy Sheen – I don’t know if this color will be everyone’s cup of tea, but I personally love it! It will give you that editorial, glossy lid look that you see in high-end beauty campaigns! The peach shimmer is going to be complimentary on so many skin tones as well! This doesn’t have the pigmented base that the other shadows have, but the glitter is incredible and will give you an effortless, while still on-trend eyeshadow look!
  • Smoldering Satin – This is my favorite shadow in the entire collection! I know this is the shade that I’ll get those most wear out of because it’s a neutral champagne shade that has a ton of gold and silver glitter! I am so excited to pair this with a bold lip for upcoming holiday parties! This would also be beautiful with an all matte eyeshadow look on the top eyelid, with a glitter accent on the lower lash line!
  • Next to Notte – I already have a look in mind for an upcoming tutorial using this eyeshadow! It is a gorgeous cranberry red, with pink and silver shimmer! I am really excited to step out of my comfort zone and rock this stunning red glitter shadow!

I can’t say enough good things about this set! I think it’s definitely worth the money and I know I’ll use all of these shades. I think this would make a great gift for anyone that loves makeup! The formula is on point and I think there are enough wearable shades for someone to use these on a daily basis! The box is so cute that you can just stick a bow on it and you have a perfect little present to place under the tree! What did you think of the swatches? Are you planning on giving makeup sets as gifts this Christmas? Let me know in the comments! Thank you so much for reading this review!

Shop this set here!

Follow me on Instagram: @abigaillindsayblog

Email any business inquires to:

abigaillindsayblog@gmail.com

How to Look Well-Rested with Brighter and Wider Eyes!

Do you have dark circles, puffy eyes or just a sleepy looking appearance after repeatedly hitting snooze on your seven alarms? Because same. I developed a routine to de-puff and give a highlighted, lifted appearance to my under eye area, while also brightening and widening my eyes! Keep reading to see the list of products I use and the ways I apply them to look more awake!

I always wake up with puffy eyes and the Clinique “Pep-Start” Eye Cream is my go-to for hydrating and brightening! I love it for so many reasons. I’ve struggled with finding the perfect formula to lightly moisturize my under eyes before I apply concealer. Whenever eye creams are too heavy, it will cause whatever you put on top of it to look heavy and crease. This one is so lightweight, while also being hydrating, so it’s the perfect formula for A.M. application! It is cooling to the touch, which helps with de-puffing as well! I’ve also noticed that this doesn’t give me those small white bumps, which sometimes can happen with different eye creams that I’ve tried. I use a small, pea sized amount and tap it on with my ring finger since it applies the lightest amount of pressure! I wait about a minute for it to sink in and then I go onto the next step!

I’ve been using the Becca “Under Eye Brightening Corrector” for a couple years now and I can’t imagine this product not being in my daily routine! If you have stubborn dark circles that show through with even the most full coverage concealers, then you need to invest in a good corrector! This one is a peach color with light reflecting illuminators, which will counteract the blue tones in your dark circles. A little goes a long way with this product, plus it lasts all day long! I apply this with my damp beautyblender underneath my eye and in the inner corners.

After I’ve moisturized and corrected, I apply a full coverage concealer! I always purchase one that’s 1-2 shades lighter than my foundation to give a highlighted effect! My holy grail formula is the Tarte “Double Duty Beauty Shape Tape Contour Concealer” (that’s a mouthful!) and it comes in 14 shades so you’re bound to find your perfect match! It is by far the most lightweight, full coverage formula that I’ve ever tried! It truly conceals acne, dark circles and redness so flawlessly! I always use this product with a damp beautyblender to help sheer it out slightly! If you’ve struggled with your concealer wearing off, then you NEED to try this one because it doesn’t fade during the day or look drying!

By this point, I’ve used so many creamy, liquid products underneath my eyes, that I have to set it with a powder to lock it all in and prevent any creasing! I always choose a yellow-toned, matte highlight powder to enhance the brightening effect I’m going for! Even if you have a different skin tone than me, I would still highly suggest checking out the NYX “Highlight Pro Singles” on Ulta.com! These aren’t sold in store, but I always stock up online! At only $5 a pan, they’re extremely affordable and there are 12 different shades to choose from. I was constantly buying the Anastasia highlight refills and then I discovered these, which are just as pigmented! The powder will also help smooth out any fine lines you may have, which is an added bonus!

Now that my under eyes are concealed and bright, I move onto making my eyes look big and awake! On a daily basis, I typically just apply my bronzer in my crease and take a shimmery shade all over the lid. Even when I’m rushing, I will never forget to highlight my inner corners with a shimmery, champagne eyeshadow! This makes the biggest difference in opening up your eyes and reflecting much needed light in an otherwise shadowy area! I love using this L’Oreal “Infallible Eyeshadow” in “Iced Latte” to brighten everything up! I take my pinky finger and dab the shadow on my inner corners, blending it outwards to seamlessly fade into my lid color.

I have round eyes, with a lot of lid space, so I always use eyeliner on the top lash line to help define and thicken the look of my eyelashes! Whenever I don’t put eyeliner in this area, I feel like my eyes look super tiny and tired. My favorite liners to use are the Kat Von D “Tattoo Liner” in “Trooper” for an ultra black, winged liner and I love the Marc Jacobs “Highliner Matte Gel Eye Crayon Eyeliner” in “(Earth)quake 41” for a smudged out, brown liner look! I also use the Marc Jacobs liner on my top waterline to further define that area, as well as smudged out on the outer corners of my lower lash line!

I’m pretty sure the best makeup secret to opening up your eyes and making you look awake is using a nude eyeliner in your lower waterline! The Tarte “Fake Awake Eye Highlight” is the most pigmented and long wearing one I’ve tried so far! I’ve repurchased it so many times because nothing compares! The nude color will neutralize any redness you have from having your eyes closed all night long. Using a light color in the lower waterline will help widen and brighten your eye. Back in the day, I would use a white eyeliner, but I’ve started to enjoy the more natural effect of a nude eyeliner now! If you haven’t tried this beauty hack yet, you really need to! It makes the biggest difference and I really can’t do my makeup without it!

Do you have any tips or tricks to getting a fresh and well-rested appearance when you’re really just a sleepy gal?! Let me know by leaving me a comment! I love learning new techniques from you guys! Thank you so much for reading, I hope you found this type of product review/routine helpful!

Follow me on Instagram: @abigaillindsayblog

Email any business inquires to:

abigaillindsayblog@gmail.com

“Tartelette Toasted Eyeshadow Palette” Review and Swatches!

It’s sweater weather, so you need a warm eyeshadow palette to feel extra cozy! The “Tartelette Toasted Eyeshadow Palette” is a brand new, 12 shadow palette from one of my favorite makeup brands, Tarte Cosmetics! I really love wearing warm shades on my eyes and find them to look somewhat natural on a daily basis. Even though I love makeup and have so many different options, I get the most out of my warm-toned, natural eyeshadows! I was so drawn to this palette in particular because it has both matte and shimmer shades. I knew I could create multiple looks using this one product, making it perfect for getting ready in a rush or traveling!

I wanted to give you a break down on all of the shades and the way they apply! As you can see, the shadows swatch beautifully, but some of them require a little extra work to show up equally as pigmented on the eyes! There are 5 shimmer shades and 7 mattes and I am super pleased with that ratio! In my opinion, you need to have more matte shades so you can create depth in the crease. It’s also nice to highlight your brow bone with a matte light shade and also have a dark enough matte color to add a shadow liner or deepen the outer crease.

  • S’more – This is the perfect “all-over-the-lid” shade. I use this after I apply eye primer to set my eyelid and give an even base to the shades I blend overtop. This is the perfect brow bone highlight too! It’s a bright, matte beige color that will work for a lot of skin tones.
  • Sunrise – I wasn’t very impressed with this color when I swatched it, just because it seems so sheer! I’m happy to report that it looks a lot prettier when you apply it as an eyeshadow! It is a cream shade with a slight golden sheen. If you like to wear really natural colors, you would love this! I love putting this in my inner corners to help my eyes look more awake!
  • Sunset – This is such a perfect gold/bronze shade! It’s not packed with sparkles, so you don’t feel overly glittery when wearing this on a daily basis!
  • Crackle – This is actually such a unique eyeshadow! It is a true brown base, but also has gold flecks throughout! When blending this shade, some of the glitter falls out, so be warned! I think this is best applied in patting motions using your finger to prevent any fallout!
  • Cashmere – A creamy, matte peach shade! I love using this as a transitional shade in my crease! It will be perfect on “no-makeup makeup” days to lightly define!
  • Warmth – This is my favorite matte color in the whole palette! It’s a rusty, terracotta shade that is super pigmented! You need the smallest amount of this color to make a statement! It will instantly warm up any eyeshadow look! I think this is going to be so pretty blended all over the eye and paired with a dark lip for Fall!
  • Flame – By far one of the most metallic colors in the palette! You can apply it with a brush and it will definitely show up on your eyes, but this is another shade that works best with your fingers. It’s a bright copper color with gold shimmer throughout.
  • Cozy – I absolutely love this matte brick color. It’s super creamy and applies evenly on the lids. You do have to be careful when using this alone, either all over the eyelid or underneath your eye because it can make you look slightly sick haha! I think it’s best to add dimension on the outer edges and that’s how I’m personally planning on using it.
  • Candle – I’m so indifferent towards this color because it’s chunky and glittery, but looks so gorgeous on the eyes. I would describe it as a sparkly champagne shimmer! This is the most “high maintenance” color in the palette because you have to use a mixing medium, like M.A.C Fix Plus or the Too Faced Glitter Glue to make it work. You will have a ton of fallout if you try to apply this dry with a brush. It’s best to use your finger to pat it on and work in light layers because it can look uneven and patchy when trying to build it up!
  • Latte – This is my perfect crease shade! It’s one of the more neutral colors in the palette and will help add some variety to natural and more dramatic looks!
  • Simmer – My favorite shimmer shade in the entire palette! This is the most beautiful copper color! It has a gold shift and applies really well with a brush OR your fingertips! I can see this complimenting blue eyes so beautifully!
  • Fireside – This swatch doesn’t do this shade justice, it looks kind of patchy, but it’s really creamy and blendable on the eyes (which is what really matters)! This is a deep plum/brown that looks beautiful as a soft liner if you want to naturally define your lashline. Or you can use it right on the outer corners of your eye for extra drama!

Even though a few of these eyeshadows require a little more work than others, I think this palette is totally worth it! I’m so happy I purchased mine before it sells out and I can already tell that I’m going to use it all the time! You get 12 Amazonian Clay eyeshadows for $46! That’s a really good deal, making each shadow a little less than 4 bucks! They are all extremely pigmented and very creamy, they also smell like vanilla! I have sensitive skin and haven’t had any reaction to the scent or red pigments in these shadows, hooray! This would make an awesome gift for the holidays too! The only person I wouldn’t recommend this palette to, would be someone that hated warm toned eyeshadows because that’s literally all that is inside! Haha! What do you think of this Toasted Eyeshadow Palette? Do you own any of the other Tartelette palettes? If so, I would love to know how this one compares! Have a great week and thank you so much for reading!

Shop the Toasted Palette Here!

Follow me on Instagram! @abigaillindsayblog

Email any business inquires to:

abigaillindsayblog@gmail.com

September Favorites!

I have been trying so many new things in September, but only a few items have stood out as absolute favorites! I love sharing the different things that I recommend to my family, friends and coworkers! My “monthly favorites” are the products that I know will work for a variety of skin types and people with different levels of experience with makeup. I try to include products that are great for everyday use because the majority of my life consists of work and activities that limit how glam I can be from 8 am – 5 pm (although I do wish I could wear glitter eyeshadow to weekly meetings).

Anastasia Beverly Hills, Brow Powder Duo – $23.00

I recently picked up this old favorite of mine that I haven’t used in years! The Anastasia brow powder duo is a two-shade product that helps fill in and shape the brows! This is the most natural way to define your eyebrows, so if you don’t like using a pencil or pomade, definitely try this out! The formula is so good, it will stay put and is completely smudge proof. You can build up this powder, so I recommend using different amounts of pressure to get the desired light-to-dark effect on your brows. With the lighter shade in the duo, gently fluff it with feather-like strokes into the front of your eyebrows. With the darker shade, use slightly more pressure and precisely shape your arch and tail. They have 11 shade options to choose from and I use the duo in “Ash Brown.” By using a powder, you will get a much softer and natural effect, while still looking like you put effort into your eyebrows!

China Glaze, Street Regal Collection – $7.50

If you know me, you know I have an obsession with blue nail polish. I have always loved royal blue shades, but I’ve noticed that so many of them chip within a day of wear. I know certain colors are more difficult to formulate than others, so maybe blue is one of the cursed ones! I finally found one that is a cream finish and lasts really well on my nails! The China Glaze “Street Regal Collection” is online only at Ulta.com. The blue polish is called, “Born To Rule.” They have some absolutely stunning Fall shades in the range and I would recommend checking them out online if you enjoy doing your nails at home! I have been pairing any polish with the CND Vinylux Weekly Topcoat and I think that also helps prolong the wear of the manicure!

L’Oreal, Infallible Pro Matte Liquid Lipstick – $9.99

This is by far the best liquid lipstick formula at the drugstore! The most standout feature for me is the longevity, this will stay on your lips without fading or transferring for hours…it lasted throughout an entire meal without budging! You actually have to use an oil-based makeup remover to get this stuff off! It’s matte, but not uncomfortably drying. I really love the applicator because it allows you to be super precise when filling in your lips and it distributes just the right amount of product. I have mine in the shade, “Stirred,” which is a vampy, burgundy color. Be warned that the colors are darker than what they appear in the tube! I’m super excited to try out some of the more wearable nude shades now that I know the formula is top-shelf status!

Kiehl’s, Midnight Recovery Eye – $37

My under eyes are such a problem area for me. I’ve tried a lot of different eye creams and never found “the one” or a formula that did everything it claimed to do. I have super sensitive skin, so most eye creams would actually burn my skin and give me a reaction with small white bumps. I have been testing the Bobbi Brown eye cream for awhile and it’s really good, it was actually my favorite for a few months. When I ran out of that one, I decided to try out the Kiehl’s Midnight Recovery Eye because 1. Sephora finally sells this brand 2. So many people rave about it being their holy grail eye cream 3. No parabens, mineral oil, fragrance, silicones 4. Affordable in comparison to other popular eye creams! This claims to help with dryness, puffiness, fine lines and wrinkles. Since using it, I’ve noticed a significant difference in my dark circles, which is super exciting! I’ve noticed an increase in hydration and my fine lines seem to be fading! It’s absolutely a miracle product and I would highly recommend it if you’re like me and desperately trying to prevent any signs of premature aging!

Tarte, On the Prowl Tarteist PRO Magnetic Palette – $10

These magnetic palettes make life so much more convenient! You can pop in your single shadows, blushes, highlighters, powders, literally anything that you can de-pot and keep them in one little place! These are really ideal to keep your 3-4 essential products that you know you reach for every day. You don’t have to dig through your vanity or worry about misplacing anything, because you have it all in one compact place. I have a few different Z Palettes and although they’re nice, I really do prefer these Tarte magnetic palettes so much more! These come with a mirror and they’re more padded than the other ones I’ve tried in the past. I would definitely feel comfortable and confident that my powders wouldn’t break when traveling with the Tarte version. The camo print is so adorable and fun! They also have a leopard print and some limited edition holiday versions as well! Any product that helps keep me and my makeup collection somewhat organized is a winner!

That is all for my September Favorites! I love using all of these products and I feel like you would too! Let me know if you are also enjoying any of these beauty items! What were your favorites in September?! Please leave me a comment letting me know! I love talking to you guys and I feel like I get so many awesome product recommendations! I hope everyone has a great week!

Find me on Instagram!: @abigaillindsayblog

Email any business inquires to:

abigaillindsayblog@gmail.com

Shop the products here!

Anastasia Brow Powder

China Glaze Nail Polish

Loreal Liquid Lipstick

Kiehl’s Eye Cream

Tarte Magnetic Palette

August Favorites!

Too Faced, Matte Chocolate Chip Palette, $26.

I have been loving matte eyeshadows for my quick and easy, every day makeup routine. This little palette has all of the shades you could possibly need for a simple look! There are 11 eyeshadows included and they are all super buttery and creamy. I love that the largest shade in “White Chocolate” is an all-over cream shade that you can use to set your entire eye lid or highlight the inner corners and brow bone with. I can tell I’ve almost hit pan on this one because I use it daily! It’s also the perfect size for travel. I would compare it to the size of my hand, extremely portable and compact. I love that there is variety in the shades, you have cool/warm tones and light/dark. Having such a seamless color range helps me easily create a “put-together” eye look in less than 5 minutes! Also it smells like cocoa so I’m instantly happier each time I use it! This is limited edition, but I found it in stock on the Too Faced website! I will link everything below!

Kat Von D, Shade & Light Face Contour Palette Refill, $14.

Am I the only one who always hits pan on the highlighting/brightening shades in the contour palette first? I can never get through an entire dark bronzing/shading color! I’m so happy Kat Von D started selling refills for the shades in her infamous contour kit. The Shade & Light Palette is my absolute favorite for powder contour and highlight. Her shades are so pigmented, creamy and long lasting! The yellow, “banana” color called, “Lyric” is my absolute favorite for brightening up my under eyes. Sometimes concealer isn’t enough and I need an extra oomph of light! Setting underneath my eyes with “Lyric” helps me look well-rested and more youthful, plus it won’t give you the heinous flashback in photos like some translucent powders can! Since the back of these refills are magnetic, I typically just pop it into a small Z Palette to store it. I would highly recommend these refills if you don’t feel like buying an entire contour palette, especially if you know you’re only going to use 1 or 2 shades! Save your money and only buy what you’ll actually use!

Essence, “Make Me Brow” Eyebrow Gel Mascara, $2.99.

I’ve recently been trying out more affordable products and this eyebrow gel is incredible for the price point! I have mine in the darkest shade, “Browny Brows 02” which brings me to the one and only con I have of this product, not enough shades! At Ulta, there are only 3 shades to choose from, Blondy, Soft Browny and Browny. If you compare to a high end eyebrow brand like Anastasia Beverly Hills, they have six different tinted brow mascaras compared to Essence’s three. I think it would helpful to add a black, light blonde and a red/auburn shade. Now onto all the reasons I love this product! The formula has tiny fibers that attach to your natural hairs and help to build up thickness. My eyebrows do have sparse areas, so running this product over helps fill in any spots in a natural way. It seriously lasts all day without fading or transferring too! It has a really strong hold, so if you like to brush your hairs straight up or lay them flat, you can rest assured that they will stay in that exact style all day long. I really can’t say enough great things about it! I have tried the Benefit Gimme Brow and this is an exact dupe (if not better) and a fraction of the price!

Bite Beauty, Prismatic Pearl Creme Lip Gloss, $22.

Metallic lips are on-trend for Fall 2017! I’ve been loving this lip gloss by Bite Beauty to give me a glittery effect. You can definitely use this product in different ways based on your personal preference. I find that if I wear it on its own and apply it just like a normal lip gloss, it can be a bit too foiled for my liking. Instead, I apply a matte lipstick first, then pat this gloss onto my lips using my ring finger. I mostly just focus it onto the center of my lips to help them appear fuller and more dimensional. These last for so long, which can be rare in glitter glosses. They are also not gritty at all! You can rub your lips together and not feel a single grain of sparkle! I have mine in the shade “Champagne Pearl” because I tend to wear warm nudes on an every day basis, but if you are into more bold lip colors, I would highly recommend checking out “Peacock Pearl.” I swatched the teal/blue shade in store and was blown away by its beauty! It has a green and red shimmer throughout and looked so fun and editorial!

NARS Lipstick, $28.

This is my favorite go-to lipstick! I have the shade “Dolce Vita” and it is a sheer nude pink color. I love this so much because it makes my lips look so healthy and hydrated! This is the type of lipstick that you can put on without a mirror since it’s super creamy and light. Although it does give color to the lips, it definitely is more on the sheer side, which I really like because I can feel comfortable wearing this product at work, on the weekends, day, night, really just any occasion! Even though it is a satin finish, I find that it still lasts on my lips for 2-4 hours, which is a perfect amount of time for me! I would highly recommend these lipsticks if you’re looking for something to wear daily! They have so many shades so you’re bound to find one you love!

Thank you for reading about the products that I’ve been loving for the month of August! As always, I want to know what you are obsessed with! Please leave me a comment letting me know! Also, how crazy is it that we’re already in September?! I think this year is flying by! Like this post if you’re excited for future Fall fashion and makeup content on my blog!

Shop these products:

Too Faced Eyeshadow Palette

Kat Von D Refill PowderEssence Eyebrow Gel

Bite Beauty Lip Gloss

NARS Lipstick

Follow me on Instagram: @abigaillindsayblog

Email any business inquires to:

abigaillindsayblog@gmail.com

Eyebrow Routine!


Eyebrows are essential. I seriously fear leaving my house without having them done…they frame my face and compliment the makeup that I put on. I have naturally full eyebrows, but they're totally different shapes and heights…LOL isn't the saying, "eyebrows are sisters, not twins?" Well, mine are like two distant cousins that live on opposite sides of the country. I do have my good brow (right side) and I can always count on it remaining thick and fluffy, but also nicely arched. My ol' bad brow (left side) is quite a troublemaker and always makes me spend extra time trying to make it symmetrical.

I have used countless brow pencils, powders and pomades. After years of trial and error, I feel like I've finally found a combination that gives me the eyebrows that I love most; natural and bushy! I know what you're thinking, what about tweezing/waxing/threading?! I try to maintain some sort of an arch and pluck any stray hairs underneath the brow and in the middle, but I've stayed away from removing any hair above my eyebrow. It's helped me grow out the horribly over-plucked, sperm shaped mess that took years to undo (thank you, 8th grade) and it gives me more of an undone, natural effect. I love 80's supermodel eyebrows, think Brooke Shields and Cindy Crawford. These ladies brushed their hairs straight up and usually sprayed hairspray on their spoolie to keep them in tact. You definitely don't have to go for this look if you don't like it! It is totally fine if you prefer a more precise, clean brow, I think that look is so beautiful too! I've just had a lot of requests to post an eyebrow routine and I wanted to show you how I've been filling them in lately!

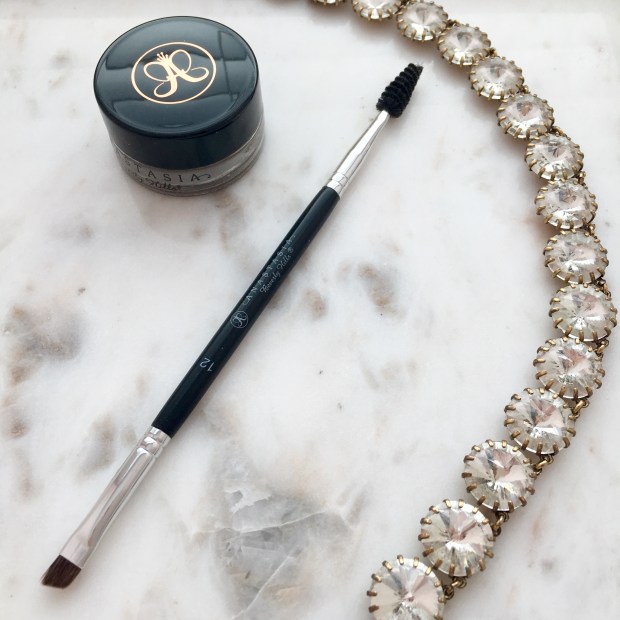
Anastasia Dip Brow Pomade, "Chocolate" and Anastasia #12 Angled Brush.


Anastasia Tinted Brow Gel, "Chocolate" and Givenchy Mister Brow Groom.

  1. These are just my all-natural eyebrows! Something for you to compare for a before and after! ☺️
  2. I always use my Anastasia Dip Brow Pomade. One little jar of this stuff lasts forever and it will never fade throughout the day. I find that it's just the easiest way for me to fill in my brows in a natural way. Using an angled brush, with a spoolie on the other end, also helps me get this done precisely and quickly! I first draw a line underneath the brow to get a defined shape. I always start on the bottom because you can just brush excess product upwards if you apply too much, it's incredibly harder to correct when you start from the top. I focus on emphasizing my arch and extending the tail of my eyebrow as well. With the spoolie side of my brush, I gently swipe any extra product into the hairs, making sure to cover any blank spots.
  3. Now I move onto the top. You can see that I've drawn a pretty harsh line to carve out my arch. This also helps me create additional symmetry and give an illusion that they're the same height.
  4. I've blended all of the lines into the eyebrow hair and brushed through everything a few times with the spoolie. It is so important during this entire routine to never put excess product towards the front of the brows. That's when things can get very unnatural looking! Instead, I take whatever is left on my brush at the very end of the sculpting process and gently fluff it through the front part to lightly shade it in.
  5. I used the Anastasia Tinted Brow Gel to give some highlights and dimension to the hairs. It also helps warm them up a little and match my current hair color a bit more. I love this eyebrow gel on its own, but of course I'm extra and add another one in the mix.
  6. I applied some of my Givenchy Mister Brow Groom and used the applicator to brush upwards on my hairs. This is a clear gel, so it's totally fine if a little gets on your skin from brushing them straight. This product is so pricey, but if you have hairs that fall or get wild throughout the day, it may be worth it. This stuff is like superglue and I love fluffing the front section of my eyebrows with this product. It also helps separate each hair and will help you look like you just naturally have beautiful, bushy brows!

What is your must-have eyebrow product? Have you ever tried any hair growth products that helped you get thick, full brows? Let me know! The bushier, the better and I just want the type of eyebrows that could make Lily Collins envious! I really appreciate you checking out my blog and reading this post! Feel free to leave me suggestions on what I should write about next!

Follow me on Instagram: @abigaillindsayblog

Email any business inquires to:
abigaillindsayblog@gmail.com