Creating A Subtle Look With Colorful Eyeliner

I really wanted to do a post on how I wear colorful eyeliner in the most subtle way. Sometimes I want to go out of my comfort zone with makeup, but personally do not feel very confident when I’m wearing bright, attention grabbing looks on a day-to-day basis. If you are like me and want to experiment with a unique eyeliner color, like blue or purple, but also want to keep the overall makeup look understated, then keep reading! 


To start off this makeup look, I begin with my face. I like to make sure that my skin looks as flawless as possible, so my eyes will pop. Of course I use a primer and a full coverage foundation to give myself a smooth, even canvas for my powder products to lay nicely on. I then try to use soft colored blushes and bronzers so my face appears to be the most natural part of my makeup. I find that when you have multiple attention grabbing elements on your face (dark eyeshadow, bright lips, shimmery blushes) you can sometimes overpower the entire look, making it hard to concentrate on your natural features, while appreciating the area you are emphasizing. On my lips, I used a matte, nude liquid lipstick from ColourPop to stay cohesive with the natural vibe I’m going for with this look! 

   
Once you have your face completed, it’s time for the fun part; the eyes! If I’m doing a bold, colorful eyeliner look, I make sure to keep the eyeshadow neutral and understated. I find that this technique makes the eyeliner pop because it stands out when placed on a blank canvas. I usually choose a light, matte eyeshadow color to place all over the lid and blend a neutral tone shade into my crease for slight definition. Next is the fun part! The blue eyeliner I used in this look was in a pencil form so I simply drew a line on my upper eyelid and then a slight wing off of the end. Lastly, I used the mascara routine that I posted about in April, to give my eyes added definition! 

Too Faced, Peanut Butter & Jelly Eyeshadow Palette, $36. ColourPop Creme Gel Liner, In the shade: “Prance”, $5.


This colorful eyeliner look really does come across as understated and simple, even though you’re incorporating a unique color into your makeup. Whenever I wore this out, no one even noticed I was wearing blue eyeliner until I pointed it out! Also even though I used blue, I think you could use any color and it would look equally as cool! I think this periwinkle-blue shade is really beautiful for Spring, so that’s why I used it! 

    
Let me know how you like to incorporate bright makeup products into a subtle look! I’m always looking to try out new ways to give my ordinary makeup a unique pop! Thank you so much for reading!

May Favorites! 

I love reading other bloggers monthly favorites, so I wanted to do one of my own! I included beauty, fashion and lifestyle favorites! Let me know if you enjoy reading posts like this and want me to do other monthly favorites in the future! Thanks for reading! 


Beauty       


Elizabeth and James, Nirvana White Eau de Parfum Spray, $80.

This perfume is described on Sephora’s website as a “blend of delicate peony, chic muget, and tender musk for a feminine scent with dark sophistication.” I have a hard time with most floral perfumes because they tend to give me headaches, however this one does not! It’s really difficult to describe scents, but I will try my best to convey my thoughts! Nirvana White is a very light floral scent that is mixed with a warm note that I can’t pinpoint! I think the idea of such a natural, floral scent gives this perfume more of a refreshing vibe that I haven’t experienced before! It lasts really long into my day and I get compliments every time I wear it! It is by far my favorite daytime scent!


Dermadoctor, KP Duty Dermatologist Formulated AHA Moisturizing Therapy For Dry Skin, $10.

I think this is the perfect product for Summer if you struggle with severe dry skin like I do! Dermadoctor’s products include, “a patented blend of glycolic acid, green tea extract and urea to help exfoliate, calm and hydrate,” which are all great ingredients for sensitive skin! As long as I can remember, I’ve had rough bumps on the backs of my arms. It’s a huge insecurity of mine because in the summertime I’m always wearing short sleeves and tank tops that reveal this problem area. Luckily, I’ve found this lotion that has significantly decreased the look of bumpy skin on my arms! On Ulta’s website it’s listed that this product, “Helps improve the appearance of parched skin and rough chicken skin bumps (like keratosis pilaris).” So good news, if you’ve always struggled with uneven texture on your body, this lotion will fix it for you! 


Loving Tan, Deluxe Bronzing Mousse, in shade “Ultra Dark,” $39.95.

This bronzing mousse by Loving Tan has the best formula by far when compared to my old favorites, St. Tropez and Vita Liberata. The color is FLAWLESS! It’s a deep olive-based, natural looking tan, rather than your standard orange or red undertone formula. The best part about this product is its longevity! On my skin, I can maintain my Loving Tan application for up to 5 days until it starts to fade! With other self tanners, I would notice it wearing off by the second day! I encourage you to check out their Instagram for before and after photos so you can see the difference I’m talking about! 


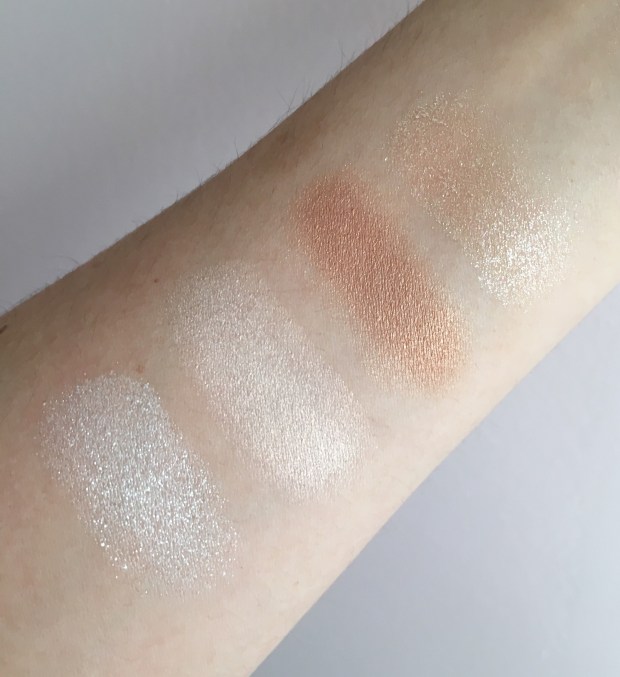
Becca Cosmetics, Becca x Jaclyn Hill Champagne Collection Shimmering Skin Perfector Pressed, in shade “Champagne Pop,” $38.

If you don’t have this product, you need to go on Sephora’s website and purchase it immediately! If I could only recommend one highlighter to you, I would say Champagne Pop by Becca every time! It is universally flattering on every skin tone and truly unique in color. It’s highly reflective with peachy, champagne undertones. It looks gorgeous for daytime or night looks and lasts all day long! It’s a beautiful, buttery product that I know you’ll enjoy no matter what! I’ve been wearing it non-stop during the month of May! 


Laura Mercier, Translucent Loose Setting Powder, $38. 

This product is something I never want to be without. I never understood the hype over using translucent setting powders because I thought if they didn’t provide any extra coverage, then what was the point? Well, this powder has changed my opinion completely! It’s silky-smooth texture fills in pores and leaves your skin looking matte in areas you would tend to get oily (t-zone). It never looks cakey, which some tinted foundation powders can tend to do! Another reason I love this is because it does not have any flash back! A lot of translucent powders will show up as a white cast on your face in flash photography, but for whatever reason, this powder does not! Believe the hype and go buy this powder for the summer months! 


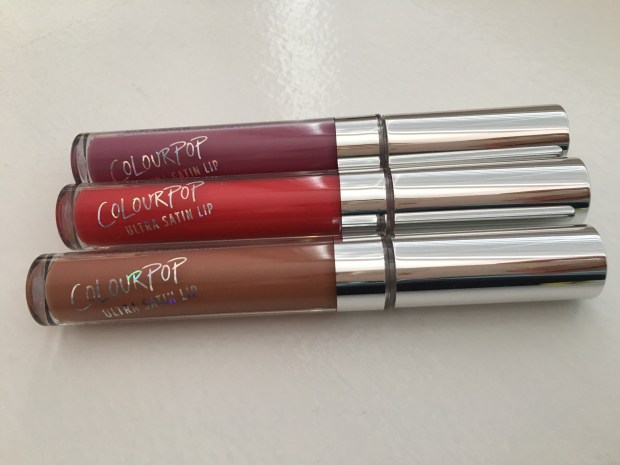
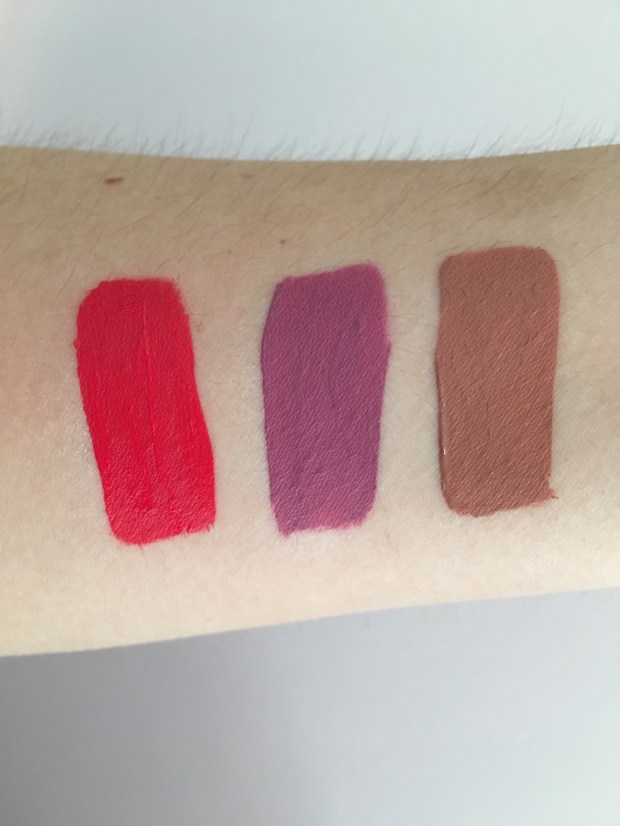
Too Faced, Melted Liquified Long Wear Lipstick, in shade “Fig,” $21. 

I’m absolutely in love with the formula on these lipsticks! It’s a very comfortable and creamy matte that you apply out of a lipgloss-like tube. I love many of the shades in the range, but in particular, I think the shade “Fig” is perfect for the spring months! It’s a beautiful, violet shade that is surprisingly subtle. These lipsticks are non-drying and leave behind a pretty stain once they’ve worn off! I have worn this lipstick so much throughout May and always receive compliments on the color of this product!


Nivea, Men’s Sensitive Post Shave Balm, $6.49.

If you’re new to makeup and want to build your collection with an inexpensive primer, you need to try this Post Shave Balm instead! Yes, it sounds crazy and this is definitely a product marketed towards men…however, the ingredients in this formula match many of those in high-end face primers! It smooths skin, extends the longevity of your makeup and moisturizes at the same time! I have the one labeled for sensitive skin and haven’t broken out once from this product. The trick to using this product is to rub it into your face long enough to feel it get tacky. You want your skin to feel borderline sticky and then apply your liquid foundation on top! Shout out to NikkieTutorials on YouTube for this amazing drugstore find! 


Fashion 


I wanted to add in some of my fashion favorites for the month of May as well! I’m not going to go into detail about each of these products because this is a beauty blog, but let me know if you would like to see some fashion posts! My Converse are comfortable to wear and go with any outfit! I love wearing these with casual outfits or t shirt dresses! My favorite loose jeans are the Tomgirl style from AE! They are baggy and on trend, without being unflattering. My fringe bag is my new favorite thing! I love crossbody styles and find that this color matches every outfit. I was really happy that I could find an inexpensive, but high quality bag that has this trendy fringe style! These are items that I’m wearing on repeat all month long and wanted to let you know about!    

Converse Chuck Taylor All Star Lo Sneaker, Optical White, $49.99. American Eagle, Tomgirl Jeans, $49.95. Nordstrom, BP. Layered Fringe Crossbody, $28.


Lifestyle     

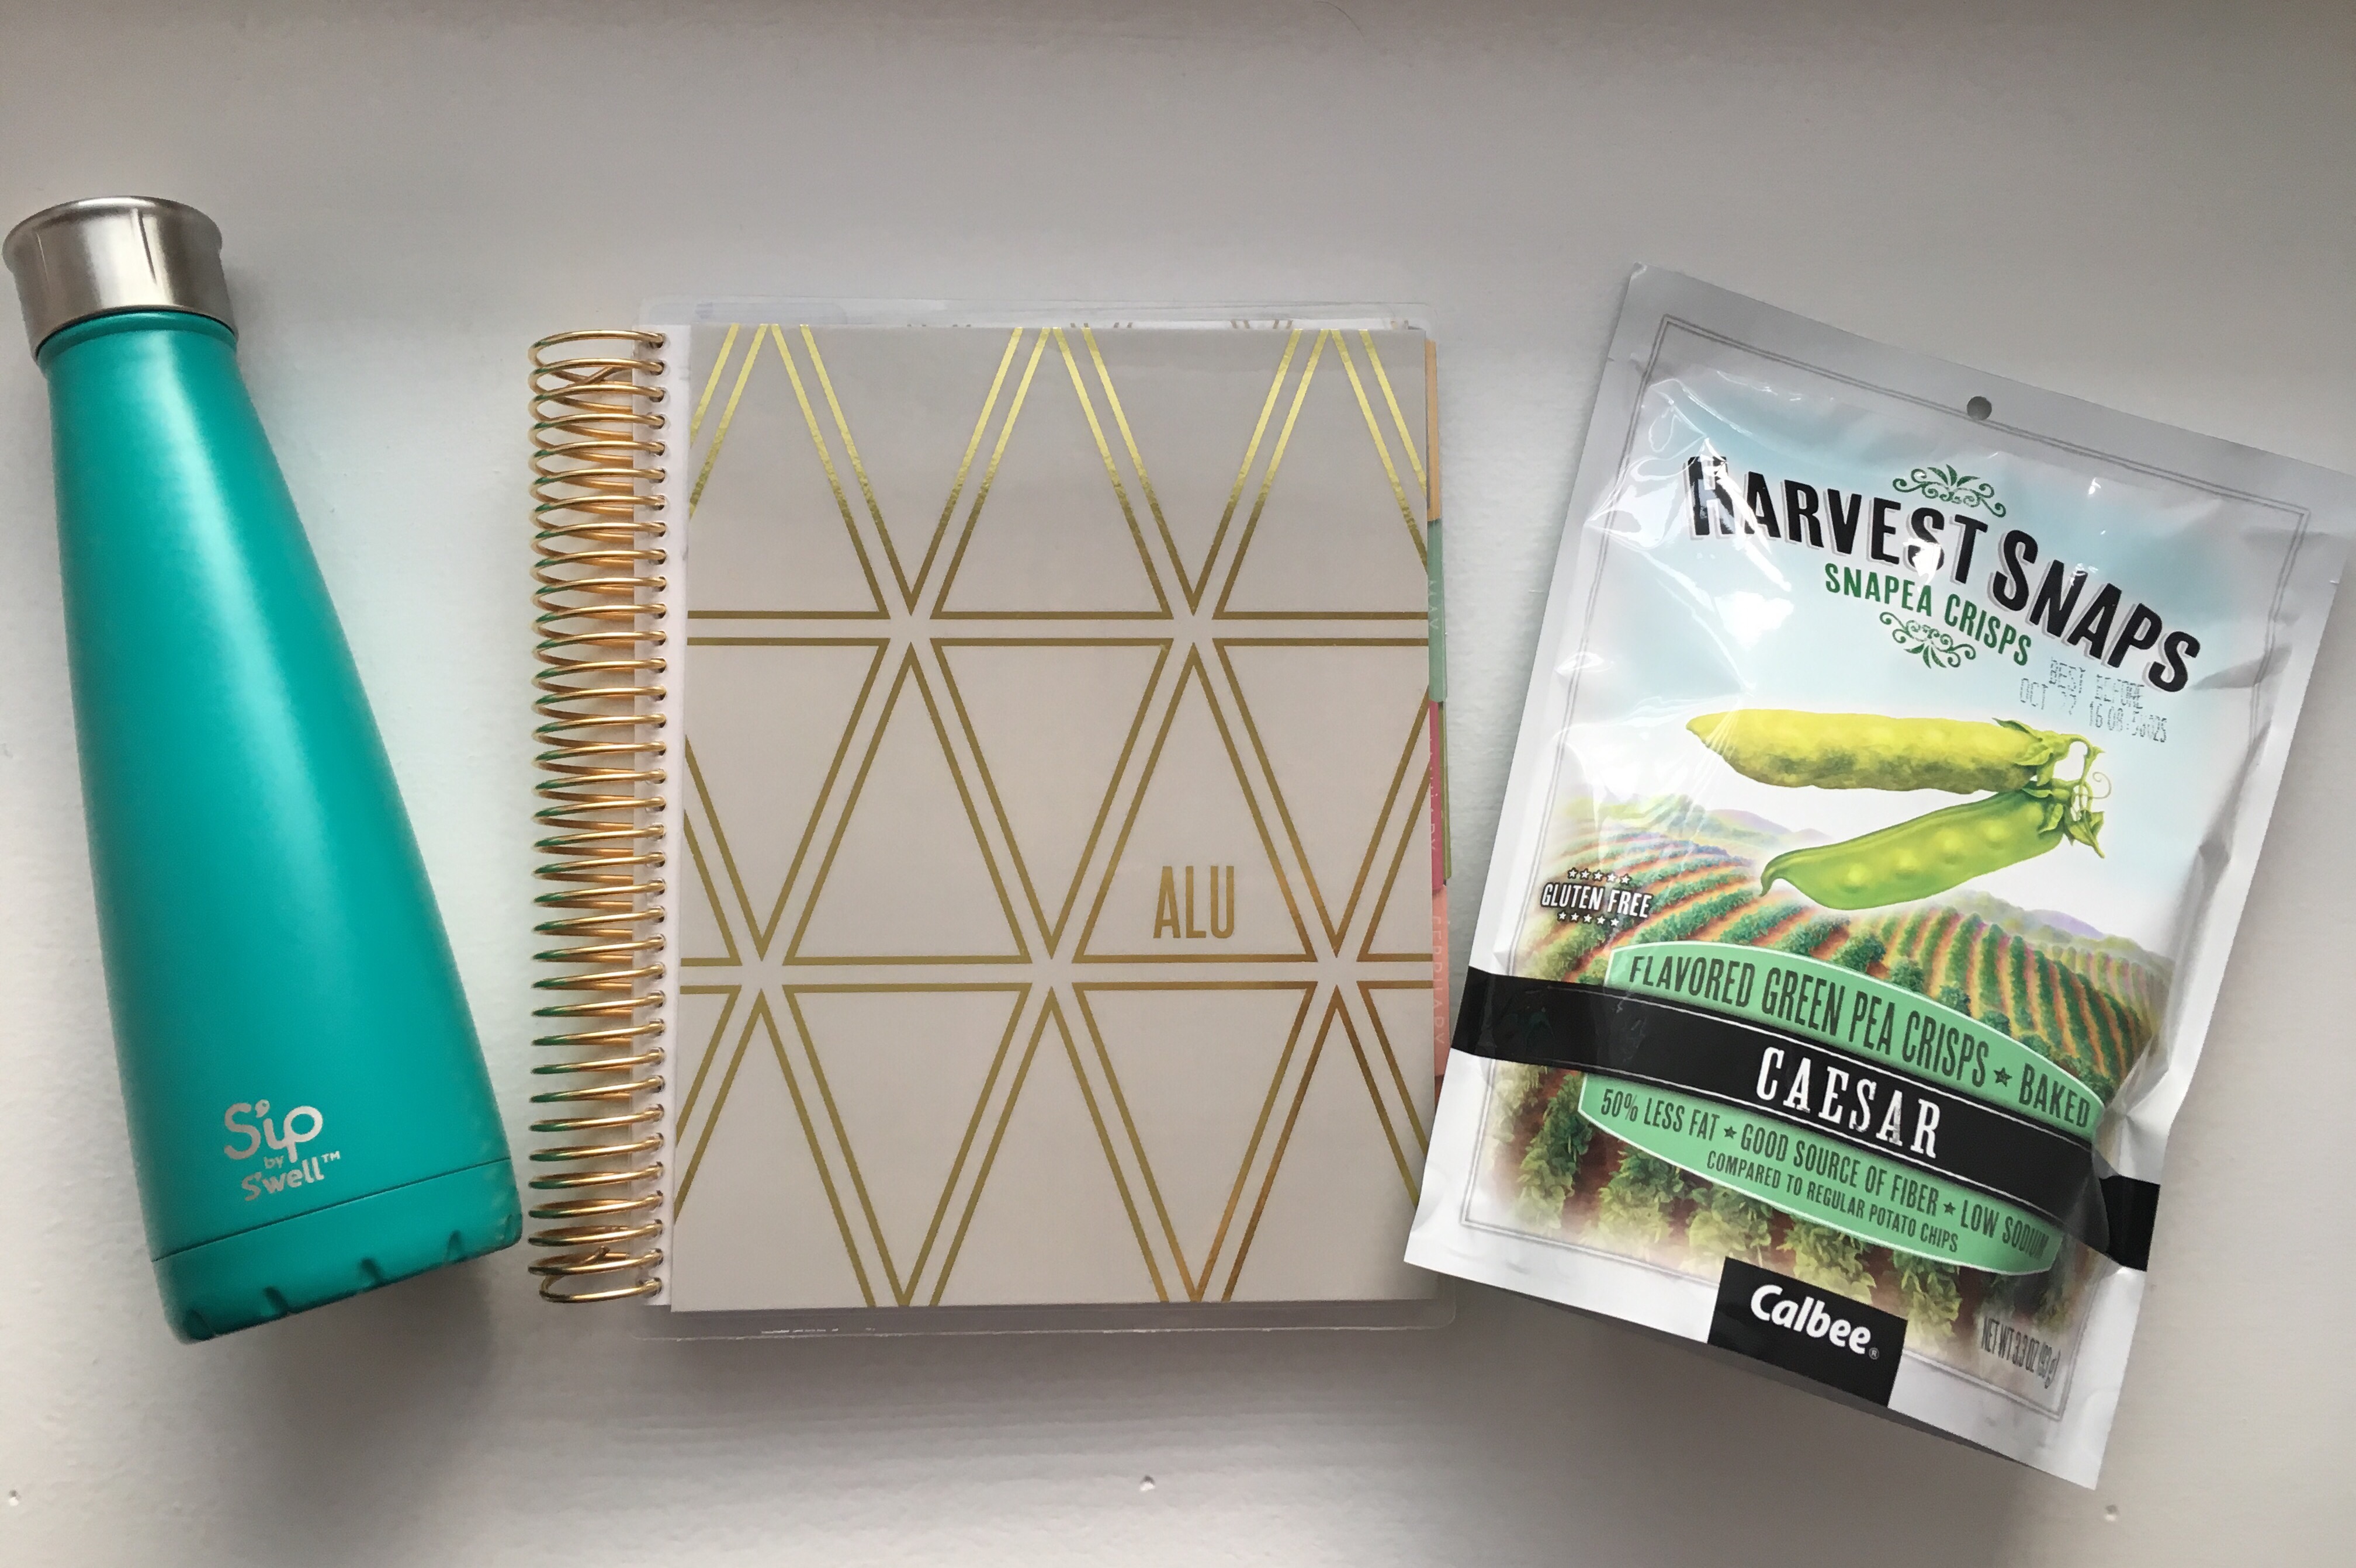
I also wanted to include some lifestyle favorites of mine that I’m loving! This bottle will keep your water ice cold for 24-hours without melting your ice! I’ve been using this product on a daily basis and never want to be without it during the summer months! My Erin Condren Life Planner keeps me organized every day! It’s durable on the outside and has beautiful colored pages on the inside! Lastly, my snack obsession are the Snap Pea Crisps in the Caesar flavor! I promise you’ll be hooked on these after you try one! They satisfy the need for something crunchy, without being high in carbs and fat! 

S’ip by S’well, Jelly Bean Green Stainless Steel Water Bottle 15oz, $24.99. Purchased from Target! Erin Condren Life Planner, price varies. Snap Pea Crisps, Caesar, $1.99.

My Favorite Blushes!

I have a weakness for blush. As you’ll soon find out, my favorite shade to wear is a very warm toned, peachy-pink. I find these are very complimentary to my olive skin tone and usually match the bronzey makeup looks I do on a regular basis. In my opinion, blush brightens my overall look and provides a natural flush of color to my cheeks that I otherwise do not have. I don’t go a day without it because I feel that it marries my bronzer and highlight together, filling in any gaps of bare skin. Even my “no-makeup” makeup looks incorporate blush application. I think it’s one of the easiest ways to look more awake too! By providing this flush of color, you will liven your complexion and create a youthful glow.


I’ve tried out so many blushes, ranging from inexpensive to very high end. I really think I’ve pinpointed my favorite formulas based on smoothness of application, pigmentation and longevity. By far, the best blushes I’ve tried and own are the Tarte Amazonian Clay Blushes. These babies are in a league of their own! I’ve never found a blush that’s anywhere close to as good as these are. They apply softly on the cheeks and the color does not fade throughout the day! Tarte advertises that they’re a “12-hour wear” formula, but these have definitely lasted on my skin for much longer! It’s really rare that every blush shade in a brands collection is equally as amazing and these truly are! I have no doubt that any color you choose will be your new favorite! I started wearing these blushes five years ago and they are still the ones I keep repurchasing to this day! Here are my absolute favorite shades that I would categorize as must-haves! 

Tarte Amazonian Clay 12-Hour Blush, $28. Top Row Shades: “Peaceful” and “Natural Beauty” Bottom Row Shades: “Tipsy” and “Glisten”


The next blushes that I love are from Too Faced! The Too Faced Love Flush Long-Lasting 16-Hour Blushes are really nice! Very pigmented and apply super evenly on the skin. I personally think the formula is more on the sheer side, which is nice if you prefer to build up color in a natural way. I definitely stand behind the claim that these last for 16 hours! I do think they start to fade after that point, unlike the Tarte blushes! Also I’m obsessed with the packaging of these blushes because they remind me of Polly Pocket, so cute! The next blush I have from Too Faced is their Sweetheart Perfect Flush Blush! These boxed blushes are also in adorable packaging that holds the beautiful, baked, ombré blush inside. I think this color is so pretty when I swirl my brush to pick up all three colors at once. The formula has fine gold shimmer throughout and shows up on the cheeks as a subtle glow that’s perfect for summer! Although Too Faced doesn’t advertise this as a long-lasting blush, this particular color held up for an entire work day on my skin and did not lose any vibrancy over time. I highly recommend you check out the other shades in the range because they have something for every skin tone! 

Too Faced Love Flush Long-Lasting 16-Hour Blush, $26. In the shade: “I Will Always Love You.” Too Faced Sweetheart Perfect Flush Blush, $30. In the shade: “Sparkling Bellini.”


Lastly I wanted to include the Becca Afterglow Palette, which can be found exclusively at Ulta. I found this palette was a great way to try some of Becca’s Mineral Blushes as well as their Shimmering Skin Perfectors! I already owned the white-gold highlight in the palette called “Moonstone” and use it to achieve an intense icy glow on the tops of my cheekbones. The Shimmering Skin Perfector Pressed in “Rose Gold” and “Topaz” are more of a blush topper for me personally! I apply these on top of the blush I’m wearing to give me an all-over illuminated glow. The Mineral Blush in “Wild Honey” and the Mineral Blush in “Flowerchild” are absolutely stunning! Both are extremely different in color, but equally as gorgeous. My personal favorite is “Wild Honey” because it’s unique to any other shade of blush own and is universal enough to match any makeup look! The Becca Mineral Blushes in this palette sadly only last about 6-8 hours on me before I feel like I need to reapply, but with that said, the smooth texture and pigmentation on these products outweigh any cons. I’m so excited to try more of these colors and put them to the test during the Spring and Summer months! 

Becca Afterglow Palette, $39.50. The blushes and highlight in the palette are in the shades: Shimmering Skin Perfector Pressed in “Moonstone.” Shimmering Skin Perfector Pressed in “Rose Gold.” Shimmering Skin Perfector Pressed in “Topaz.” Mineral Blush in “Wild Honey.” Mineral Blush in “Flowerchild.”


I hope I gave you some good suggestions on different brands of blushes to try! I know a lot of the shades are similar, but these peachy-pink tones are my favorite to wear! Let me know your favorite blushes because I’m always willing to step out of my comfort zone and try new ones! Thanks for reading! 

Cream Contour and Highlight Routine 

I wanted to share how I contour and highlight my face for special occasions! I am often asked how I achieve a full coverage, evenly blended, contoured look. On a day-to-day basis, I definitely do not use a cream contour because in my opinion, it’s not necessary. I opt for this routine whenever I have a special occasion, when I need my makeup to last and stand out in photos. 

    
With contouring, you really want to make sure you adapt the placement of lines to your face shape. My face shape is a mix between square and round (so annoying) so I draw lines based on where areas of my face need to appear more sculpted. The darker colors should be placed in the hollows of your cheeks, where you want to create a shadow. If you want to sculpt your chin, draw lines at your jawline and blend underneath. If you want to minimize your forehead, darken your temples and hairline. This is the basic rule of E and 3. Think of drawing an E shape on the right side of your face (temples, under the cheeks and jawline) and a 3 on the left side of your face. This will serve as a guideline on where to place the darker colors you use for contouring. I also like to contour the tip of my nose so it appears more slim. As far as highlighting, you can use a concealer or a light colored highlighting stick to place in the areas you want to bring out in your face. For me, this is underneath my eyes to brighten my dark circles. To even things out, I’ll place some concealer in between my eyebrows and into the center of my forehead and on the tip of my chin. If you want to get a super sculpted appearance, you can place the concealer underneath the contour on your cheekbones to chisel this area out more.

I like using the Smashbox Step-By-Step Contour Stick Trio for my cream contour because you can be very precise with your application. Since they’re in a stick form, you can place the product directly on your face without the need for a brush. The formula is dry enough to stick to your skin, but also creamy enough to blend out seamlessly.

My cream contour and highlight routine begins with the application of primer all over my face and a light layer of foundation. You want to choose a foundation that is light-medium coverage so that you can add the extra layers of cream products and not look cakey. Next I take my “Contour” colored stick and draw lines around my forehead, temples, underneath my cheekbones and jawline. I then place the “Bronzer” shade directly above the “Contour” lines to add warmth to my look. I find that when I blend these colors out together, they create my perfect contour shade. Next I add a concealer that’s 1-2 shades lighter than my foundation in the areas I want to highlight. For extra brightness I apply the “Highlight” shade on top of the concealer. 

     
Once I have the lines placed on my face, it’s time to begin blending! This process can be tricky if you rush through it. The worst mistake you can make is to use the same brush to blend out the dark areas as well as the highlighted places. You’ll end up with a muddy and non-sculpted look. So make sure you take your time and blend out the contour first with a brush and then the highlight with a different brush. I use a Real Techniques buffing brush for my contour and my beauty blender for my highlight. 

Before: With only a light layer of foundation. After: Blended out cream highlight and contour. Set with Kat Von D powder contour kit.

Now that everything is blended out, I set my entire face with a loose translucent powder. My favorite is by Laura Mercier because it’s lightweight and never looks overly powdery on my skin. Since I’m extra, I set the places I cream contoured with a powder contour and do the same with the highlighted sections. I use my Kat Von D contour palette to do so. I think this extends the longevity of my cream products and is especially useful in situations where my skin gets oily. If you haven’t tried using a brightening powder underneath your eyes, I highly recommend it even on a day-to-day basis!

Smashbox Step-By-Step Contour Stick Trio, $45. Kat Von D Shade & Light Contour Palette, $46. These products can both be found at Sephora!

To finish the entire look, I spray a setting mist to lay all of my powder products flat and make sure my makeup lasts all day long. I really hope you enjoyed this post and have a good idea of contouring and highlighting after reading! It can be pretty tricky, but with a lot of practice, you’ll learn the best look for your personal facial structure! Again, I only do this full routine whenever I have a special occasion or an event where photos will be taken, but feel free to do this on a daily basis if you really enjoy the way it looks! Thanks for reading! 

Yay for the finished product!

L’Oreal Glam Bronze Bronzer

This gloomy weather has been making me crave Summer. Since I can’t naturally achieve my desired tan, glowy skin at the moment, I decided to cope the best way I know how and buy a new bronzer. Whenever I walk into any drugstore, I always check out the new makeup collections displayed in the front. I noticed L’Oreal’s new products for Summer right away because they were in sparkly orange packaging. Once I examined the new “Glam Bronze Bronzer Summer Collection,” I noticed there were three different shades in the range to suit light, medium and dark skin tones. I chose the shade “Glam Bronze Medium” because the shade was uniquely the perfect mix between a cool and warm toned brown. I also could see that there was visible gold shimmer on the pan, but I personally like my bronzers to have a sheen to them! Especially in the summertime for an added healthy glow to the skin!     

Glam Bronze Bronzer Summer Collection, Glam Bronze Medium, $14.99.


So now onto the actual review of the product! I’ve only been testing it for about a week, so these opinions are based on my first impressions! Beginning with the packaging, I really feel like for drugstore it’s pretty solid! It doesn’t feel super luxurious, but I also don’t think it’s flimsy like some other drugstore packaging can be. I think the size of the bronzer is amazing! The pan is huge so you can fit any sized brush into the product. Sometimes I like to use a large powder brush to lightly sweep bronzer all over my face for a natural, non-contoured effect, so pan size is important!   

Such a beautiful woven pattern stamped onto the bronzer. Love the attention to detail, L’Oreal!


The consistency of the bronzer is really different, in a good way! It feels like a hybrid between cream and powder. When swatched, this bronzer feels super silky on the skin, which is nice because most powder bronzers can be slightly chalky and have a lot of fallout. This bronzer is very evenly pigmented and doesn’t transfer the visible glitter that is on the pan, onto your face. I have a feeling it is an overspray and once I use the entire top layer of this product, a satin bronzer will be underneath! Overall this bronzer applies in a really natural way once on the skin. I believe the unique silky texture forces this product to blend in with your skin without any harsh likes. Once finished applying this bronzer, it truly just looks like a natural tan. 


As far as the longevity of this product, it lasted throughout an entire work day for me. This time lapse included applying at 7:00 am and arriving home at 6:00 pm. I would say once it was 8-9:00pm, I noticed it was broken up and patchy around my forehead. This is probably due to this area of my face falling victim to oiliness! Other than that, the product lasted nicely throughout my entire day! I did find that setting my entire face with a makeup setting spray (I use Urban Decay All-Nighter) did extend the wear time of this bronzer, but it honestly does that with any bronzer that I wear. 


I think this bronzer is perfect for someone who enjoys a neutral bronze shade. One that isn’t too warm and orange-based, or too cool with a gray undertone. It really looks so natural on the skin and melts in with the rest of your face products seamlessly. At $14.99, it is pricey for drugstore, but L’Oreal tends to be. I think with the amount of product you receive, the price can be justified! Again, you can usually find good deals on L’Oreal and other drugstore brands if you research what weekly sales are happening in your area, so try to get an added discount if you can! I would definitely repurchase this product and it’s now my new favorite bronzer from the drugstore. Also let me know if you would like to see a post about all my favorite drugstore and high-end bronzers! I think I have quite the collection and variety so it could help you find your next bronzer obsession! Thanks for reading! 

ColourPop Haul, Review and Swatches!

Who can say no to 20% off?! I sure cannot! When ColourPop was offering the discount site wide a few weeks ago, I decided I had to take advantage of such a good deal! Not only is their non-discounted price point extremely inexpensive, but combined when combined with an additional percentage off, this was a deal too good to pass up! 

Molly, Naked Ladies, Magic Wand, $6.


I really wanted to try their new Ultra Satin Liquid Lipsticks after hearing that they are matte without feeling dry. My biggest complaint with regular liquid lipsticks are the dry, chalky feeling that typically happens to me within the first hour of wear, hence the reason I was so attracted to this formula. As soon as I put this on, I immediately noticed how comfortable it felt on my lips. It is a mousey consistency that had a whipped texture even when it has “dried down.” I tested all three colors and was pleasantly surprised that the nude shade, as well as the two vibrant shades, both applied evenly and highly pigmented. I did wear these with a ColourPop lip primer too and noticed that this prolonged the wear time. I was able to eat and drink without this product breaking up in an obvious way on my lips. I was also pleasantly surprised to see that this particular formula stained my lips so even after it had completely worn off, I still had a hint of color left. I would highly recommend these to anyone that dislikes that drying, flakey feeling that is all too common with liquid lipsticks, but love the look of a matte formula. Also they have an extensive color selection with shades that range from natural to bold, so you’re bound to find one you like! Safe to say, I’m ordering more of these!

Swatches from left to right: Naked Ladies, Molly, Magic Wand.

Honey Dude, Prance, $6.

The other new product I tried for the first time are the creme gel eyeliners! I purchased the periwinkle-blue color “Prance” as well as the nude shade “Honey Dude” to give me a good balance between natural and edgy! I’ve been seeing lots of looks using colored liners in the water line and as winged liner, so I’m excited to experiment with the blue shade for summer! I’m always using a nude eyeliner in my waterline on a daily basis because I love a wide-eyed look! I’m loyal to my Tarte Inner Rim Brightener, so this ColourPop one has a lot to live up to! I’ve worn it for the last two days and although I don’t think it’s the best…it’s definitely not bad! For the price, it’s great! I just do have a hard time with it staying on my water line. Maybe it’s because it’s allergy season and my eyes are constantly watering, but the nude shade was really difficult to keep pigmented and bright in my waterline. As for the blue shade, “Prance,” this color lasted beautifully in my waterline all day long! It remained vibrant and true to color for the entire day and I received so many compliments on the unique pop of color! I really want to do a tutorial on the look because I think it was different and perfect for people who want to try something on trend for summer, but also want to keep the overall look very wearable and subtle.  

Swatches from left to right: Honey Dude and Prance.


Tassel, Girly, Alchemy, Sunset Blvd, $5.


Lastly, I purchased four of their eyeshadows because I’m addicted to these! I’m finding that they’re all I wear because they’re so pigmented and sparkly! I really love the look of just a wash of shimmery shadow on the lids with mascara for summer! I think this method emphasizes my eyes without looking overdone. I will give a disclaimer that these shadows really need to be worn with a primer during the spring and summer months when makeup products tend to break up and transfer from sweat or excess oil. My favorite primers to use with these shadows are M.A.C 24 Hour Extended Eye Base and Urban Decay Primer Potion in “Eden.” If I forgo a primer, sometimes these shadows transfer from my eyelid and into my crease area. This process can take my once neat and blended eye look into a messy, creasing catastrophe. Onto the shades that I purchased! “Alchemy” is listed on the ColourPop site as a translucent peachy tone, sprinkled with multi-dimensional glitter and is labeled as a Glitter Sheer finish formula. I would definitely agree with this description. The shadow is essentially all sparkles with a natural colored base. I think this would be beautiful with very bronzed and highlighted skin and a bright red lip. Next is “Sunset Blvd,” which is a shadow from their recent KaePop collaboration with Karrueche. This shade is described as a warm golden bronze in a Pearlized Finish formula. I think the color of this eyeshadow is super pretty and subtle. On my skin tone, it shows up as a shimmery wash of color and looks natural enough for daytime. I really like this for an easy, every day shadow because it provides definition without being in-your-face. I feel like this would be a great color to add to anyone’s collection because it is so beautiful and will match any face and lip product you pair with it. Next is “Tassel,” which is a bright, true white with multi-dimensional, highly reflective glitter. I got this color because I thought it would be perfect for a bright inner corner highlight. By adding a white or light colored shimmery shadow to your inner corners, it will open up your eyes and make you appear more awake! So far this shadow is beautiful to serve that purpose. It is very stark white with major glitter, so I can’t imagine wearing it all over my lid and not looking like an ice princess. It looks great in the inner corner and lightly applied underneath the brow bone! Last, but not least, is “Girly” and it’s described as a warm golden bronze in a Pearlized Finish. I definitely don’t see anything bronze about this eyeshadow, but would agree that it is a very warm-toned, cream shade with golden shimmer. I think this color would look gorgeous on lighter skin tones that want a simple shadow to apply all over the lids for a natural look. I applied this shadow all over my lids, with a matte, warm brown shade in the crease and winged eyeliner, and was still asked multiple times what my eyeshadow is! So “Girly” does stand out even in a simple look. 

Swatches from left to right: Tassel, Girly, Sunset Blvd, Alchemy.


I really hope you try out some ColourPop items after reading this! Hopefully I gave you some good ideas on new products to try out! I would highly recommend the new Ultra Satin Liquid Lipsticks because they are really easy to apply and give you an on-trend lip look, without spending a ton of money! These are by far the most comfortable liquid lipsticks I have ever tried in any price point, so you need them! Plus they have so many unique colors so you can try something new! Thanks for reading! 

How To Get A Gel Manicure For Only 5 Bucks!

I am someone who loves the look of a gel manicure, but despises the act of going to a nail salon for an hour to get them done. So instead, I have searched high and low for nail polish formulas that claim to give the same effect without an LED light. I have tried expensive gel formula polishes from Sephora and Ulta, but I’ve also tried some drugstore brands as well. Before this point, my favorite line of polishes were the O.P.I Infinite Shine Gel Effects Lacquer Collection. The formulation on these polishes are really creamy and only need 2 coats to be completely opaque. However, at $12.50 a bottle, you can easily spend the same amount trying out a few colors than on a single gel manicure. Thus my attempt to find cheaper alternatives at the drugstore. 

    
Wet N Wild isn’t a brand I’m personally too familiar with, but I’m always hearing different YouTuber’s and bloggers talk about. I saw the display for their Wet N Wild 1 Step WonderGel Nail Color and was intrigued by the advertised claims. You can find on their website that the details of these polishes are, “Up to 2 weeks of color & shine based on consumer grading. No UV Light Required. No Harsh Removal. 3-Free! No Formaldehyde, Toluene, or Phthalates!” So after seeing these impressive claims, I decided to pick out some colors! Out of the 18 shades in the collection, I chose my 5 favorite to test the formula. I also want to mention that at only 5 bucks a polish, you can really try out a lot of colors without breaking the bank. Whenever I bought mine at Rite-Aid, they were 40%, which was such a good deal! I highly recommend doing your research on weekly drugstore deals and waiting until you can get them for even cheaper than the standard price. 

Wet N Wild 1 Step WonderGel Nail Color. Colors from left to right: Lavender Out Loud, Stay Classy, Pinky Swear, Condensed Milk, Peri-wink-le Of An Eye, $4.99.

    
These Wet N Wild polishes are SO GOOD! By far the longest lasting nail polishes I have ever tried. Typically nail polishes, regardless of their long lasting formulas, chip within 2-3 days for me. However, these last for about 5-6 days before showing any signs of wear or chips. I would say they last close to 2 weeks until I personally get to the point where I want to either change my polish color, or they’ve grown out and look unkempt. Also keep in mind that since I’m a germaphobe, I’m always washing my hands and using sanitizer and this formula still withstands it all! 

     
So another pro to choosing this polish is the quick dry time! I would say that after I have applied the second coat of polish, it takes my nails a total of 15 minutes to dry completely! For me, this is really impressive because sometimes with other polishes, I wait 30 minutes to dry and find out that they’re still tacky feeling! So yes, these dry all the way extremely quick, which I appreciate very much. 

      
Lastly, these polishes are all you need for a shiny, even coated manicure. Forget about a base coat and a top coat with this product because you do not need one! These polishes are awesome on their own and I have seen no visible difference in the way they apply or perform when using a base coat or a top coat. 

Lavender Out Loud, Stay Classy, Pinky Swear, Condensed Milk, Peri-wink-le Of An Eye

     
I really hope you try some of these Wet N Wild 1 Step WonderGel Nail Color polishes! My favorite colors are Stay Classy and Peri-wink-le Of An Eye. I definitely want to expand my collection, so let me know your favorite shades too! Thanks for reading! 

Kat Von D Shade + Light Eye Contour Quad in “Sage”

During my most recent trip to Sephora, I decided to purchase the new Kat Von D Shade + Light Eye Contour Quad in Sage. Although some of the other shade selections were more aesthetically pleasing to me, I wanted to go out of my comfort zone and pick the Sage quad, which has shadow colors that supposedly compliment brown eyes.    

Kat Von D Shade + Light Eye Contour Quad, Sage, $26.


I want to start this review out by stating how beautiful these eyeshadows are. Whenever I first swatched these shades, I was in disbelief at how smooth they felt. The texture is really silky and buttery, which is rare in a matte eyeshadow! These shadows are incredibly pigmented as well. You can see in the swatches above that these shadows do not look chalky or patchy on my skin. The colors are unique and beautiful, I have nothing like the dark green shade in the palette and really loved the way it is borderline black. This makes it super wearable and adds a unique effect whenever applied into the outer corner or as eyeliner. 


I think this palette is versatile enough to be used on a daily basis for a natural look. The base shade is a warm tan color that is perfect for all over the lid. It gives definition, without darkening your eyes in an unnatural way. As you know, I love the definer shade, which is a hunter green color. It really is so unlike anything else I own and I think it does bring out my brown eye color. The contour crease shade is a gray toned, olive green. It looks beautiful to blend out any harsh lines above the lid. I also think this color would look really beautiful as a base shade. Lastly, the highlight is a cream shade that ties the entire look together when applied underneath the brow and on the inner corner of your eye. Although the look I created in the photo is more daytime appropriate, I can see this palette being amazing for smokey eyes by using the dark green definer shade all over the lid. I really love that you can create an entire eye look by using the colors solely in this palette. It’s nice for travel because it’s compact in size and gives you multiple options for natural or glam looks! 

I am really excited to continue using this product and try out the other Shade + Light Eye Contour Quad in “Rust,” “Smoke” and “Plum.” Have you ever tried any of these before? Let me know which ones are your favorite! Thanks for reading! 

P.S. I created Facebook and Instagram accounts! You can find either accounts by searching “Abigail Lindsay Blog” yay! 

Sephora Birthday Haul!

With birthdays, come Sephora gift cards. I decided to treat myself to a few new items that I haven’t seen before! I want to give you my first impression based on using these products over the past week.

Tarte Application Mitt, $6. SEPHORA Beauty Amplifier Set and Refresh Spray, $16. Kat Von D Shade + Light Eye Contour Quad, Sage, $26. Too Faced Sweethearts Perfect Flush Blush, Sparkling Bellini, $30. Tatcha Luminous Overnight Memory Serum Concentrate, $110. Fresh Rose Face Mask, $60. Fresh Soy Face Cleanser, $15-$30.


Tarte Application Mitt: 

This particular self tanning mitt feels soft and velvety. I was intrigued by the texture because I assumed this would mean my tanning mousse would blend in smoother and appear more natural. I also noticed that this mitt is reinforced with durable stitching so your hand won’t randomly break through when you’re in the middle of applying (yes, this has happened to me before.) I love that this has the same plush material on the back of the mitt too, rather than the typical flimsy netting that most tanning mitts have. I am going to use this mitt with my Loving Tan Ultra Dark Mousse and I will keep you posted in an upcoming blog about my feelings towards it!

      
SEPHORA Beauty Amplifier Set and Refresh Spray:

As someone who religiously uses Urban Decay All Nighter setting spray after makeup application, I knew it was going to be difficult to find a mist that was just as good. After using this Sephora Set and Refresh spray for a week, I think it is a wonderful product that sets my makeup beautifully and extends the longevity of my face products. It also smells amazing! I would describe the scent as very light and refreshing, which compliments the slight cooling sensation that the mist leaves on your face. The only reason I wouldn’t label this as my “holy grail” or new favorite makeup setting spray is because of the packaging. For whatever reason, the nozzle that the mist comes out of has stopped working. It sprayed perfectly for the first few days I used it, but now the nozzle appears to be blocked with the liquid from within the bottle and won’t spray out. BUMMER.


Kat Von D Shade + Light Eye Contour Quad:

I purchased this palette in the shade “Sage” because it’s promoted as a brown eye enhancing selection of shadows. I also had nothing like this in my collection, so I was drawn to the green-gray, cool tones that I rarely use. When I began swatching these eyeshadows, I immediately recognized how creamy they are! They feel buttery soft to the touch and blend out so beautifully on the lid. I did a look using these shadows as they are recommended in the palette (lid color, crease color, blending shade and highlight) and will be posting that next! You can be the judge if these cool, green tones really enhanced my brown eyes. I’m definitely going to be purchasing the other color versions of this palette after how incredible these performed! 

       
Too Faced Sweethearts Perfect Flush Blush:

I have been wanting to try one of these blushes for a long time! I was so drawn to the new shade “Sparkling Bellini” and felt compelled to purchase it. Peach colored blushes are my favorite kind to wear because I think it compliments my olive complexion. I have found that very pink blushes seem to look unnatural and stand out in a bad way on my face. This particular blush is very peach when you look at and once you swirl the colors around, it leaves a warm orange tone on the cheeks. I personally really like the color it gives off because it suits me and blends in beautifully with my bronzer. I also love the soft shimmery effect that this blush formula gives off. It’s subtle, but definitely provides a glow-from-within look that is perfect for Summer. I also wanted to mention this blush lasted all day for me! 

       
Tatcha Luminous Overnight Memory Serum Concentrate: 

I got this as a free sample with my online order and couldn’t be more impressed with this product. As many of you know, Tatcha is a super luxurious skincare brand that celebrities, like Kim Kardashian, swear by! I jumped on the chance to score a nice sized sample and began using a small amount every night for the past week. It claims to moisturize and plump your skin, all while giving you a glow! This couldn’t be more true. I was actually kind of sad at how well this product worked because a full size is $110…so… It’s definitely an item I would feel a bit guilty repurchasing again and again. However, if you’re in a “treat yo self” type of mood and want to try a really luxurious product that gives you the most beautiful skin, this one truly works and delivered on every claim it listed in the product description. 

      
Fresh Rose Face Mask and Fresh Soy Face Cleanser: 

Yay for getting good, free birthday presents from places I frequently shop! I opted to select the skincare gift option, rather than the Marc Jacobs lipstick and eyeliner duo. I have tried both of these Fresh products before and absolutely love them! It always feels good to know that I’m putting all natural ingredients on my skin throughout the day. Plus Fresh makes a great moisturizer and an eye cream that are perfect for sensitive skin. I’m glad I got these best selling items in portable, travel sized versions! 

Mother and Daughter Beauty Favorites

In honor of Mother’s Day, I decided to post about favorite beauty products that both my Mom and I use on a daily basis! These items have been put to the test and work for anyone, regardless of age. 
To begin, we both agreed that the Too Faced Natural Matte Neutral Eye Shadow Palette is a must have. If you are looking to achieve an every day, natural makeup look, then this palette will be your best friend. It’s divided into sections with coordinating colors to ensure effortless application. My Mom loves the buttery formula of Too Faced eyeshadows because they blend out beautifully and last all day!

    
We had to include the Maybelline Instant Age Rewind Eraser Dark Circle Treatment Concealer as a favorite! We both use this product religiously. I’ve recommended this to almost everyone I know! Such a reasonably priced, but amazing concealer, which is why it’s been recognized as the number one best selling on the market. We both use the shade “Neutralizer” because it has a yellow undertone that brightens and matches our olive skin perfectly. 

     
Have you tried the Smashbox Photo Finish Primer Water?! My Mom and I love it before and after we apply our makeup. On clean skin, we spray this mist all over our face to prime for foundation. I didn’t know if this product was going to work very well as a primer, but it really does hydrate your skin, while controlling oil throughout the day! We also love to spray it after we have applied all of our makeup to take away any powdery effect to our skin. If you’ve ever struggled with your makeup looking dry, cakey and the lines on your face blending out harshly, try this technique! The mist will blend in and lay the powders flat so your finished face has a more skin-like, natural appearance. 

      
The Tarte Amazonian Clay 12 Hour Blush is as good as it gets! Neither of us have tried a better blush than these! The Amazonian Clay formula is soft, but also long lasting! I’ve found this product wears longer than 12 hours for me and does not fade in pigment throughout the day! My favorite shade is “Peaceful,” which is described as a “soft nude-peach.” My Mom’s favorite is “Exposed,” which is described as a “nude pink.” This particular blush formula does not emphasize my pores (which are prominent on my cheek area) or causes any skin irritation. The Amazonian Clay blushes by Tarte are always winning awards from prominent beauty influencers, so trust me when I say you must try these! 

       
Lastly, we both decided to share our newfound love for the It Cosmetics Celebration Foundation Illumination Powder! This stuff is amazing to wear alone, or on top of foundation to set and provide extra coverage. When I’m doing my quick and easy makeup look for work, I don’t use liquid foundation because it takes so long to blend out. Instead, I apply this powder all over my face once I’ve put on primer and concealer! This particular powder foundation covers really well and has light reflecting technology in the formula so your face doesn’t look cakey. The one downside to this product is that it comes in only 5 shades. The limited selection may prove problematic to some, but personally I can wear the shade “Medium” throughout the fall and winter months, then switch to the shade “Tan” whenever it’s summer! My mom wanted to mention that this product provides a luminosity to her skin and does not settle in her fine lines. This powder gives a glow to the skin that isn’t shimmery or oily looking, but also controls powder like a matte formula would! My Mom wears the shade “Medium” as well! 

Too Faced Natural Matte Neutral Eye Shadow Palette, $36. Maybelline Instant Age Rewind Eraser Dark Circle Treatment Concealer, $8.99. Smashbox Travel Size Photo Finish Primer Water, $16. Tarte Amazonian Clay 12 Hour Blush, $28. It Cosmetics Celebration Foundation Illumination, $35.


I hope you enjoyed reading this post as much as I enjoyed creating it. My Mom was the first person to introduce me to makeup and always taught me the value of inner beauty. Let me know if you would like to see more blog posts featuring my Mom, she really loved voicing her opinion on tried and true products that work for her every day! Happy Mother’s Day to all!