Zoeva Limited Edition Melody Eyeshadow Palette | Review & Swatches

Zoeva Melody Eyeshadow Palette

Hello! With so many new eyeshadow palettes releasing at once, it can be a bit overwhelming to sort through the initial hype and find the real gems out there! I (like most people) am drawn to things that are in beautiful packaging. It’s one of the best marketing techniques to put something in appealing packaging on an attention grabbing display. I saw this Zoeva Melody palette online at Ulta. The outer covering is obviously gorgeous with the holographic butterflies and modern font, but the inside is what really got me. The shades range from basic matte neutrals to unique duo chrome shades. I had to have it! In this post, I’ll be explaining the pros and cons of this palette, what I like and don’t like, and whether or not I feel like it’s worth the $28 price tag. Let’s get started!

Zoeva Melody Eyeshadow Palette

Upon first glance, I was impressed that this palette seemed so well balanced. There is a good variety of everyday colors that I would feel comfortable wearing to work, mixed in with some fun pops of purple, green, that would be perfect for a night out! I liked the amount of mattes vs shimmers and felt that the range had enough depth to prevent the colors from blending out to one similar shade after application. Next, I began swatching these colors and realized that they were super buttery and pigmented! The duo chrome shades were so eye catching, as you can see below. Depending on the lighting, they would shift to a different color and create a really cool effect. I liked that this palette offered something different than a lot of my others.

Zoeva Melody Eyeshadow Palette

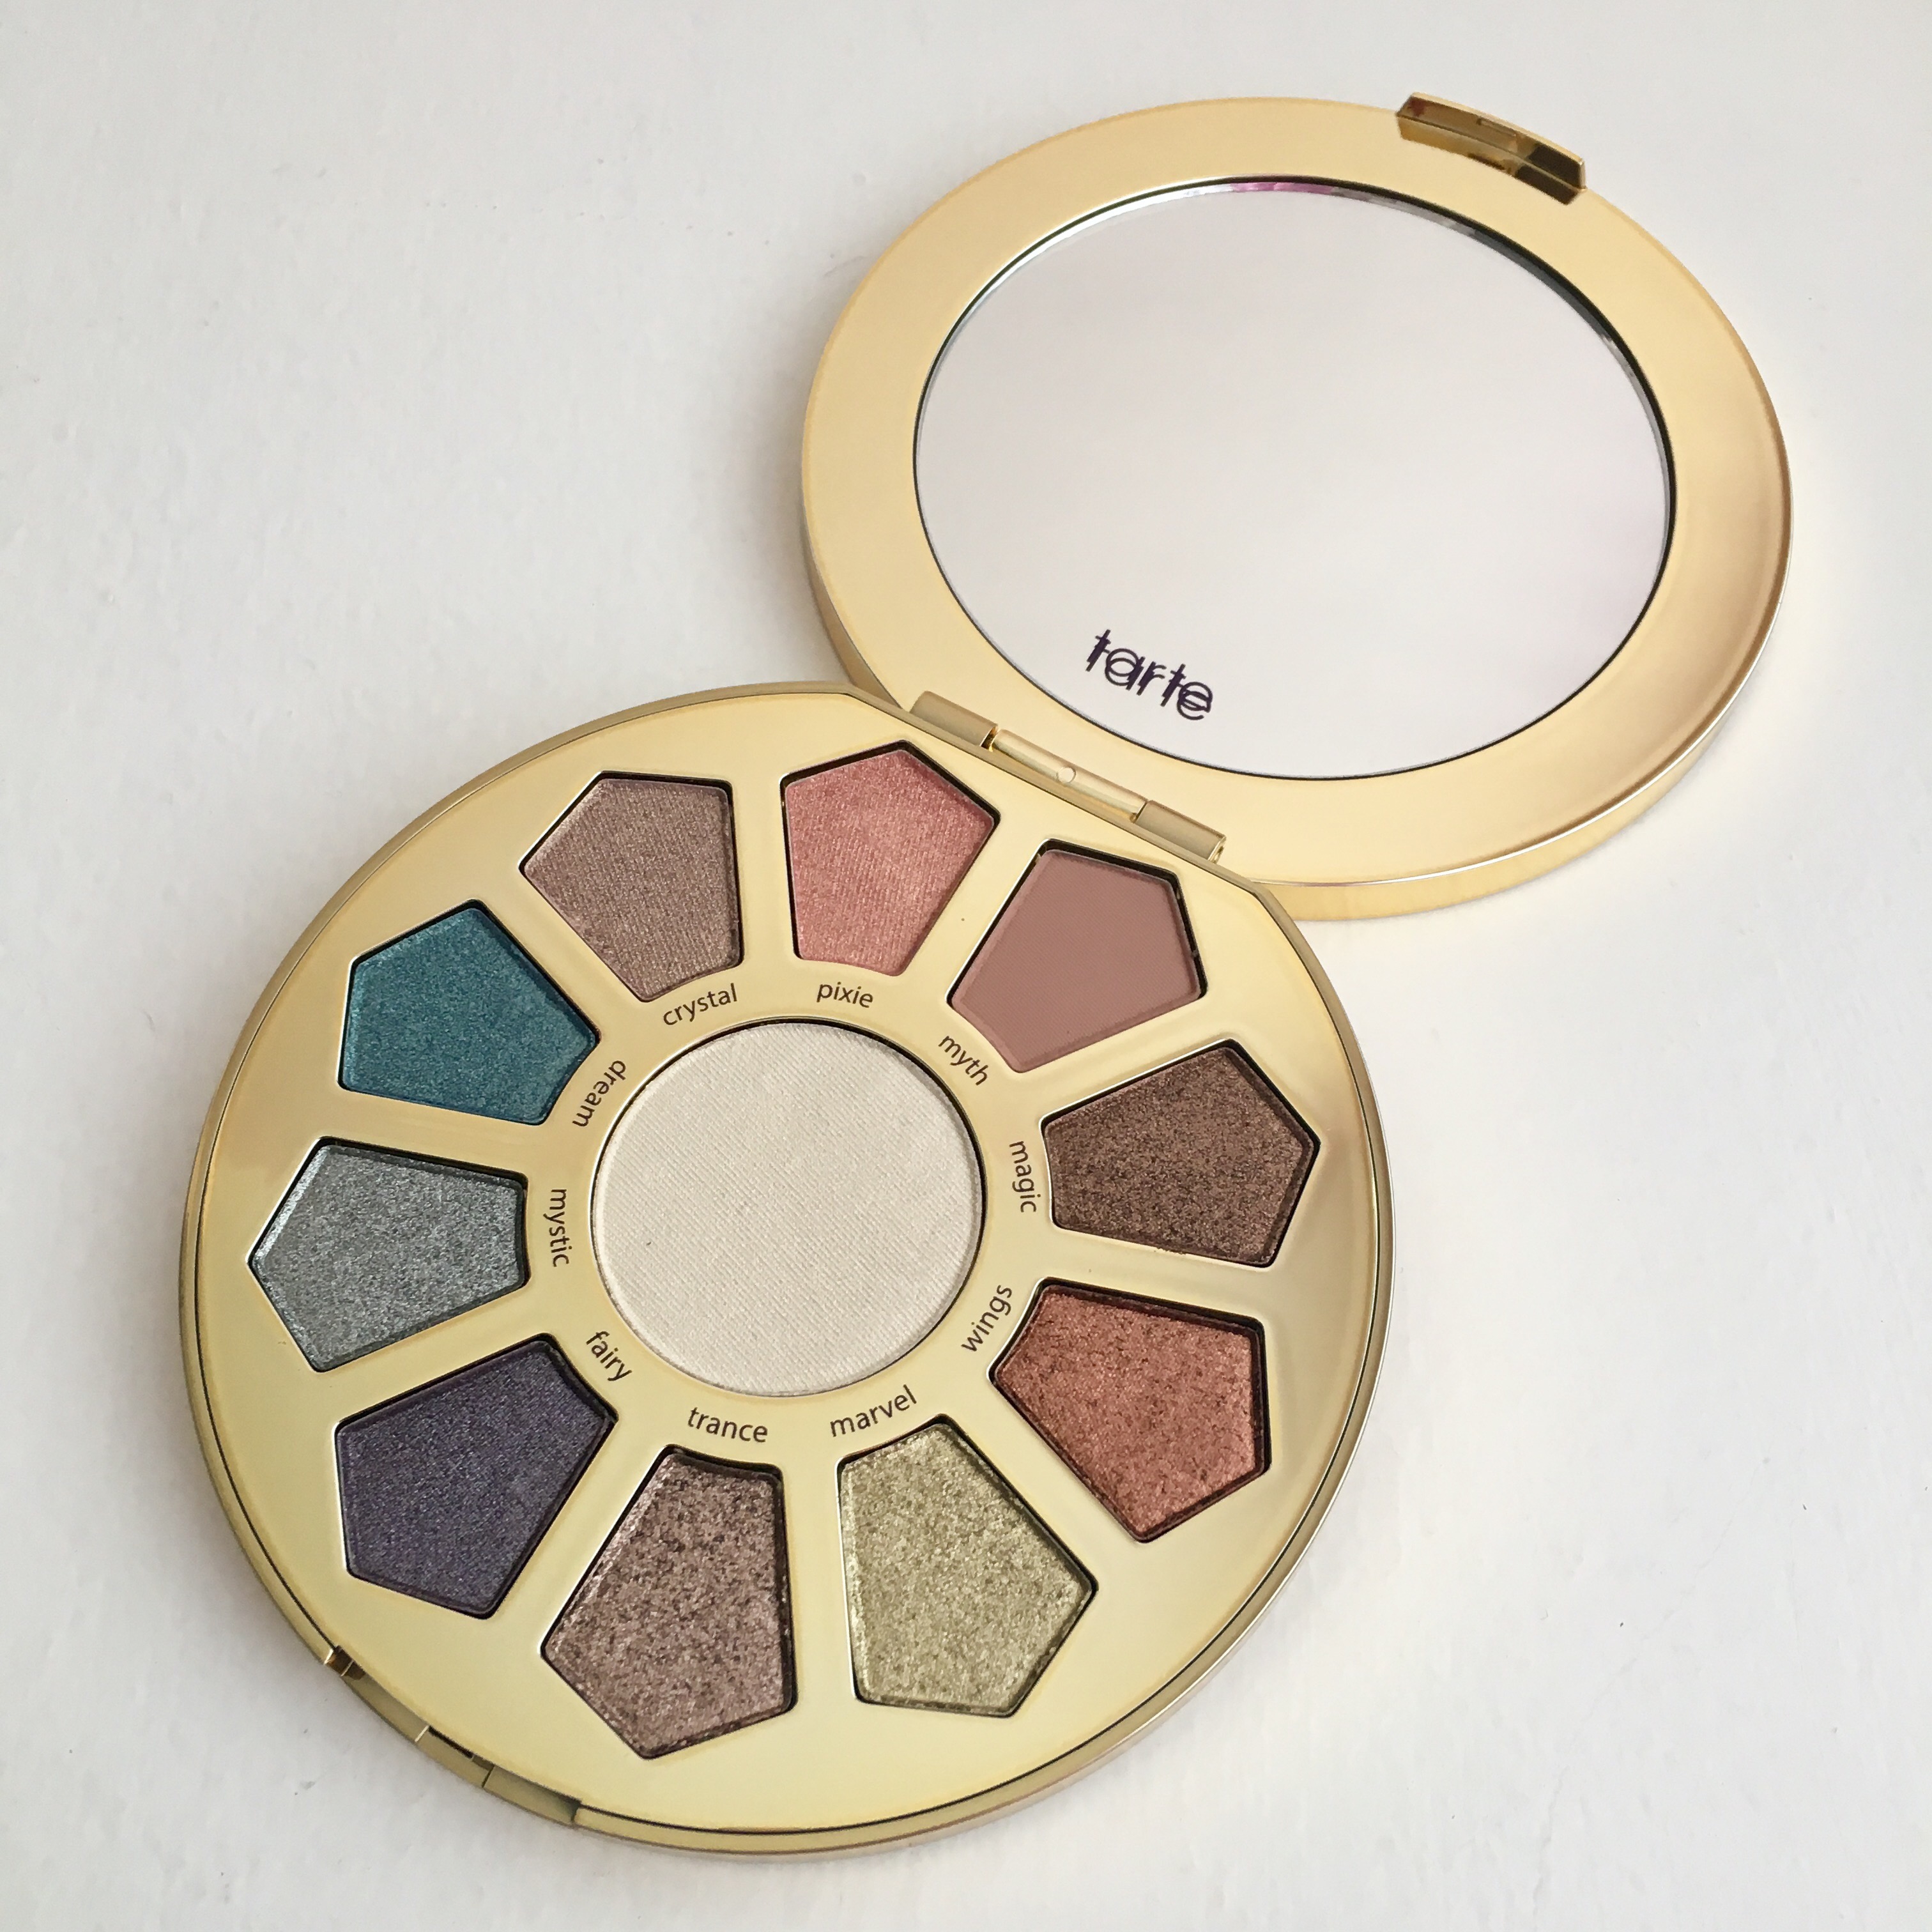
Shades: (from Ulta’s website description)

• Gowns Swirling (matte porcelain pink with glitter)

• Airy Dalliance (satin delicate apricot)

• Gentle Clasp (satin cool blue with glitter)

• Cocoon of Doubt (satin antique gold)

• Fly Solo (matte cool ash brown)

• From Heaven (duochrome rose satin base with icy blue shift)

• Whirled Above (matte sandy maple brown sugar)

• Crystal Wings (duochrome rust-red satin base with golden green shift)

• Soul Unheld (shimmer golden honey bronze)

• About to Leave (matte rich espresso brown)

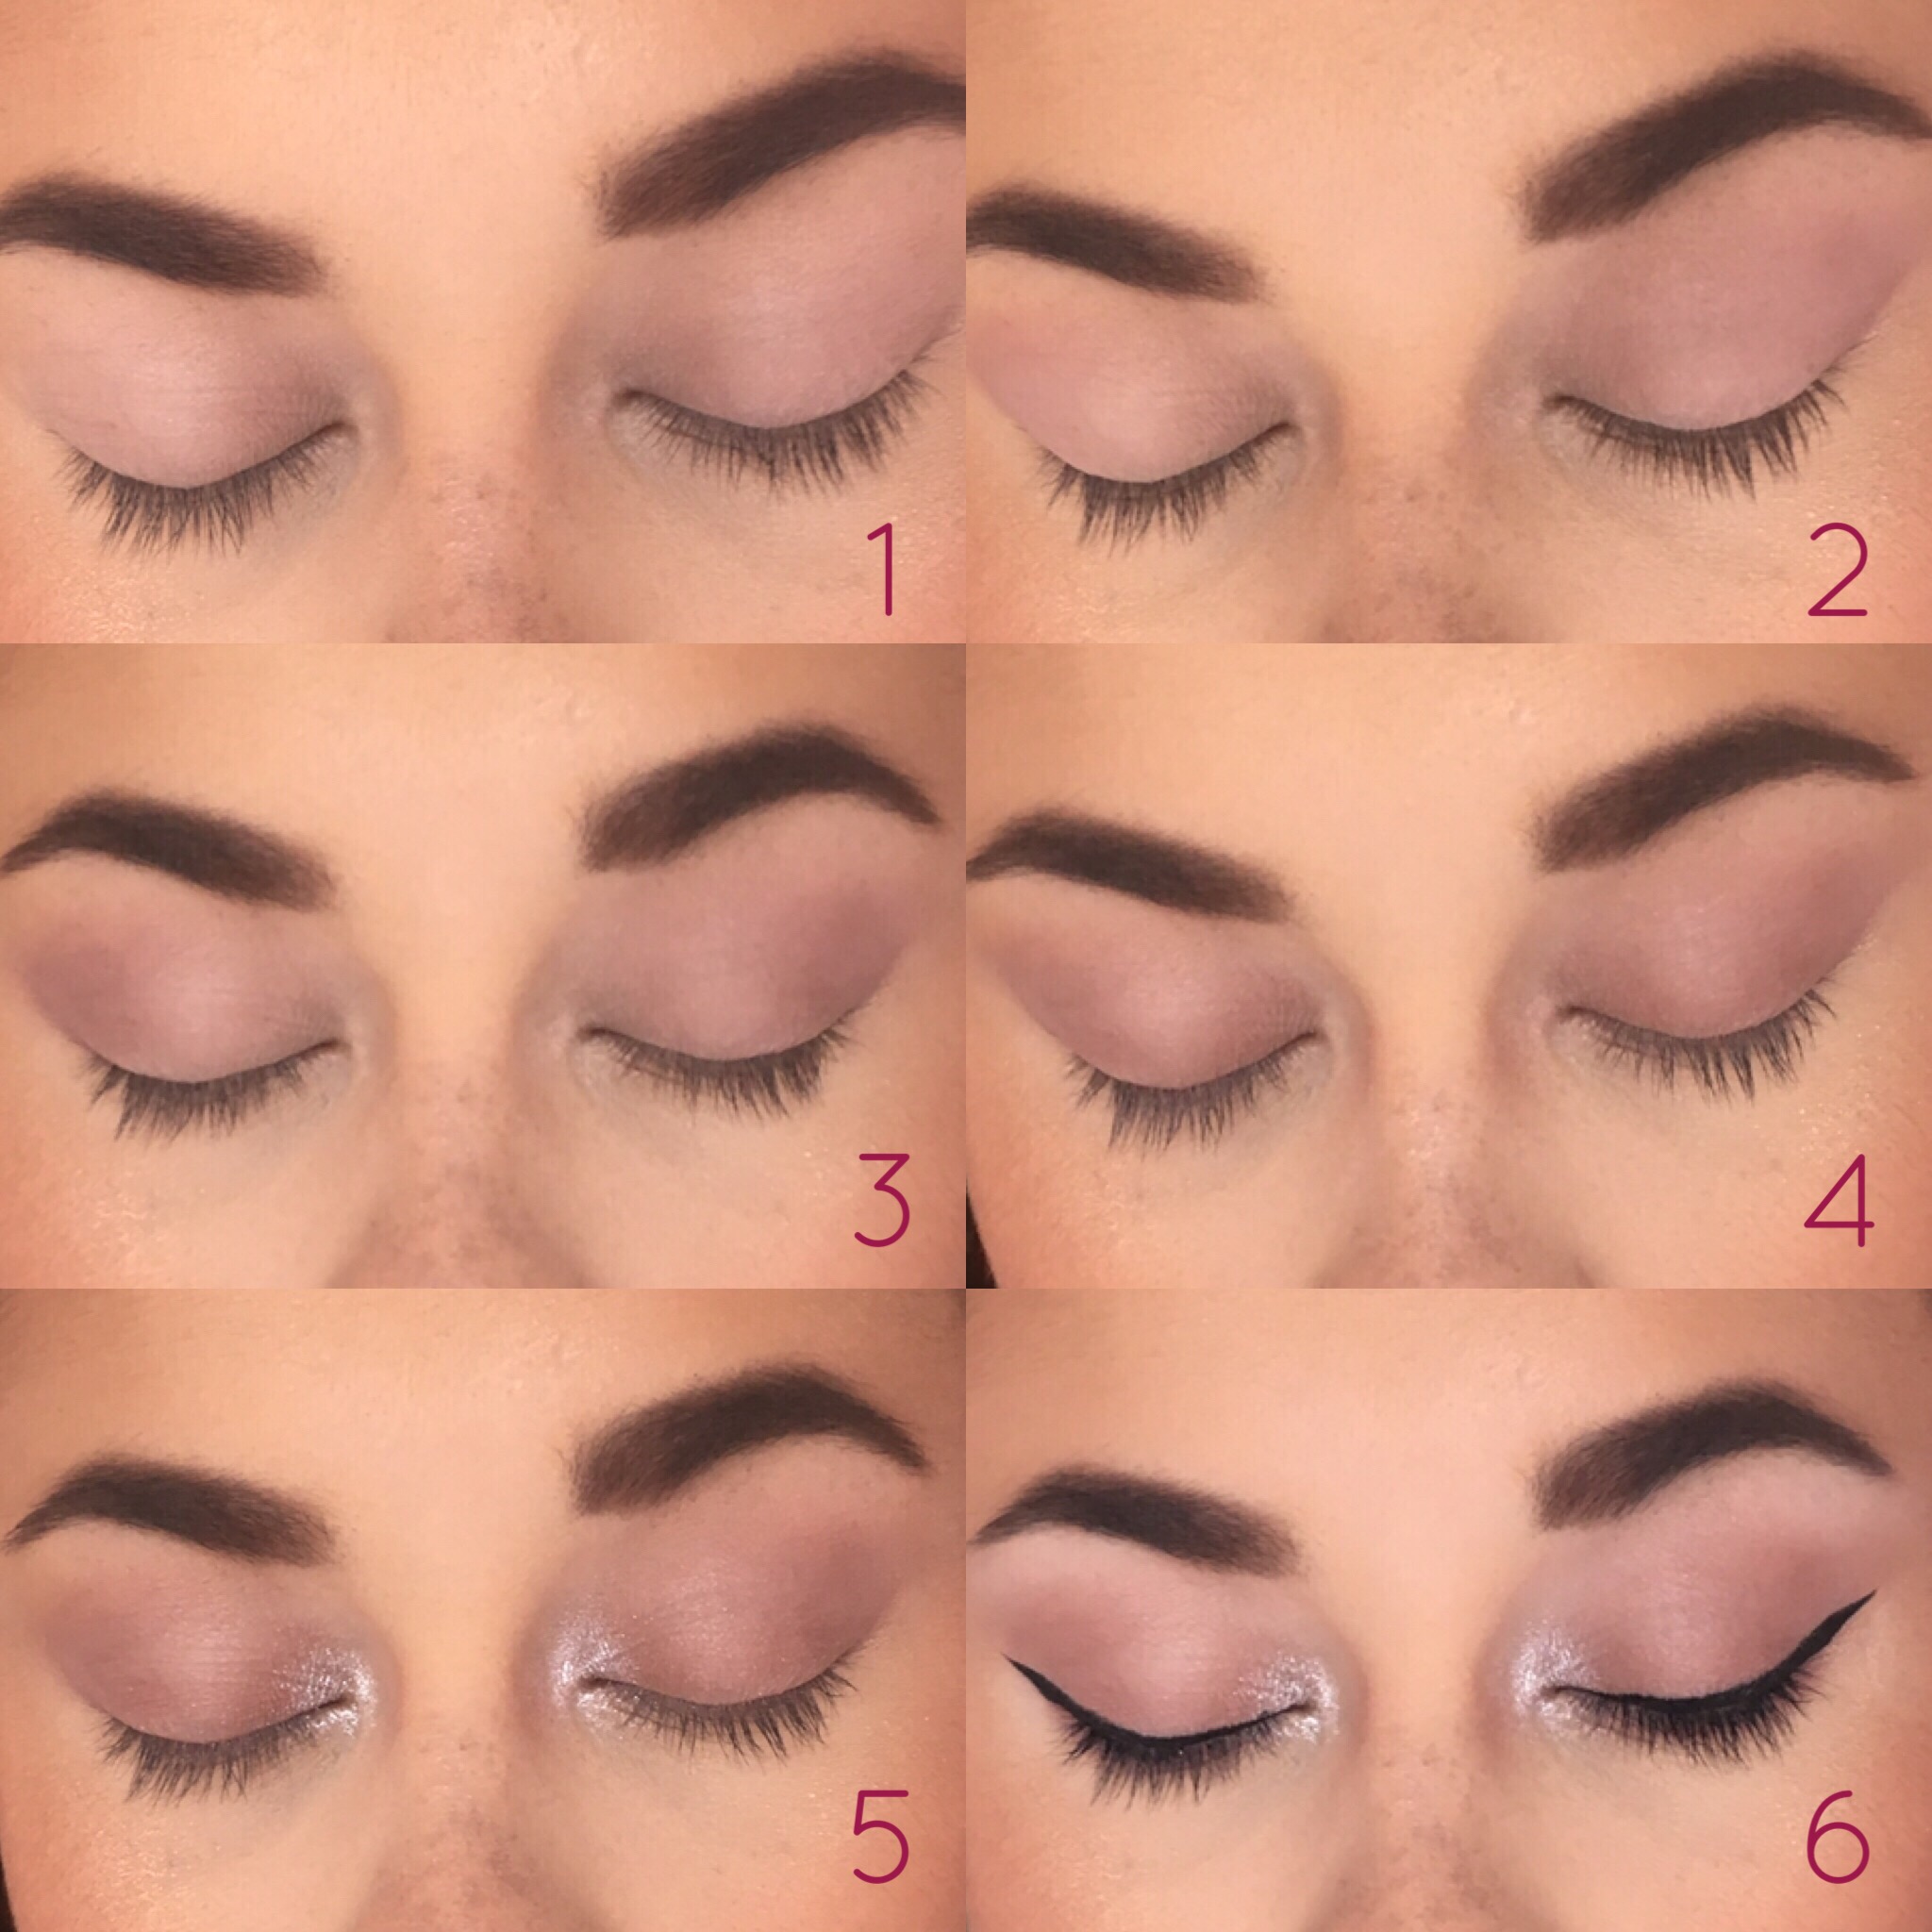
In my swatches, you can see how richly pigmented and metallic these shades are. However, once applied to the eyes, they do lose that BAM, in your face, sparkle quality…which is unfortunate, because I personally love glitter! However, for some people, that may be exactly what they want! I don’t want to say that I don’t approve of this palette, because I am happy to have it in my collection and I know I will use it, but I’m not in love with it. Since the shimmers are so finely milled, they translate to more of a satin finish on the eyes. I tried using a dry brush, wet brush, and my fingertip. All tools produced the same effect. A soft, diffused wash of color that differed from the way the shadow appeared in the pressed pan and the way it looks with an arm swatch. It was disappointing only because I expected it to look one way, not because it’s an ugly palette. It did last on my eyes all day and I did get compliments on my makeup, but I just wanted it to be more of a true representation of the shades that were in each pan. I noticed the duo-chromes were the most sheer, which was sad because I was looking most forward to those when I purchased the palette. The mattes are actually a beautiful formula and couldn’t be more blendable. I would love to try a Zoeva palette full of mattes now that I’ve tested this one! If I had to give an actual ranking on this palette, I would say it’s a 6/10 just because it’s not my type. He’s not ugly, he’s just not my type! 😂 If you’re looking for something that’s mainly sheer satin shades with a few buttery mattes, then you would love this palette!

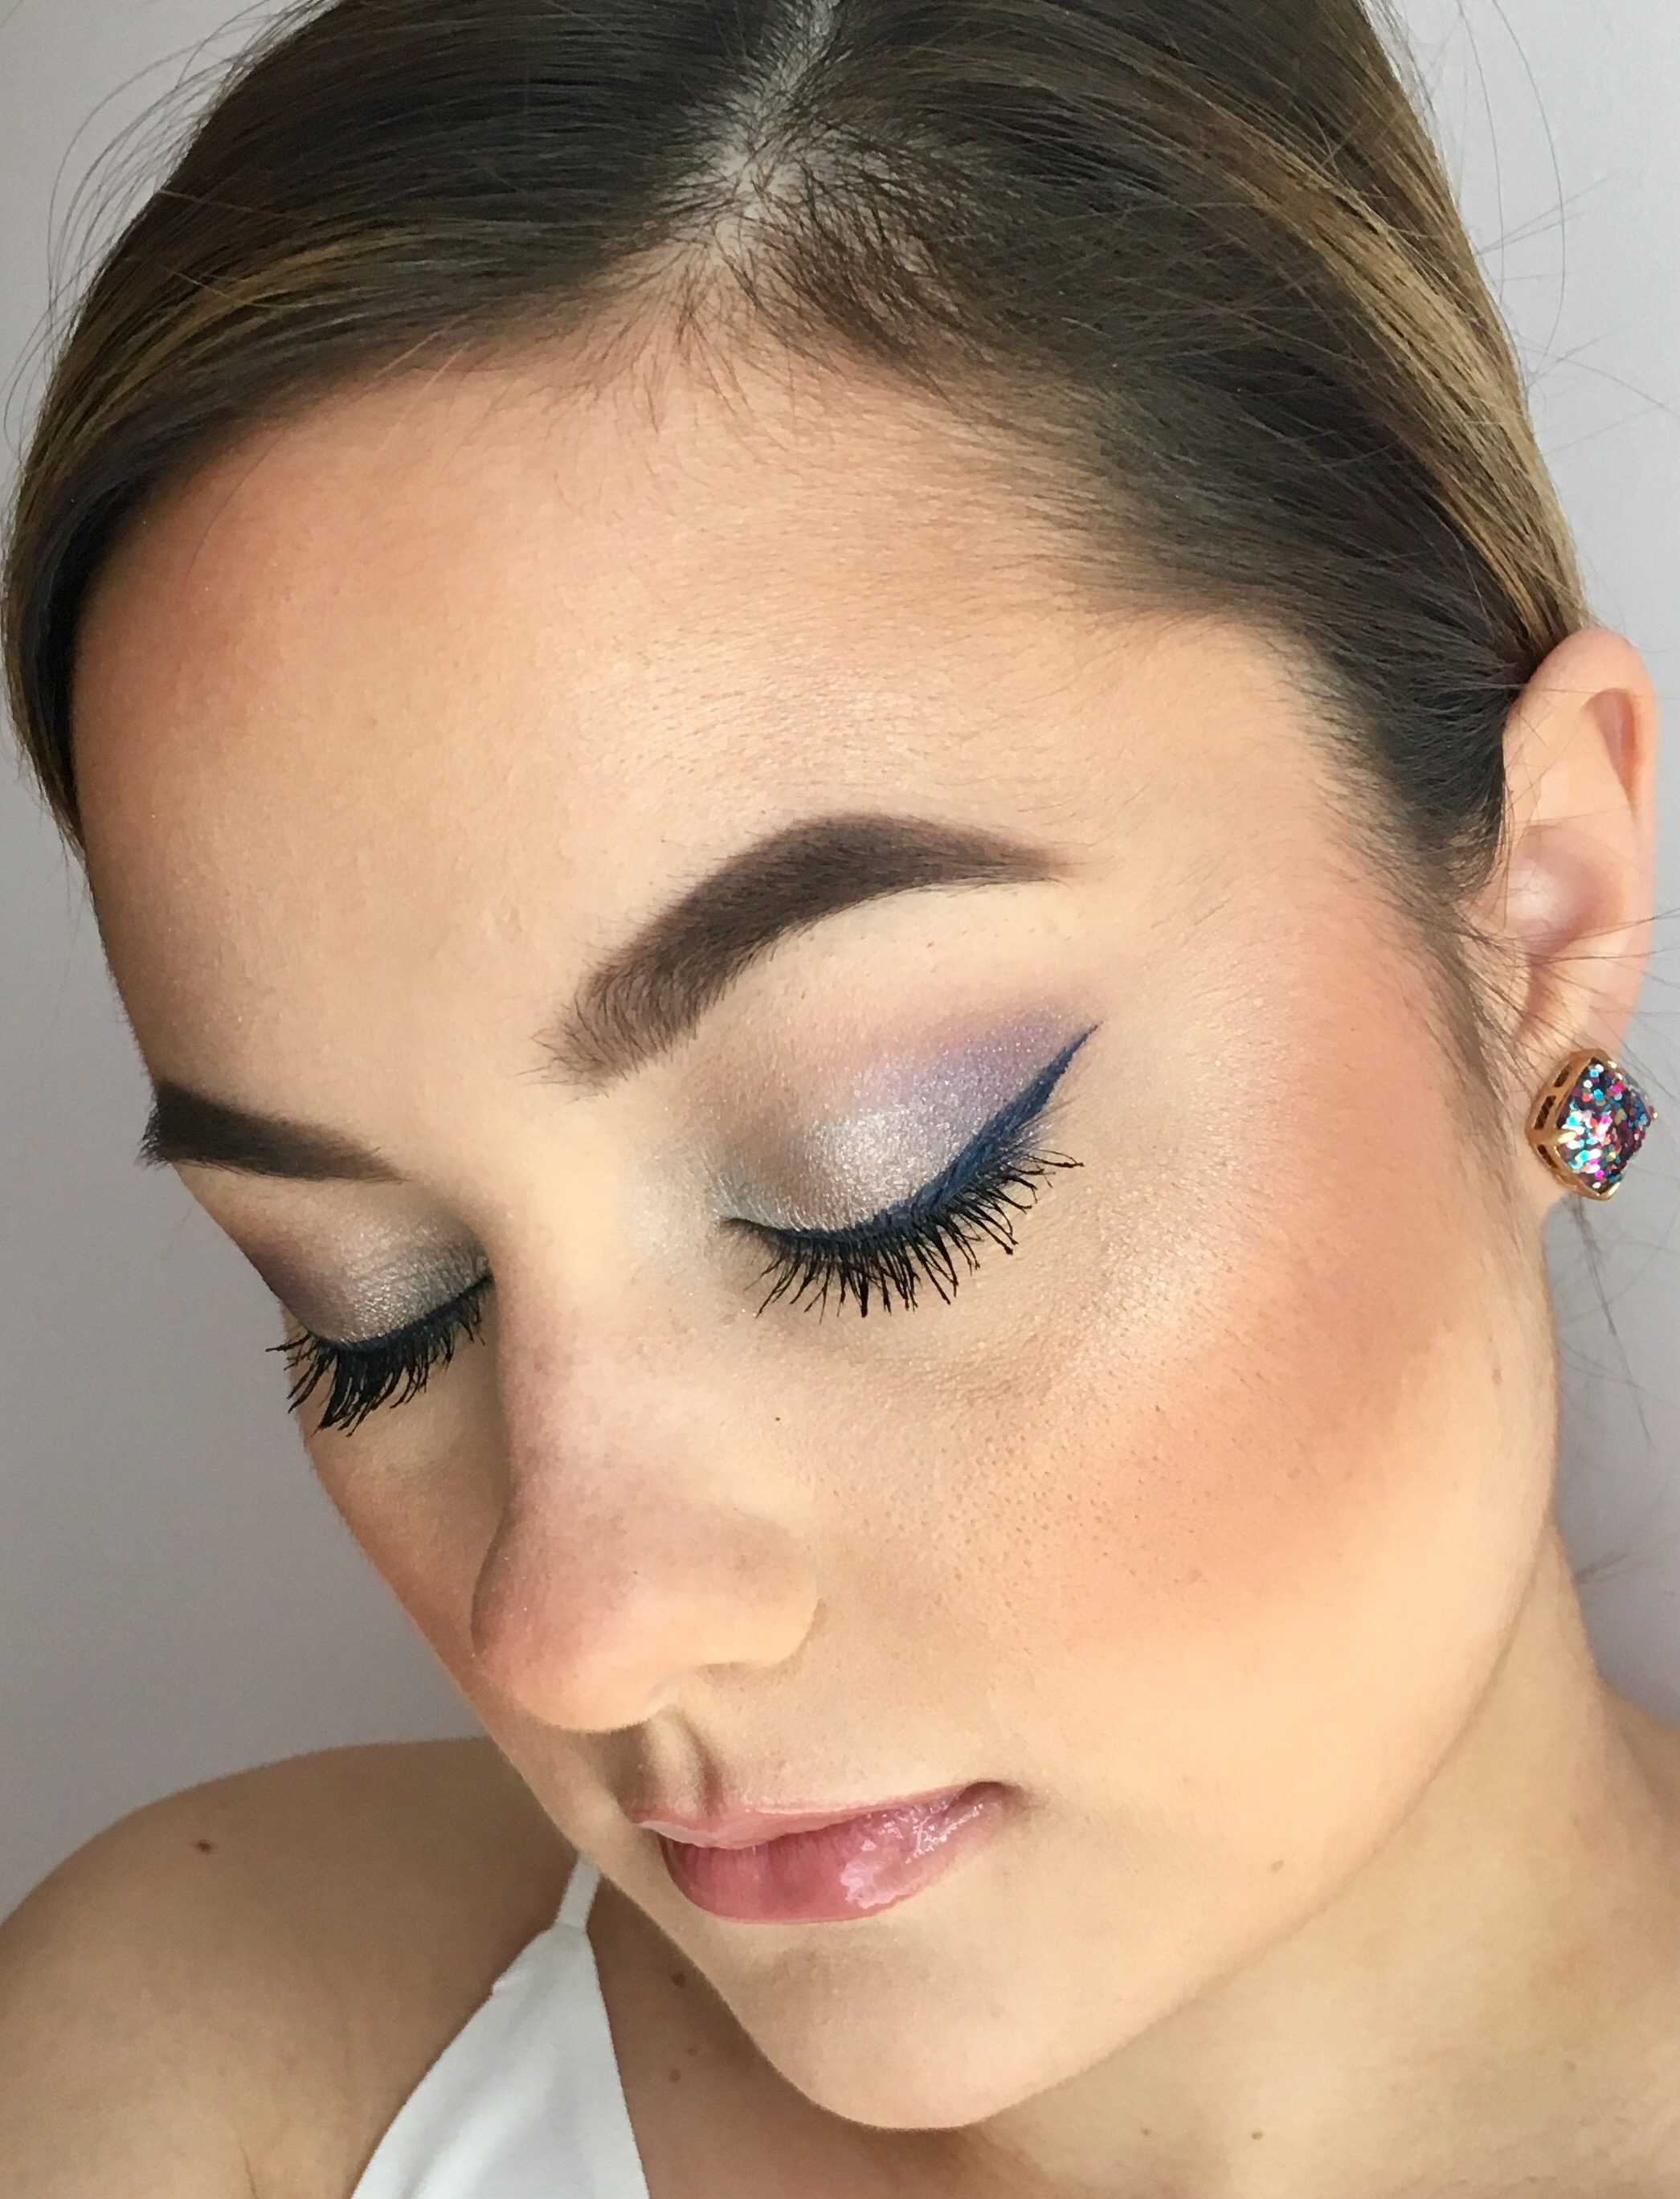
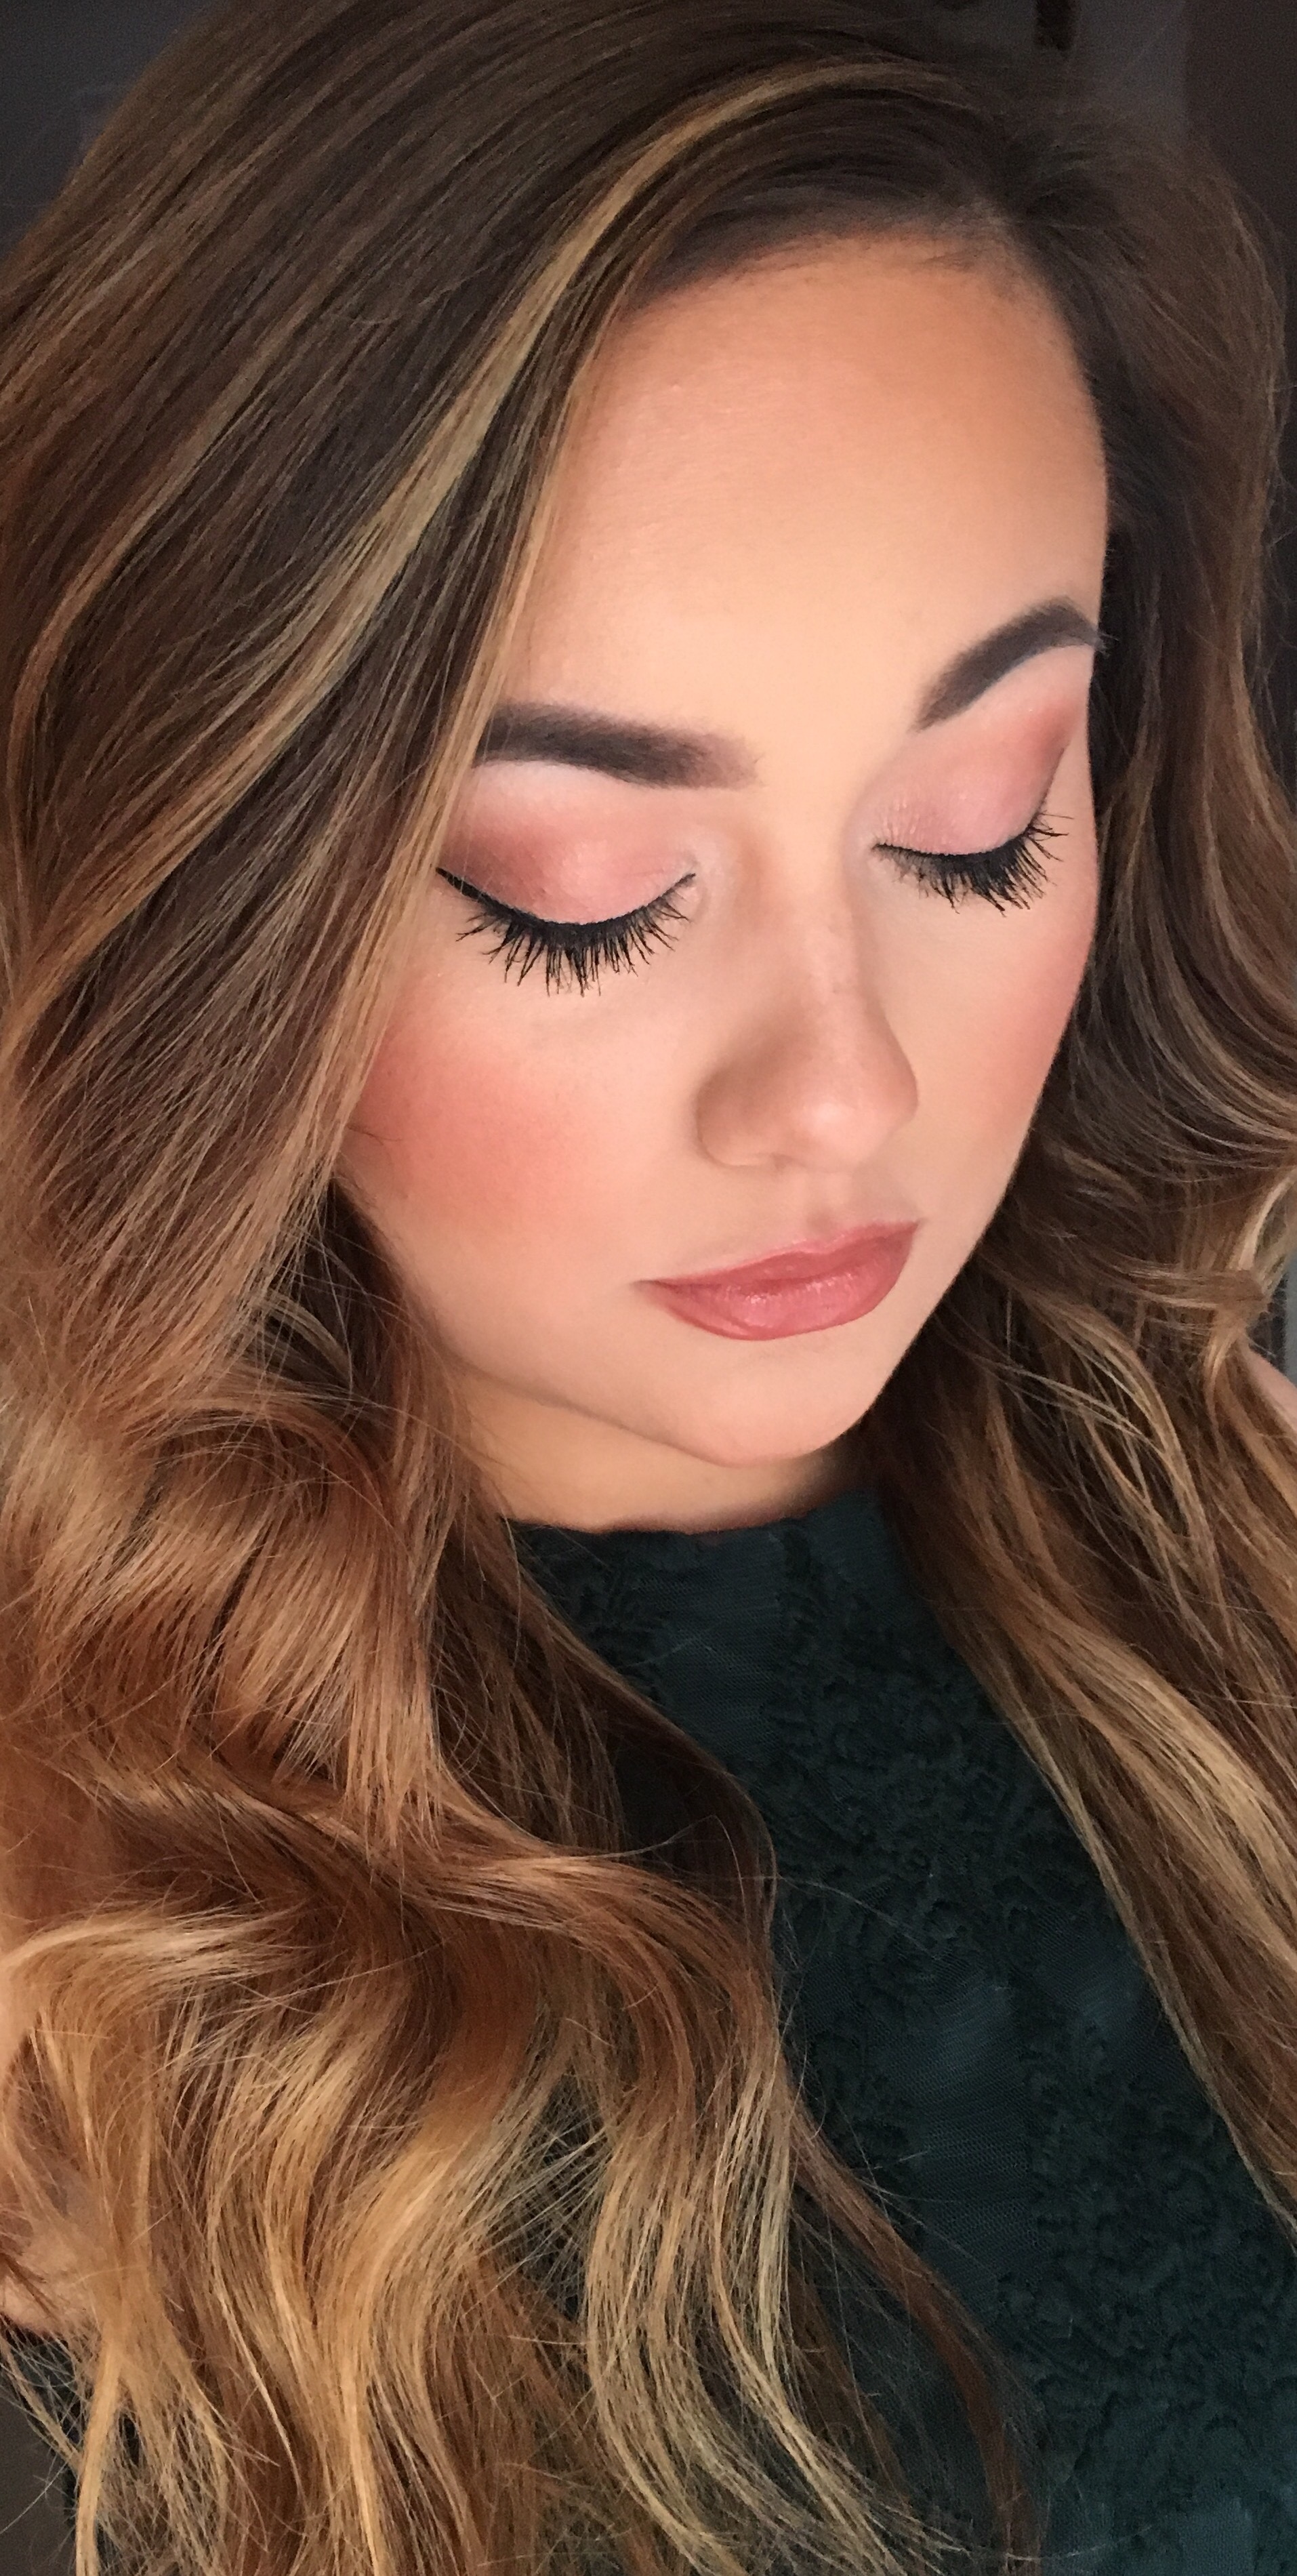
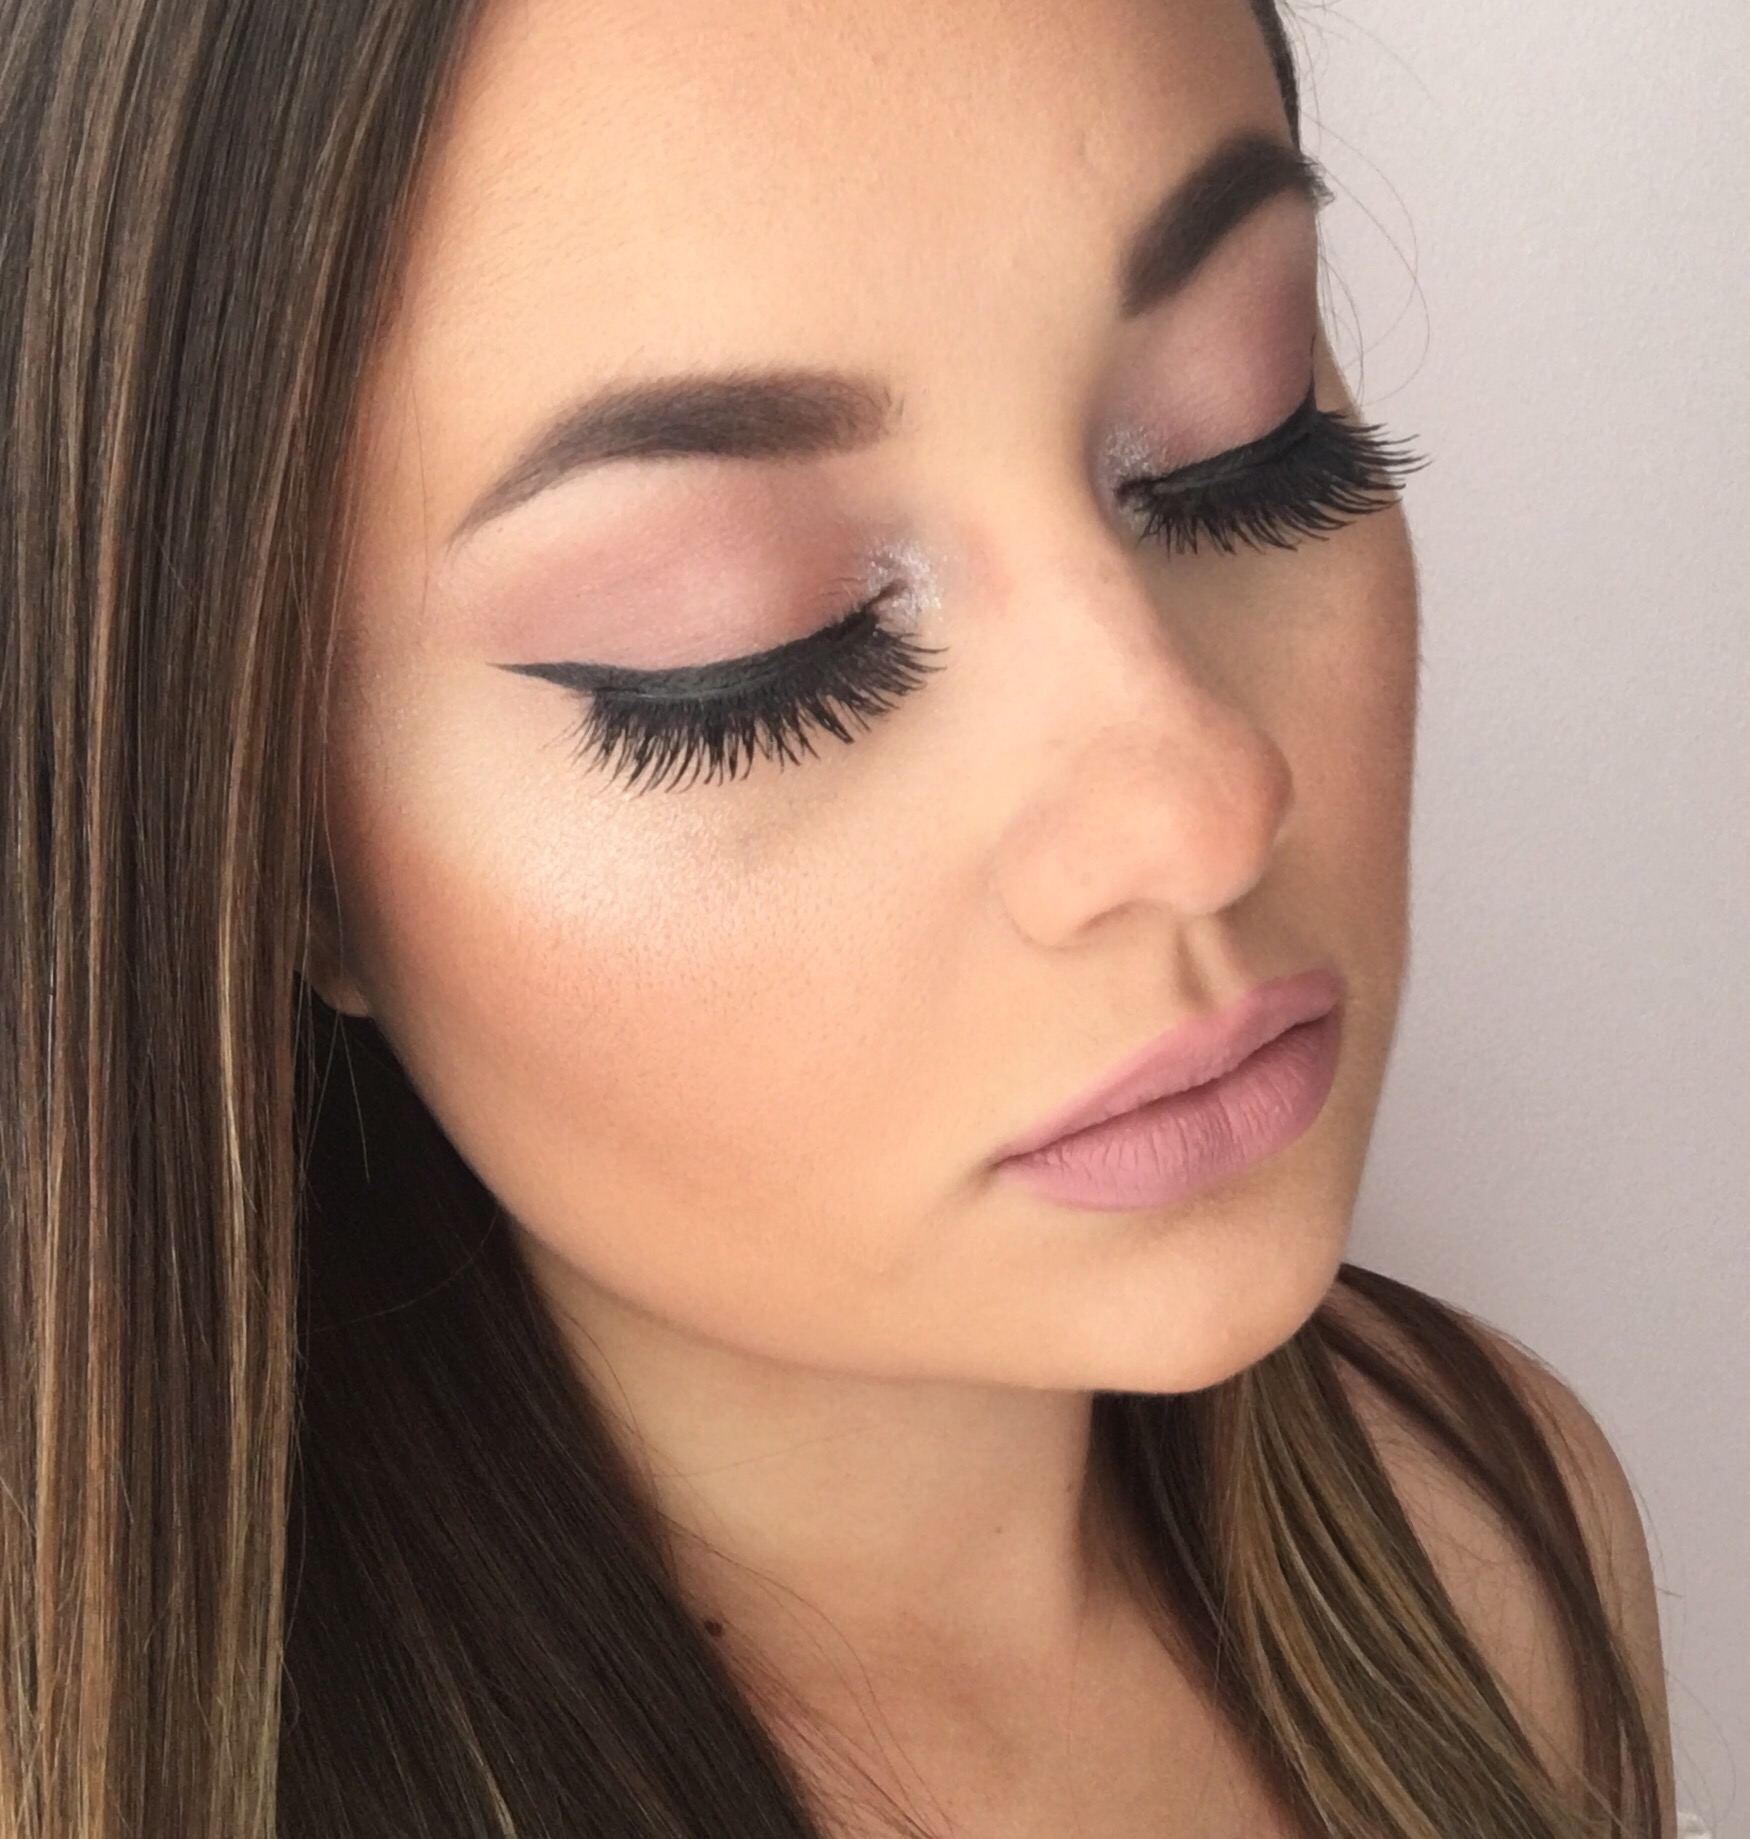
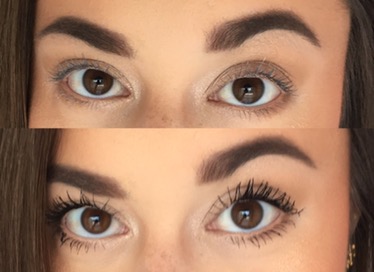
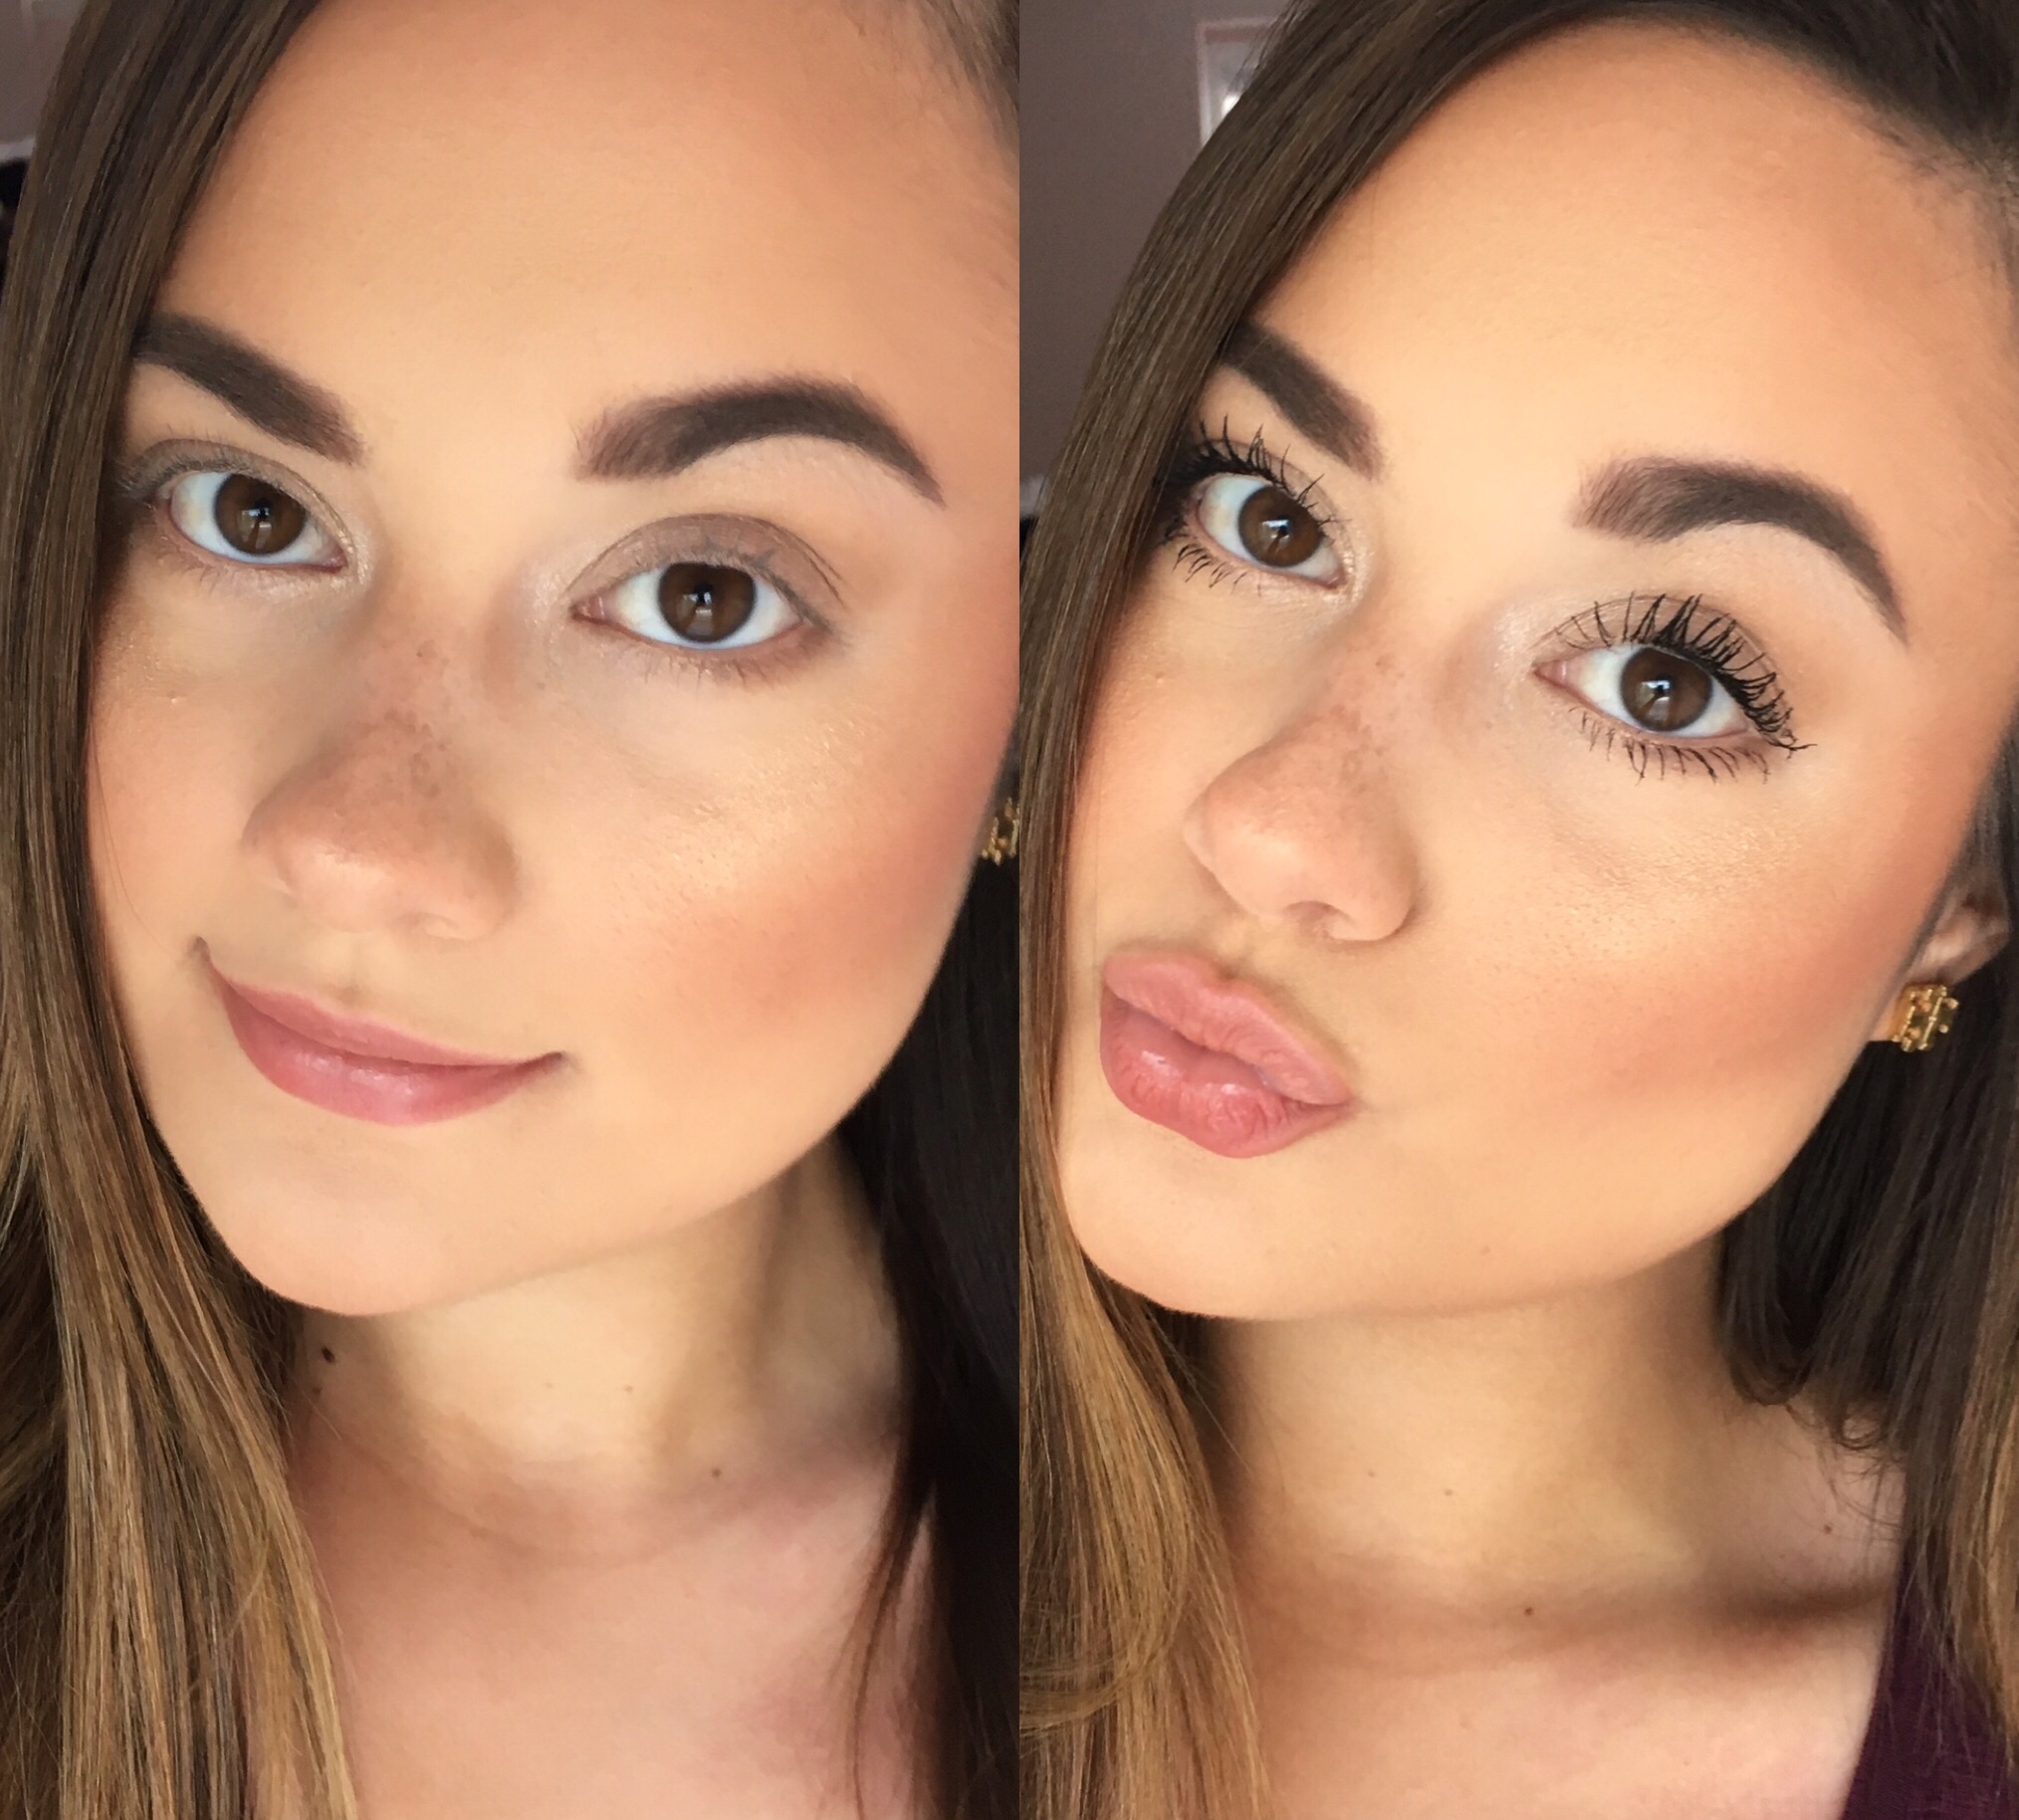
Looking back at the 2 eye looks I created, I think they look pretty and simple, even though I incorporated about 5 different shades in each picture. Again, I’m not blown away by the end result and I’m not telling anyone “You need this palette ASAP!” even though it is limited edition. I would love for every review I bring to you to be glowing and positive, but the reality is, not every product out there is a home fun. I rely heavily on these types of posts to make informed buying decisions and that’s why I wanted to publish this, even though it’s not my new favorite palette! For some, this may be what sways you not to get it and for others, you may see this palette and think “that’s exactly what I’ve been looking for!” It really is all preference and mine is to be full of glitter and high pigmentation at all times haha! Thank you so much for taking the time to read this review and check out my swatches/awkward makeup faces! I would love to know your opinion of this Melody Palette in the comments below. Let me know if there is a better application technique too! I learn from my readers every day, so all input is welcome and encouraged. 😌 Have a great week everyone! See you next Sunday! ❤️

Follow me on Instagram: @abigaillindsayblog


Email any business inquires to:

abigaillindsayblog@gmail.com  

How to Look Well-Rested with Brighter and Wider Eyes!

Do you have dark circles, puffy eyes or just a sleepy looking appearance after repeatedly hitting snooze on your seven alarms? Because same. I developed a routine to de-puff and give a highlighted, lifted appearance to my under eye area, while also brightening and widening my eyes! Keep reading to see the list of products I use and the ways I apply them to look more awake!

I always wake up with puffy eyes and the Clinique “Pep-Start” Eye Cream is my go-to for hydrating and brightening! I love it for so many reasons. I’ve struggled with finding the perfect formula to lightly moisturize my under eyes before I apply concealer. Whenever eye creams are too heavy, it will cause whatever you put on top of it to look heavy and crease. This one is so lightweight, while also being hydrating, so it’s the perfect formula for A.M. application! It is cooling to the touch, which helps with de-puffing as well! I’ve also noticed that this doesn’t give me those small white bumps, which sometimes can happen with different eye creams that I’ve tried. I use a small, pea sized amount and tap it on with my ring finger since it applies the lightest amount of pressure! I wait about a minute for it to sink in and then I go onto the next step!

I’ve been using the Becca “Under Eye Brightening Corrector” for a couple years now and I can’t imagine this product not being in my daily routine! If you have stubborn dark circles that show through with even the most full coverage concealers, then you need to invest in a good corrector! This one is a peach color with light reflecting illuminators, which will counteract the blue tones in your dark circles. A little goes a long way with this product, plus it lasts all day long! I apply this with my damp beautyblender underneath my eye and in the inner corners.

After I’ve moisturized and corrected, I apply a full coverage concealer! I always purchase one that’s 1-2 shades lighter than my foundation to give a highlighted effect! My holy grail formula is the Tarte “Double Duty Beauty Shape Tape Contour Concealer” (that’s a mouthful!) and it comes in 14 shades so you’re bound to find your perfect match! It is by far the most lightweight, full coverage formula that I’ve ever tried! It truly conceals acne, dark circles and redness so flawlessly! I always use this product with a damp beautyblender to help sheer it out slightly! If you’ve struggled with your concealer wearing off, then you NEED to try this one because it doesn’t fade during the day or look drying!

By this point, I’ve used so many creamy, liquid products underneath my eyes, that I have to set it with a powder to lock it all in and prevent any creasing! I always choose a yellow-toned, matte highlight powder to enhance the brightening effect I’m going for! Even if you have a different skin tone than me, I would still highly suggest checking out the NYX “Highlight Pro Singles” on Ulta.com! These aren’t sold in store, but I always stock up online! At only $5 a pan, they’re extremely affordable and there are 12 different shades to choose from. I was constantly buying the Anastasia highlight refills and then I discovered these, which are just as pigmented! The powder will also help smooth out any fine lines you may have, which is an added bonus!

Now that my under eyes are concealed and bright, I move onto making my eyes look big and awake! On a daily basis, I typically just apply my bronzer in my crease and take a shimmery shade all over the lid. Even when I’m rushing, I will never forget to highlight my inner corners with a shimmery, champagne eyeshadow! This makes the biggest difference in opening up your eyes and reflecting much needed light in an otherwise shadowy area! I love using this L’Oreal “Infallible Eyeshadow” in “Iced Latte” to brighten everything up! I take my pinky finger and dab the shadow on my inner corners, blending it outwards to seamlessly fade into my lid color.

I have round eyes, with a lot of lid space, so I always use eyeliner on the top lash line to help define and thicken the look of my eyelashes! Whenever I don’t put eyeliner in this area, I feel like my eyes look super tiny and tired. My favorite liners to use are the Kat Von D “Tattoo Liner” in “Trooper” for an ultra black, winged liner and I love the Marc Jacobs “Highliner Matte Gel Eye Crayon Eyeliner” in “(Earth)quake 41” for a smudged out, brown liner look! I also use the Marc Jacobs liner on my top waterline to further define that area, as well as smudged out on the outer corners of my lower lash line!

I’m pretty sure the best makeup secret to opening up your eyes and making you look awake is using a nude eyeliner in your lower waterline! The Tarte “Fake Awake Eye Highlight” is the most pigmented and long wearing one I’ve tried so far! I’ve repurchased it so many times because nothing compares! The nude color will neutralize any redness you have from having your eyes closed all night long. Using a light color in the lower waterline will help widen and brighten your eye. Back in the day, I would use a white eyeliner, but I’ve started to enjoy the more natural effect of a nude eyeliner now! If you haven’t tried this beauty hack yet, you really need to! It makes the biggest difference and I really can’t do my makeup without it!

Do you have any tips or tricks to getting a fresh and well-rested appearance when you’re really just a sleepy gal?! Let me know by leaving me a comment! I love learning new techniques from you guys! Thank you so much for reading, I hope you found this type of product review/routine helpful!

Follow me on Instagram: @abigaillindsayblog

Email any business inquires to:

abigaillindsayblog@gmail.com

“Tartelette Toasted Eyeshadow Palette” Review and Swatches!

It’s sweater weather, so you need a warm eyeshadow palette to feel extra cozy! The “Tartelette Toasted Eyeshadow Palette” is a brand new, 12 shadow palette from one of my favorite makeup brands, Tarte Cosmetics! I really love wearing warm shades on my eyes and find them to look somewhat natural on a daily basis. Even though I love makeup and have so many different options, I get the most out of my warm-toned, natural eyeshadows! I was so drawn to this palette in particular because it has both matte and shimmer shades. I knew I could create multiple looks using this one product, making it perfect for getting ready in a rush or traveling!

I wanted to give you a break down on all of the shades and the way they apply! As you can see, the shadows swatch beautifully, but some of them require a little extra work to show up equally as pigmented on the eyes! There are 5 shimmer shades and 7 mattes and I am super pleased with that ratio! In my opinion, you need to have more matte shades so you can create depth in the crease. It’s also nice to highlight your brow bone with a matte light shade and also have a dark enough matte color to add a shadow liner or deepen the outer crease.

  • S’more – This is the perfect “all-over-the-lid” shade. I use this after I apply eye primer to set my eyelid and give an even base to the shades I blend overtop. This is the perfect brow bone highlight too! It’s a bright, matte beige color that will work for a lot of skin tones.
  • Sunrise – I wasn’t very impressed with this color when I swatched it, just because it seems so sheer! I’m happy to report that it looks a lot prettier when you apply it as an eyeshadow! It is a cream shade with a slight golden sheen. If you like to wear really natural colors, you would love this! I love putting this in my inner corners to help my eyes look more awake!
  • Sunset – This is such a perfect gold/bronze shade! It’s not packed with sparkles, so you don’t feel overly glittery when wearing this on a daily basis!
  • Crackle – This is actually such a unique eyeshadow! It is a true brown base, but also has gold flecks throughout! When blending this shade, some of the glitter falls out, so be warned! I think this is best applied in patting motions using your finger to prevent any fallout!
  • Cashmere – A creamy, matte peach shade! I love using this as a transitional shade in my crease! It will be perfect on “no-makeup makeup” days to lightly define!
  • Warmth – This is my favorite matte color in the whole palette! It’s a rusty, terracotta shade that is super pigmented! You need the smallest amount of this color to make a statement! It will instantly warm up any eyeshadow look! I think this is going to be so pretty blended all over the eye and paired with a dark lip for Fall!
  • Flame – By far one of the most metallic colors in the palette! You can apply it with a brush and it will definitely show up on your eyes, but this is another shade that works best with your fingers. It’s a bright copper color with gold shimmer throughout.
  • Cozy – I absolutely love this matte brick color. It’s super creamy and applies evenly on the lids. You do have to be careful when using this alone, either all over the eyelid or underneath your eye because it can make you look slightly sick haha! I think it’s best to add dimension on the outer edges and that’s how I’m personally planning on using it.
  • Candle – I’m so indifferent towards this color because it’s chunky and glittery, but looks so gorgeous on the eyes. I would describe it as a sparkly champagne shimmer! This is the most “high maintenance” color in the palette because you have to use a mixing medium, like M.A.C Fix Plus or the Too Faced Glitter Glue to make it work. You will have a ton of fallout if you try to apply this dry with a brush. It’s best to use your finger to pat it on and work in light layers because it can look uneven and patchy when trying to build it up!
  • Latte – This is my perfect crease shade! It’s one of the more neutral colors in the palette and will help add some variety to natural and more dramatic looks!
  • Simmer – My favorite shimmer shade in the entire palette! This is the most beautiful copper color! It has a gold shift and applies really well with a brush OR your fingertips! I can see this complimenting blue eyes so beautifully!
  • Fireside – This swatch doesn’t do this shade justice, it looks kind of patchy, but it’s really creamy and blendable on the eyes (which is what really matters)! This is a deep plum/brown that looks beautiful as a soft liner if you want to naturally define your lashline. Or you can use it right on the outer corners of your eye for extra drama!

Even though a few of these eyeshadows require a little more work than others, I think this palette is totally worth it! I’m so happy I purchased mine before it sells out and I can already tell that I’m going to use it all the time! You get 12 Amazonian Clay eyeshadows for $46! That’s a really good deal, making each shadow a little less than 4 bucks! They are all extremely pigmented and very creamy, they also smell like vanilla! I have sensitive skin and haven’t had any reaction to the scent or red pigments in these shadows, hooray! This would make an awesome gift for the holidays too! The only person I wouldn’t recommend this palette to, would be someone that hated warm toned eyeshadows because that’s literally all that is inside! Haha! What do you think of this Toasted Eyeshadow Palette? Do you own any of the other Tartelette palettes? If so, I would love to know how this one compares! Have a great week and thank you so much for reading!

Shop the Toasted Palette Here!

Follow me on Instagram! @abigaillindsayblog

Email any business inquires to:

abigaillindsayblog@gmail.com

Pumpkin Spice Makeup Tutorial!

I wanted to do a look using the Jaclyn Hill Morphe palette for Fall! I get a lot of comments and messages asking to do a look using the shades in this palette because so many people own it and love it! The hype is real, I’m obsessed with mine and use it on a daily basis. It has the perfect array of neutrals and bright colors.

Warm-toned smokey eyes are my favorite to create because they give your eyes definition, without being too intense. There is something about combining these matte shades of brown, orange, red, and yellow that translates as “more natural” than the traditional silver and black smokey eyes. I would personally wear this eye look during the daytime, but I think it would look great for nighttime too! You could even go extra glam by adding some gold glitter onto the center of the lid, falsies and a more intense winged eyeliner!

  1. I always start off by priming my eyelids with the Urban Decay Primer Potion in “Eden” to cancel out any redness and conceal veins. This will also prevent your eyeshadow from creasing throughout the day and allow the shades to appear more vibrant. I apply a light amount of translucent setting powder over the lids to help the shadows we place on top to blend easier!
  2. I always use a matte, light brown eyeshadow in my crease. Even when I’m rushing, I will still blend a little of my bronzer to lightly define the shape of my eyes. I applied “Silk Creme” in windshield wiping motions with a fluffy blending brush. With the same brush, I buffed “Butter” right underneath to add a layer of dimension.
  3. I took the color “Pukey” on a more precise blending brush and concentrated the color on my outer V. I made sure to blend it into the two other shades in my crease, but tried to focus it mainly on my outer corner to create a cat eye effect.
  4. “Hunts” is one of my favorite shades in this entire palette! On a tapered blending brush, I brought this color on the outer third of my eye.
  5. I used “Creamsicle” as my lid shade! I was so afraid of using a true yellow color on my eyes, but I think this one is actually super wearable and flattering! Taking a flat shader brush, I pressed this color on the inner third of my eye and lightly blended it with a clean, fluffy brush into the middle section for a seamless transition into “Hunts.”
  6. On a detailed blending brush, I patted “Jacz” on the outer edge in a V shape. I made sure to keep this darker color lower on the eyelid and didn’t bring it up too much into the crease.
  7. I drew my standard winged eyeliner and then decided that the look wasn’t as dramatic as I liked, so I took “Chip” on a precise angled brush and patted it on the outer edge, layering it close to the winged eyeliner. I took another clean blending brush and lightly buffed it into the rest of my outer crease colors.
  8. I just used some regular mascara for my lashes, but I think this would’ve looked amazing with falsies! My favorite are the Ardell Demi-Wispies Natural and I love the House of Lashes glue!
  9. On my lower lash line, I blended “Pukey” and “Jacz” and added “Chip” only on the outer edge for a gradient, eye-opening effect.

I circled the shades I used in the palette, just in case you didn’t know them by name and accidentally threw away the plastic insert that labeled them!

The additional makeup products I used on the rest of my face!

Anddddd that’s it! So easy right?! I really love how the eye look turned out and I definitely think it’s easy to recreate! It gives me pumpkin spice, Fall makeup vibes and that’s what I crave all October long! Do you own the Jaclyn Hill palette?! Are you equally as obsessed with it?! I’m already thinking of ideas for my next few blog posts and I would love to know what you want to see next! Feel free to leave your suggestions, I always respond to comments and would love to talk to you! I hope you had a great Sunday and enjoy the week ahead, thanks for reading!

Follow me on Instagram: @abigaillindsayblog

Email any business inquires to:

abigaillindsayblog@gmail.com

Natasha Denona Eyeshadow Palette 5! Review and Swatches!

Have you ever heard of Natasha Denona? She is an international, highly acclaimed makeup artist who started her own brand! Her signature look includes glowing skin and shimmering eyes, so it’s no surprise that the majority of products in her line will give you a similar appearance! I have read many reviews about her eyeshadows being incredibly pigmented and blendable, but they’re also pricey, so I decided to wait until I could buy during a random sale at Sephora. I recently was able to earn 4x the points as a VIB Rouge, so I decided to purchase the palette and use it towards maintaining my rewards status until 2019! I wasn’t planning on dedicating an entire blog post to this product, but as soon as I swatched it, I knew I had to share it with you all!

I got the 5 pan palette because I really couldn’t commit to the cringe-worthy price of her larger 28 shade palettes ($239) YIKES. Now that I’ve tried the shadows, I know they’re definitely something special, but I personally could never justify spending that much on eyeshadow, sigh. However, for $48, you can get 5 extremely high quality eyeshadows in 13 different color combinations. I decided to purchase “4,” which includes the shades, Aura, Cool Bronze, Oxide, Cool Plum and Moonstone. I love wearing one metallic color across my entire lid and they’re all gold/rose gold/bronze tones, which are my absolute favorite for every day makeup looks. I wanted to buy the colors that I knew I would get the most wear out of! I was super close to getting “2” and “10,” but I’m extremely happy with my choice and find the colors to actually be more wearable than the online product photos portray!

I barely pressed my finger into the first eyeshadow and was truly shook at the color payoff. Like you need the smallest amount to get a full, metallic, pigmented layer of color on your eyes. I tried these shadows with my fingers and brushes and they definitely show up more foiled with your finger, but if you want a more subtle effect, I would recommend a flat, synthetic shader brush! The shade “Cool Plum” is a satin matte formula, so that’s why it isn’t “BAM” when you look at it compared to the other shades! I used it in my crease to add depth and it was really creamy and blended so well. These have minimal fall-out, which is so rare for a sparkle/glitter eyeshadow. They are even water-resistant…so you know that implies how long-wearing and fade-proof these will be throughout the day!

Here is just a little natural, easy eyeshadow look that I created with this palette!

  1. I only have eyeshadow primer and translucent powder on my eye at this point, no shadows!
  2. Since there isn’t a matte transitional shade in the palette, I threw some bronzer in the crease to help add depth and blend any harsh lines from the lid shades that I apply next.
  3. I patted Moonstone on the inner half of my eyelid. I wanted to use a brighter shade towards the front of my eyes to help them appear larger!
  4. With a flat shader brush, I swept “Cool Bronze” on the outer half of my eye. I love the subtle transition from light-to-dark that this combination of colors gave!
  5. Using a fluffy blending brush, I buffed “Cool Plum” into my outer third to give depth and shape my eye. With my finger, I patted “Aura” on my inner corners to help open the eyes and help me look more awake!
  6. I really dislike this angle because eye whites and veins 😂 however, I wanted to show you that I used “Oxide” on my lower lash line to give a little drama and definition!

Here’s the final look! As you can see, it really came out super natural and it was incredibly easy to create! I’m so excited to wear these warm metallic shades in the Fall with a dark red lip! I really want to buy another one of these 5 pan palettes, but have you seen the new Natasha Denona “Lila” Eyeshadow Palette coming out to Sephora in September?! It has 15 eyeshadows, so of course it’s expensive, but the colors are literally calling my name! So many purple and gold shades, which are my absolute favorite to wear! Let me know if you’re thinking about getting it, I want to read your opinion of the swatches! Thank you so much for reading!

Follow me on Instagram: @abigaillindsayblog

Email any business inquires to:

abigaillindsayblog@gmail.com

Unicorn Makeup Look!


Unicorn makeup is definitely a thing right now, so I decided to do a little look on my interpretation of the trend! I purchased the Tarte “Make Believe in Yourself: Eye & Cheek Palette” because it has really gorgeous neutrals, as well as fun pops of color! It’s an awesome deal too, 10 eyeshadows, plus a highlight for only 40 bucks! Tarte released this palette as a part of their new collection of other Unicorn-themed makeup items! 


I typically steer clear from purple and blue eyeshadows, but I was drawn to these shades in particular because they’re surprisingly wearable. I wanted to create a look that was definitely colorful, but not intensely shocking on the eyes. 


  1. I primed my eyes using the Urban Decay Primer Potion in the shade “Eden” and set my entire eye lid with my translucent setting powder for a smooth and even canvas. Next, I blended the only matte shade in the palette “Myth” into my crease. I pressed this color onto my outer corners as well for added dimension. 
  2. I took the shade “Mystic” on a flat shader brush and applied it to the inner corners of my eye. This icy blue color is super bright and beautiful!
  3. For my all-over lid shade, I patted “Trance” using my finger tips. This is a pretty lavender color that has a lot of silver and taupe shimmer. I found that applying with my finger gave this color maximum color payoff. 
  4. I used the darker purple in the palette, “Fairy” to shade in my outer corners! I do wish I had a darker matte shade in this palette to use for this step. It’s just my personal preference to not use so many shimmery colors in the crease, but I surprisingly liked how this color worked out! 
  5. I wanted to do something a little different than my usual black winged eyeliner, so I opted for a navy blue gel liner by Tarte! I think this just helped the look stay super cohesive since it’s all in the same color family. I also applied my Tarte “Tarteist” Lash Paint Mascara, I love that stuff so much!
  6. I used the turquoise color in the palette called, “Dream” to define my lower lash line! I also blended “Mystic” over top of that to give it a softer appearance. I also used a pastel blue eyeliner by ColourPop in my waterline to make the whole look pop! 


What are your thoughts on the Unicorn makeup trend? I actually really liked the way this look turned out! It’s fun and different, but it’s also wearable since I kept the rest of my makeup super neutral. The eyeshadows in this palette are actually really pigmented and super buttery, which means they are going to be applied best with your finger! I noticed some glittery fall out when I was trying to blend out a couple of the shades, but that’s super common with sparkle eyeshadows so it was to be expected! Next time I’ll just use extra setting powder underneath my eyes to wipe away the fallen shadow! 


Let me know if you would like to see a look where I use this palette to create a super natural look! I think it would be fun to compare the warm, neutral shades in the palette and see if they are equally as magical when applied to the eyes! Thank you so much for reading this post! 


Follow me on Instagram: @abigaillindsayblog


Email any business inquires to:

abigaillindsayblog@gmail.com  

Sweet Peach Makeup Look! 


If you read my previous post, you know I went peach crazy and ordered every item in the new Too Faced Sweet Peach Collection! Well, rather than only showing the swatches from my review post, I decided to also do a quick, little makeup look using all of the products I purchased! As you can guess, the look is very peachy, but I wanted to create a cohesive look that shows you how to make the pinky-orange tones wearable for day-to-day! Of course, you can totally make it your own! I think this would be gorgeous without eyeliner and brown mascara if you want a more natural, soft effect. You can also add false lashes and darken the outer corners a bit more to give a dramatic effect! Either way, I hope you really enjoy seeing how I put all of these products together for a pretty peach makeup look! 

  1. I first primed my eyes using the Urban Decay Eyeshadow Primer Potion in the shade “Eden.” I love this for canceling out the veins and redness in my eyelids, while also extending the wear of my eyeshadows. Next I applied “White Peach” from the Sweet Peach Eyeshadow Palette all over my eyelid and up to the brow bone. I find that the rest of my shadows blend easier when I set down a neutral shade to take away the tackiness of the primer and provide a smooth canvas for the colors we place on top. 
  2. For my transitional shades, I took “Peaches ‘N Cream” on a fluffy brush throughout the entire crease area. Once I had that blended out, I added a bit of “Georgia” to soften the entire look, while giving more dimension. 
  3. So the next color I used, “Summer Yum” is an absolute game-changer and definitely my favorite shade in the entire palette. It’s a perfect warm, terracotta, chocolate brown. Ugh, it’s just really something special. So I picked up a more detailed blending brush and focused this color on the outer edges for a wide-eyed effect. This color would also be amazing as an all-over kid shade for an all-matte brown smokey eye! Ah! 
  4. I picked up “Bellini” next, which I would describe as a peachy-rose gold shade. This is perfect for highlighting the eyelid and providing the look with more dimension. I used a flat shader brush to press the color in and reduce any fallout from the shimmer. I also added the color “Nectar” into the corners of my eyes to help them look awake and sparkly! 
  5. To add further depth to the eyes, I took “Delectable,” which I would describe as a matte, deep plum shade on a small definer brush. I blended this onto my upper lash line and slightly into the crease. Typically, I use a matte black color for this step, but I actually really like how this shade worked with the whole look! 
  6. For the final step, I used the Kat Von D liquid liner and applied two coats of Too Faced “Better Than Sex” mascara! After looking at the photos from this pictorial, I really saw how crazy of an impact these steps make! Wow! Of course I did my standard winged eyeliner, but I think it would look equally awesome with just a regular like or no eyeliner at all! 


For the rest of my makeup, I used the Sweet Peach Glow palette for my bronzer, highlight and blush topper! I also used the Papa Don’t Peach blush, which I absolutely love! I predict this product becoming my new favorite! For my lips, I used the Sweet Peach Creamy Peach Oil Balm in “Papa Don’t Peach” for a glossy look! I have been wearing this product nonstop and absolutely love the way it feels on my lips, so I’m excited to try the other colors in the range! Let me know if you like this makeup look! I want to know your favorite shades in this palette too! A lot of the colors are out of my comfort zone, but I believe that will continue to inspire me to get more creative with my makeup looks! Thank you so much for reading! 

Follow me on Instagram: @abigaillindsayblog


Email any business inquires to:

abigaillindsayblog@gmail.com  

Romantic Mauve Makeup Look

Mauve and blush tones are very on-trend this year and seem to be popping up all over various Instagram makeup accounts. I feel like these rose-toned shadows look super natural, without being the same-old browns and gold tones I usually stick to. This makeup look would pair well with your standard neutral shades, like gray, cream and black, but I think it would look gorgeous with a blush-toned ensemble for a monochromatic, trendy vibe. I used the Naked 3 palette to complete the eye look and I loved the way it turned out. I re-discovered my love for these eye shadows and would highly recommend this palette if you love mauve-toned makeup looks.


  1. I started off by priming my eye lids with my new favorite Wet N’ Wild Eyelid primer and then sweeping the color “Strange” from lash line to brow bone. I love using a matte, light color to set my primer and allow the other shades I place on top blend easier.  
  2. Next, I blended “Limit” throughout my crease as a transitional color.
  3. Taking the matte shade, “Nooner,” I deepened my outer crease. I love doing this gradient effect to make my eyes appear larger and more defined.
  4. I used a combination of “Burnout” and “Liar” for my lid shade. I made sure to pack on this color with a flat shader brush to decrease the likelihood of glitter fallout!  
  5. I used ColourPop’s “Tassel” on my inner corner to provide an intense highlight effect and further widen the look of my eyes. I loved the pop of sparkle that this step added to the overall look!
  6. Lastly, I lined my upper lash line using the Stila “Stay All Day” felt tip eyeliner pen and used the Tarte “Tartiest” mascara to prep my eyelashes for falsies.


I used the shades “Bubbly” and “Dripping In Gold” from the Anastasia “That Glow” Glow Kit for my highlight! I love the glossy look of this product when applied to my cheekbones, which is rare to find in a powder formula! For the lips, I used ColourPop Ultra-Matte Liquid Lipstick in the shade, “Midi,” which is a cool-toned, dusty pink shade that compliments the eyes really well. I would definitely recommend wearing a chapstick or lip primer underneath these lippies because they’re very drying and borderline chalky otherwise! The only aspect of this look that I wasn’t too fond of was the lashes…not only were they extremely uncomfortable, they would not adhere to my natural lash line! They were the Ardell “Double Up” Wispies, but I wanted to mention the Ardell “Demi Wispies Natural” are my favorite lashes and are so light to wear! I tried two different lash glues with the “Double Up” style and neither of them would help this thick band stay in place on my eyes, which resulted in covering the band with lots of gel eyeliner and trying to make it work! They look beautiful when your eyes are open, but unfortunately it is pretty visible and not cute whenever you close them.


Let me know if you enjoy these simple makeup looks and would like for me to do more! I know it would be much easier to film a tutorial from beginning to end, rather than meticulously explain each detail of the process, so let me know if you would be interested in seeing that instead! Thank you so much for reading!


Follow me on Instagram: @abigaillindsayblog

Email any business inquires to:

abigaillindsayblog@gmail.com  

Are Lash Primers Really Worth it?

If you know me, you know my holy grail makeup item is mascara. I feel like the effect of long and volumized lashes makes the biggest impact on my overall appearance! Without mascara, I feel like my eyes look super tiny and sleepy, which I of course want to avoid. I have been interested in trying a white eyelash primer for a long time now, but I never really saw the purpose in using one since my lashes are pretty long as it is. Plus, I typically use two mascaras (one for volumizing and one for lengthening) so I never really found it necessary to search for another method to achieve eyelash goals. However, when I was browsing some of the top rated products at Sephora and came across the, “Lancôme CILS BOOSTER XL Super-Enhancing Mascara Base,” I decided to try it for myself to really see what the hype was about.

Lancome, CILS BOOSTER XL Super-Enhancing Mascara Base, $25.50


It is described on Sephora’s website as,”A lash-conditioning, mascara primer in the same great formula and new packaging that conditions and primes lashes to maximize results—creating even longer and more volumized lashes.” Reading that description honestly gave me emoji heart eyes because I would love bigger lashes, but would especially benefit from having a conditioning treatment while wearing this product. My eyelashes are constantly falling out and I do worry if it’s because I’m not conditioning them properly after wearing mascara every day. 


This formula is infused with micro-fibers and Vitamin E, which is why you achieve so much extra length and volume before adding your standard black mascara over top! I really noticed that my eyelashes looked thick and much longer with just one coat of the white mascara base. Once I applied my traditional mascara over top, it did go on a little more patchy than it does without a primer. I have a feeling it’s because my natural lashes are brown, so I’m not able to see the gaps that easily, but with a white base, you can really tell the exact places your mascara isn’t coating. With that said, once the black color is built to your desired intensity, it does stand out really well from being applied on the white base, which was a pleasant surprise I never saw coming! Yay!


I wish I could answer my the title of this post and tell you whether this was worth it or not, but I honestly don’t know?! I can’t make up my mind on whether or not I need this product in my life, or if it’s just an extra step that prolongs my getting ready process. Ugh, these are real problems people! I guess I would say that no, you definitely don’t NEED this, but what makeup product does one even “need” anyways? If you have short or sparse lashes and you can’t find a mascara to give you the full effect you’re looking for, then yes, totally get this Lancome mascara base because it will make a difference and I definitely think you’ll enjoy the results! For me personally, I’ll continue using it, but I don’t know if I’ll repurchase! I love the way my lashes look once the process is complete and I really enjoy how much longer my mascara stays dark and vibrant by using a primer! However, it does take awhile to apply the base, then go in with my mascara and make sure all of the white is covered up! If you’ve been on the fence about trying an eyelash primer, then I would definitely recommend giving this one a shot because it really does work great! I also wanted to mention that I used my Sephora Collection “LashCraft” black mascara along with the Lancome mascara base and that combination worked really well for me! I mentioned that mascara in my recent August favorites, so definitely check out that post for a separate review on that product! 


Thank you so much for reading this post! Let me know your thoughts on eyelash primers/mascara bases! I want to know the best strategies on applying as well, so if you have any tips or tricks, please let me know! 

Follow me on Instagram: @abigaillindsayblog

Email any business inquires to:

abigaillindsayblog@gmail.com  

Bronze Eyes and Terracota Lips

One of my new favorite lipstick shades to wear are these warm, terracotta, burnt-orange colors. I mentioned in my June Favorites that M.A.C “Del Rio” is my latest obsession. I find this product to be especially flattering in the summertime when I have a tan and wear less eye-makeup than usual. One of my favorite ways to look like I put effort into my makeup look is to wear a bold lip color and spend less time focusing on my eyes and face. I love the way this lipstick defines my smile and gives a whitening effect to my teeth, even though it isn’t a blue-based red color. Since I kept the eyes and face super easy, I think this look is totally wearable for work or any daytime occasion as well. Feel free to wear this anywhere you want!


I began the look by priming my eyes with Urban Decay primer potion in “Eden” to extend the wear time and prevent any creasing of my eyeshadow. For this look, I used ColourPop’s “Sunset Blvd” eyeshadow all over the lid and blended up into the crease. This shade is a gorgeous, golden-bronze shade that compliments the warmth in the lipstick shade. I used my Too Faced Chocolate Soleil Bronzer in “Medium” to further define my crease. I used a mixture of “Sunset Blvd” and my bronzer to blend onto my lower lash line too. Next I took the eyeshadow, “Smog” from my Urban Decay Naked Palette and drew a soft winged eyeliner. I like the effect shadow liner gives my eyes whenever I am wearing a bold lip because it defines, while still being subtle and allowing the lips to steal the show. Next, I used my Tarte Inner Rim Brightener eyeliner on my waterline to give myself a “wide-eyed” appearance. The last step on my eyes was just to apply two coats of L’Oreal Telescopic Mascara on my upper and lower lashes.


For my face makeup, I did my usual foundation routine and added highlight, blush and bronzer for additional warmth to compliment this look. I would like to point out that the blush photographed very bright and peach, but was more bronze and subtle in person. I like to keep the face fairly simple when doing a bold lip or eye. I find that when I do intense contouring and bright face colors, it can sometimes distract from the statement lip color and throw off the balance of the look. Let me know if you want to see a blog post of my foundation/concealer routine since the products I am using now have changed in the last month!


Now for the star of the show, the lipstick! I am obsessed with M.A.C lipsticks in general and have not purchased a single shade that I do not like! “Del Rio” is such a unique color and I liked it because I had nothing like it in my collection. I used the Revlon lip liner in “Nude” to outline and define. In my personal opinion, I think using natural colors for lip liner pair better with a bold lip than finding that exact lipstick color in a liner and using them together. Sometimes it can be really harsh and noticeable lining your lips with red and then filling them in with red. Plus, if you make any mistakes or overdraw too crazy, it’s much easier to blend out with a nude shade than a bold one. So after lining and filling in my lips, I applied “Del Rio” all over. This is a satin formula, so it provided a subtle sheen. I personally think the satin formulas are the best from M.A.C because they’re richly pigmented, comfortable to wear and last a long time. This product stayed put through eating and drinking and after hours of wear, it still left a pretty stained effect on my lips. 


I got a lot of compliments on this look because it was minimal makeup, but still appeared that I put effort into getting ready. I think a warm lip shade and a bronzy/gold eye are gorgeous for summer, but equally stunning as we transition into fall. If you want to try the dark lip trend, but are too afraid to wear something intense, I would say this lipstick is a great starting point! It isn’t “dark,” but definitely pigmented and bold, so you’re able to make a statement, without feeling like you’re wearing editorial makeup to the grocery store.

       
Let me know if you enjoy reading about the different looks I’m loving at the moment and the products I use to achieve them! I enjoy sharing artistry, but find it’s not always the easiest to write about technique. I have always been interested in creating YouTube tutorials, so if you think I should do that, let me know too! Thank you so much for reading 🙂