Are Makeup Setting Sprays Even Necessary? 

Let me begin by answering the title question; yes, makeup setting sprays are a very necessary part of any makeup look and will completely change the look and wear-time of the products you use. The most obvious usage for these products are to set your face to extend makeup longevity, however there are other ways you can use these mists to get the most out of your money! I want to share with you my favorite makeup setting sprays and the ways in which I use them!

M.A.C Prep & Prime Fix +, $22. Urban Decay All Nighter Long-Lasting Makeup Setting Spray, $30. Tony Moly Pocket Bunny Sleek Mist, $15. SEPHORA COLLECTION Beauty Amplifier Set and Refresh Spray, $16. Smashbox Photo Finish Primer Water (1 oz. Travel Size), $16.


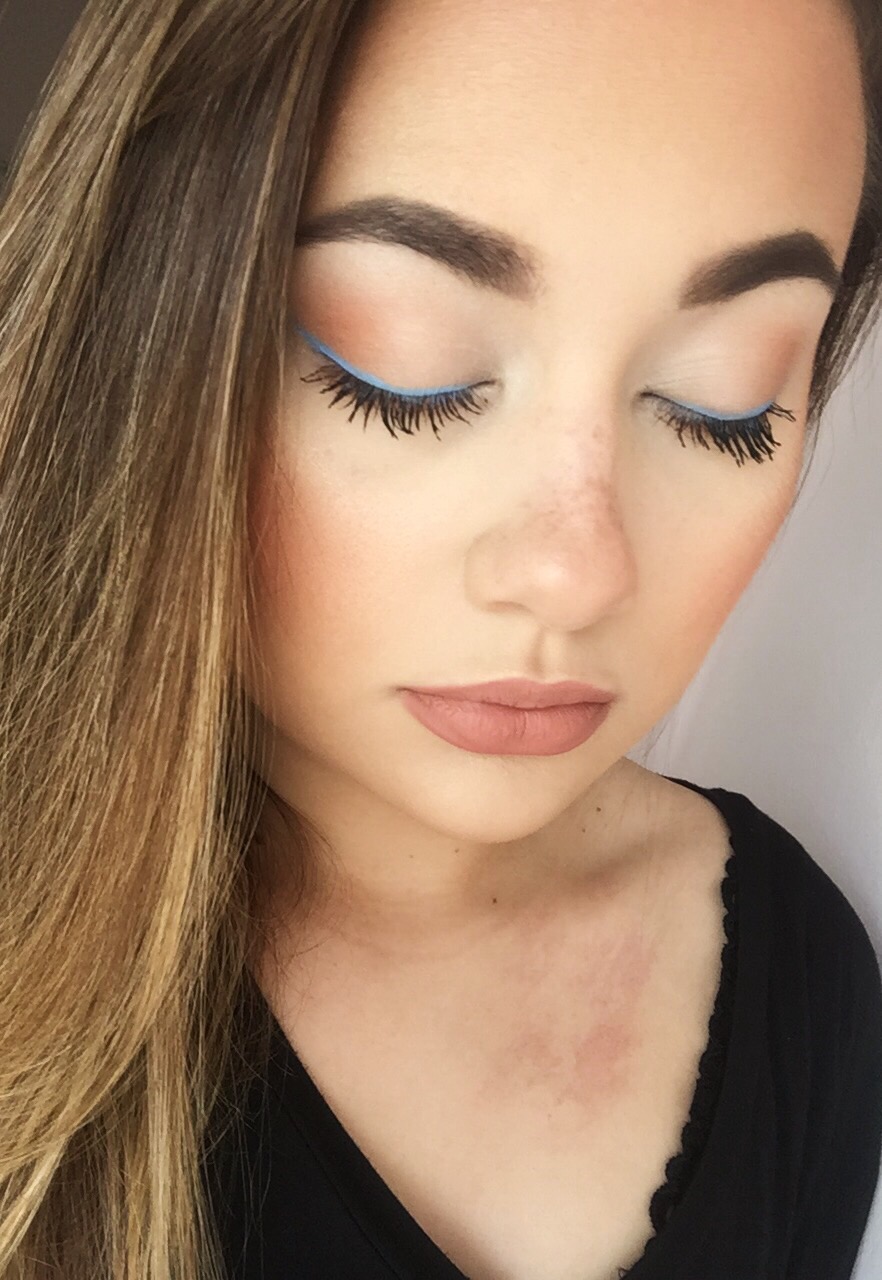
M.A.C Fix + is a setting spray mist that is water-based and lightweight. It refreshes skin after makeup application and will lay all of your powder products flat to reduce the look of a cakey appearance. This is also the best setting spray to use to intensify the look of your sparkly eye shadows! If you spray your eye shadow brush with this mist, then dip into the shadow you want to use, it will then apply in a more foiled effect for a intense pigmentation! You can even use this method if you want to intensify the glow on your highlighting products. This product stands out to me because of the dewy effect it gives to my makeup. It has the power to take an all-powder, matte look and transform it into a natural, seamless makeup look. It can blend out harsh lines from contouring and highlighting, flattening and melting the product into your skin. M.A.C Fix + is truly a one-of-a-kind product that I cannot live without!


My all-time favorite, holy-grail makeup setting mist is the Urban Decay All Nighter Long-Lasting Makeup Setting Spray! If you buy only one of these products from this post, I would suggest this one! For starters, this works on every skin type, from dry to oily, it will extend your makeup longevity! I have tested this spray for years and it can will perform through the coldest months, when your skin tends to get dry and the hottest months, where sweat and oiliness can otherwise cause your makeup to break up! I think this spray is a true setting spray in the sense that it locks in your makeup and extends it’s wear time throughout the day (or night)! You seriously need this product because it will completely change the way your makeup looks and feels and of course, it will make all of your makeup products last longer!

     
A newfound love of mine is the Tony Moly’s Pocket Bunny Sleek Mist! First of all, the packaging is so adorable and definitely was the driving force behind purchasing this product! You will find the mist is very finely dispensed and feels so refreshing on the skin. It is described as an oil-controlling facial mist that is also hydrating for your skin. There are added skincare benefits to using this product because it is formulated with fruit extracts! I definitely think this product controls the oiliness of my skin whenever I use it in the morning to set my makeup. It also softens the overall appearance of my pores, which is an added bonus! This product is also awesome to store in your purse for a refreshing mid-day mist. The only con to this product (which I can definitely see past) is the initial fragrance. It does smell exactly like baby powder, so if you are sensitive to that scent, you may want to stay clear!


The next setting spray that I love using is the SEPHORA COLLECTION Beauty Amplifier Set and Refresh Spray! This is a really awesome product because it is neither mattifying or glowing, it truly gives a natural, skin-like finish to your makeup once you apply it! The price is also great, $16 for 2.7 oz.! I also wanted to mention that this product has a slight cooling sensation when applied to the skin, making it ideal for the summer months. I have found I can increase the vibrancy of my shadows and pigments by spraying this on the brush I am using, so it serves a dual purpose too! From my personal experience with this product, I have found it extends the longevity of my makeup for a couple of hours, but nothing more than that! Unfortunately, it does not do the best job at controlling oil, so I would pass on this product if that is a major concern for your skin type!  


The Smashbox Photo Finish Primer Water is a product I initially felt skeptical about. I could not justify paying for something that claimed to be a glorified water. Luckily, this product really is so much more than that! If you enjoy using products that are free of alcohol, oil and silicone, than this will be your best friend! It is enriched with electrolytes to keep your face moisturized, while locking in your makeup. I have tried this product as a priming spray underneath my makeup and I love the way it performs! It is extremely lightweight and refreshing on your bare skin, but works to fill in pores and smooth uneven texture. I find that my foundation applies beautifully and lasts for a long time when used on top of this primer water. I have also used this product to set my makeup and found it also works well in this form too! It is a product that will not extend the longevity of your makeup for an extreme amount of time, but it will prolong it for a few hours. I have heard it does work better on dry skin because the concept for the formula does focus on hydrating, more than oil-control.

    
I really hope you were able to pick a new setting spray out from the list to try out! Since it is summer and the weather is only getting warmer, I wanted to get this post up as soon as possible! I have noticed such an incredible difference in the way my makeup looks, feels and lasts since beginning to use a makeup setting spray. I still have many more that I want to try, so feel free to leave a comment with your favorite! Thank you so much for reading!
Follow me on Instagram: @abigaillindsayblog

Email any business inquires to: abigaillindsayblog@gmail.com  

How I Make Bold Lip Colors Wearable!

One of my favorite ways to wear makeup in the summertime is a natural eye look with glowing skin and a bright, attention-grabbing lip color. I find that this is the perfect way to wear minimal makeup, but still appear to have taken time and effort to look put together. Keep reading if you want to learn some of my favorite tricks on how to wear a bold lip color, while keeping the rest of your face subtle!      


My first tip is to start with even and glowing skin! I like to use a pore-filling primer, full coverage foundation, highlighting concealer and a matte setting powder to provide a great base that will be long lasting. I next go in with a bronzer that matches the undertone of the red lip product that I’m using. For example, in this post I’m wearing a warm-orange toned red liquid lipstick, so I wanted to use a warm bronzer to match! I find that the juxtaposition when using makeup products with clashing warm and cool undertones can look unflattering and throw the entire look off. This also applies to the blush and highlighter I use as well! Again, I opted for a warm toned coral blush and golden highlight to create cohesiveness! Lastly I keep my eye makeup fairly simple by just using a golden, shimmery shadow all over my eyelid, and blending out my crease using the bronzer I used! I also decided on a black winged eyeliner based on just personal preference, but feel free to skip this step and just focus on really building up your lashes!

e.l.f. Lip Exfoliater, $3. M.A.C. Cosmetics Prep + Prime Lip, $16.50 ColourPop Ultra Satin Lips, in the shade Naked Ladies, $6.

Now onto the fun part; the lips! I really love wearing these coral-orange-toned reds in the summertime because they’re bold, yet wearable! I start off with exfoliating my lips and making sure there is no dead skin that could cause gross patchiness with my lipstick. I love using the e.l.f lip exfoliator because it’s only $3 and tastes like brown sugar! The packaging is in a lipstick holder, rather than a pot, making it very convenient for travel. Anytime I use a liquid lipstick or matte lipstick, I use my M.A.C lip primer underneath to provide moisture and increase longevity! I’ve found that when I use this, my lip products wear off more evenly, rather than in noticeable, random sections. Whenever I choose a bright lipstick, I prefer to make sure the formula is matte for a couple of reasons. Typically matte formulas do not transfer to other areas of the face, meaning that if you’re outside and sweating, your lipstick will not start sliding around and transfer to your chin and around your mouth! I love matte liquid lipstick formulas for bold colors because I don’t have to buy matching lip liners every time since these don’t go out of my natural lip line once applied! I also feel like matte formulas are less harsh, so you can be more adventurous with your color selection! Sometimes when a lipstick is also glossy and also sparkley and also bright, it can be a really attention-grabbing statement that isn’t always desirable for daytime wear. Whenever I wear a bold color lipstick that is in a matte finish, I find that it doesn’t overpower my entire look and demand awkward, judgmental staring from strangers. That is just my personal opinion though and what I have found makes me most comfortable on a day-to-day basis with my makeup! I have talked about the ColourPop Ultra Satin liquid lipsticks in other blog posts and I still stand by my initial review of this product being so good! They are extremely comfortable, do not wear off and at a great price point of only $6! They have so many shades online, so you’re bound to find something you love! This shade, “Naked Ladies” is a beautiful coral-red that I got so many compliments on when wearing. I would highly recommend you check it out! Let me know your go-to, summer, bold lip color and your favorite liquid lipstick formulas! Thanks for reading! 

Best Bronzers For Any Budget!

Hourglass Ambient Lighting Bronzer, Luminous Bronze Light, $50. Too Faced Soleil Matte Bronzer, Chocolate – medium to deep, $30. Too Faced Beach Bunny Custom-Blend Bronzer, Beach Bunny – bronze/ soft peach/ golden ivory/ golden tan, $30. Physicians Formula Butter Bronzer Murumuru Butter Bronzer, Bronzer, $14.99. Physicians Formula Bronze Booster Glow-Boosting Pressed Bronzer, Medium, $14.99 L’Oreal Glam Bronze Bronzer Summer Collection, Glam Bronze Medium, $14.99.


Bronzers are an essential makeup item during the warmer months. If you’re like me and enjoy looking bronzed on a daily basis, I have some favorite drugstore and high-end bronzers to share with you that I think you will really enjoy! I wanted to break these bronzers up into a few different categories, such as price, color and finish. These are the best formulas in those three different categories in my opinion, so I wanted to share my favorites with you and hopefully help you find a good match that fits your personal preferences!    

Hourglass Ambient Lighting Bronzer, Luminous Bronze Light, $50. Too Faced Beach Bunny Custom-Blend Bronzer, Beach Bunny – bronze/ soft peach/ golden ivory/ golden tan, $30. Too Faced Soleil Matte Bronzer, Chocolate – medium to deep, $30.


We will begin with bronzers in the high-end category that are available for purchase at Sephora. My ride-or-die favorite is the Too Faced Chocolate Soleil bronzer. I have been using this product since I was a sophomore in college (aka 2011!) and have never been without it! This is the type of bronzer that goes perfectly with my skin tone no matter the season, so I always like to have it available in my collection. First of all, it smells like chocolate; so that is enough reasoning for you to run out and purchase it immediately. Second of all, it comes in three different shade ranges so you can choose the best match for you, I am in the medium shade known as, “Chocolate.” The formula is creamy and blends seamlessly into the skin. This color is on the cool-toned shade range, which makes it perfect to contour and bronze all at the same time! It is also a matte finish bronzer so if you prefer that look, or have problems with texture on the skin you do not want to emphasize, I think you would really love the smoothing effect of this product. I cannot say enough good things about this bronzer and definitely will keep repurchasing for years to come!


The next high-end bronzer I wanted to mention is also from Too Faced, however it is drastically different than the Chocolate Soleil! The Beach Bunny bronzer is a shimmery, glowing formula of bronzer that has a warm undertone when applied to the skin. It is beautiful for the warm weather when you want your skin to glow and reflect in the light. I would describe this product as having a sophisticated shimmer because it is definitely not glittery by any means. I also love wearing this product as an eye shadow whenever I want to use minimal products on my face. It is a really long-lasting product, as all Too Faced face products seem to be. My favorite way to apply this product is with a big, fluffy brush over the high points of my face for an all-over, artificially sun kissed glow.


Lastly, I had to mention the most luxurious makeup product I own, my Hourglass Ambient Light Bronzer. I honestly cannot believe I paid $50 for a bronzer, but I was so intrigued by the idea of a bronzer being mixed with a luminous swirl of light reflecting powder. I picked up the lightest shade of this formula after reading reviews that the Medium shade looked really orange once applied on the skin. Whenever I wear this product, I am blown away by the finish it gives on my skin. It can be described as a sheer, but buildable formula that naturally bronzes your appearance. Since I do have an olive skin tone, this is more of an all-over face product for me. I use it when I want to give my entire complexion a glowing, bronzed look! This product is not shimmery or sparkly, it truly just has a glow to the formula that is so subtle, people will really think you have this gorgeous, healthy skin naturally! I am always receiving compliments whenever I wear this bronzer!

L’Oreal Glam Bronze Bronzer Summer Collection, Glam Bronze Medium, $14.99. Physicians Formula Bronze Booster Glow-Boosting Pressed Bronzer, Medium, $14.99 Physicians Formula Butter Bronzer Murumuru Butter Bronzer, Bronzer, $14.99.


Of course, I had to mention my favorite bronzers that can be found at your local drugstore! There are so many good inexpensive bronzers out there, but I narrowed it down to my current favorite three. One of my very first makeup products that I ever bought was the Physicians Formula Bronze Booster. When I first started wearing this product in high school, I didn’t realize how great it was without any prior product knowledge to compare it to. Now that I have tried dozens of bronzers in every price range, I can confidently say this is one of the best. It is a very terracotta, warm-toned bronze shade with slight gold shimmer. It is extremely bendable and will look perfect with any makeup look. I love wearing this bronzer throughout the summer because it doesn’t fade regardless of the hot, humid weather and has the perfect amount of subtle shimmer to give the skin a pretty, sun kissed effect.     

The new Butter Bronzer, also from Physicians Formula, is a gorgeous light bronze, matte shade that truly smells like a tropical vacation. I honestly can’t get over how good this product smells, it reminds me of a pina colada! Even if you don’t purchase this product, you should seriously smell it whenever you see it out in stores. The formula is very smooth and blends so beautifully into the skin. It is a satin-matte finish, which is extremely natural looking. I have my Butter Bronzer in the darkest shade called, “Bronzer” and even that is very light on my skin tone, so this is definitely suited for fair-light gals! They also have a shade even lighter than this, so check it out if you have a hard time finding a bronzer that doesn’t look too harsh! I’m so happy I picked this product up because it’s a perfect neutral brown shade, which are hard to find at the drugstore! I think the packaging is so beautiful and again, I cannot stress enough just how good this bronzer smells! 


I did a full blog post on this L’Oreal Glam Bronze bronzer and wanted to update you on just how much I’m loving it! I use this product on a daily basis because it’s very wearable and easy to blend. I find that this is a product that takes little-to-no effort to blend and instantly gives me that warm bronze shade that looks like I just got out of the sun! I still love this formula and find it to be very long lasting. It is a satin-matte bronzer because it does have slight shimmer in it, but once blended on the skin, it resembles the look of a matte bronze. I think the packaging is great because the pan size is huge; making it easy to swirl your bronzer brush around and pick up product evenly. I love using this bronzer with a warm toned blush and gold highlight because I feel so summery and glowy! 


I really hope you enjoyed reading this post! Hopefully you found a bronzer to pick up next time you’re shopping! Let me know your favorite bronzers because I enjoy testing them out and adding to my collection! 

Review and Swatches of Becca X Jaclyn Hill Champagne Collection – Face and Eyeshadow Palette!

The limited-edition Becca X Jaclyn Hill Champagne Collection was highly anticipated by all! Once I found out the collection was being released online on May 26, I set my alarm for 12pm and ordered immediately! Acting like a crazy woman paid off because this entire collection sold out within the first hour! If you don’t already know about Jaclyn Hill, she’s a very popular beauty YouTuber and is one of my favorite girls to watch! She’s extremely knowledgeable about products, genuine in her approach, artistically talented and just absolutely beautiful! I highly recommend you subscribe to her channel! I already own a full-size Becca Champagne Pop highlighter (and love it), so I knew I wanted to purchase the limited-edition Face Palette and Eyeshadow Palette to add to my collection! If you didn’t get your hands on the products you wanted from this limited-edition set, have no fear! The full collection will be available in Sephora stores for purchase on June 16th! 

Becca x Jaclyn Hill Champagne Collection, Champagne Collection Face Palette, $52 ($132 value)


The Face Palette has two shades of highlighter and 3 shades of blush to illuminate your entire face look! The formula of the highlights are extremely pigmented and can be layered to create an intense glowing effect. They are both extremely long-lasting as well! The original Champagne Pop is a very peachy-toned, champagne colored highlight, while the new Prosecco Pop is a light gold, warm-toned shimmer. Both are absolutist beautiful and will be a must have for the summer months! The blush shades are Rosé Spritz, Amaretto and Pamplemousse. My current favorite way to wear these shades is to take Pamplemousse on my cheeks and Rosé Spritz right on the apples. I find that because Rosé Spritz is a shimmery blush, it really looks beautiful dusted on the front of whatever blush color you’re wearing to bring out that all over face glow, without emphasizing pores, as some shimmery blushes tend to do when applied all over the cheek area. These blushes are very sheer in formula and look beautiful layered on top of each other. They aren’t the longest lasting blushes I own, but I would consider them to last about 5 hours until fading, which isn’t terrible! I also think the shades are going to look really beautiful on every skin-tone, which is awesome that Becca and Jaclyn Hill took that into consideration when choosing these colors!

Becca x Jaclyn Hill Champagne Collection, Champagne Collection Eyeshadow Palette, $40.


The Eye Palette includes the shades Chardonnay, Champagne Toast, Cordial, Cognac and Bordeaux! This palette of both shimmer and matte shades is very versatile, making it wearable for daytime and nighttime looks! To be completely honest, these are not the best quality of eyeshadows I own. Yes, they are pigmented and blend out beautifully on the eye, but I noticed they fade pretty quickly even with a primer. My favorite color is Champagne Toast because it’s a beautiful warm bronze shade (my favorite) and it was unfortunately the most disappointing shadow in this palette. It faded from my eyes within the first couple hours and by the end of the day had completely disappeared. The matte shades are longer lasting in pigmentation and didn’t fade as terribly on my eyes. I am going to keep using this palette and try to find ways to make it work because the colors are so beautiful, but I definitely would recommend other eyeshadow palettes before this one. 

Becca x Jaclyn Hill Champagne Collection, Champagne Collection Face Palette, $52 ($132 value) Becca x Jaclyn Hill Champagne Collection, Champagne Collection Eyeshadow Palette, $40.

   
If you only want to buy one item from this collection, I would highly recommend the Face Palette. It’s highly pigmented with beautiful shades selected for any skin tone. I think you will really love how this product layers on your skin, making it versatile enough to compliment many makeup looks. This Face Palette will be the perfect traveling companion for summer beach trips when you want your makeup to be pretty and glowy, without having to pack multiple products! Unfortunately, I wouldn’t recommend the Eyeshadow Palette because it just fades so bad! The sheer pigmentation of these shadows just doesn’t work for me. Let me know if you have a primer or special secret to applying these because I truly do want to make them work! Thank you so much for reading this post, leave me a comment below if you have this collection and what your thoughts are on these products! 

Nighttime Skin Care Routine

Clarisonic Mia 2 Skin Cleansing System, $149. First Aid Beauty Ultra Repair Wash, $25. Origins Original Skin Renewal Serum with Willowherb, $39. Origins Dr. Andrew Weil for Origins Mega-Bright Dark Circle Minimizer, $42. Origins High Potency Night-A-Mins Mineral-Enriched Renewal Cream, $43. It Cosmetics Confidence in a Cream Transforming Moisturizing Super Cream, $48. SEPHORA COLLECTION Mud Mask Purifying & Mattifying, $20.


Here is my nighttime skin care routine that I have been using for the last few months! I feel like I can see a noticeable difference in the way my skin looks and feels. Some of my personal problem areas are enlarged pores, uneven texture, dullness and dark spots. So far, I have noticed a significant decrease in my uneven texture and dark spots. I am so thankful that they have started to disappear because now I feel confident even when I am not wearing foundation! I accredit a lot of my skin’s improvement to my Clarisonic. I started using it in July of 2014 and was immediately blown away by the results. My texture has improved significantly and I believe the exfoliating properties have brightened the overall tone of my skin. Whenever I stop using my Clarisonic, I instantly notice my skin looking dull and patchy. I fully believe that the improvements I’ve noticed over time are because of this device. If you only invest in one skin care item from this post, I would highly recommend purchasing the Clarisonic because it has changed my skin completely and is the reason I no longer suffer from cystic acne breakouts. All of these products mostly stay the same throughout the year, but I do switch up certain products based on the season, since sometimes I suffer from oily skin in the Summer months! This is the current routine that I have been using for the past four months and truly believe my skin has never looked better!

Clarisonic Mia 2 Skin Cleansing System, $149. First Aid Beauty Ultra Repair Wash, $25.

I always shower at night, so I begin my nighttime routine with washing my face! I rinse my face a few times with just water to break down the majority of my makeup. Next, I place the First Aid Beauty Ultra Repair Wash onto my face and gently work the product into a slightly foamy texture. I then make sure my Clarisonic brush head is wet to begin cleansing! If you don’t know already, this device washes your skin through sonic pulses that feel like vibrations on your face! This is supposed to cleanse on a deeper level and resurface the appearance of your natural skin. 

It Cosmetics Confidence in a Cream Transforming Moisturizing Super Cream, $48. Origins High Potency Night-A-Mins Mineral-Enriched Renewal Cream, $43. Origins Dr. Andrew Weil for Origins Mega-Bright Dark Circle Minimizer, $42.

After I cleanse my face and have completely dry skin, I begin to moisturize! For whatever reason, the second I get out of the shower, the skin on my face dries so tight! It’s borderline painful how dry my skin feels after cleansing, so I have to use a moisturizing cream in order to hydrate and plump my skin back up to normal. Right now, my absolute favorite mouisturizer is the It Cosmetics Confidence in a Cream Transforming Moisturizing Super Cream! I feel like this is really different from other night creams because its intensely hydrating without feeling greasy! Your skin will look noticeably more youthful because it gives so much added moisture to your face! I love taking this product down my neck and décolletage to make sure that skin does not wrinkle or look aged! I think this night cream would be amazing for skin of any age. I also think you would love this if you have a skin type of combination to dry. If you have oily skin, I do think you may find it to be too heavy and thick! However, if you do suffer from oily skin, I have a great nighttime moisturizer for you too! A major misconception among those with oily skin is that they should not use a night cream because their skin produces so much moisture already. This is false! Whenever you have an oily skin type, it typically is derived from your skin not recieving enough moisture, so your glands produce excess to make up for the amount its missing! My best suggestion would be to use an oil-free night cream formula that is non-comodegenic (will not clog pores) so you are recieving just the right amount of hydration. My favorite oil free moisturizer is by Origins. The also comes in a form that is not oil free, so make sure you read the packaging closely. I have fallen in love with both formulas and truly believe they deliver on every claim they make. 


Now for eye cream! Okay so this is an area I may need help in… As you may know, dark circles are a major problem area for me. Not a day goes ny where I dont need concealer. It is that bad. So of course I am trying to find a holy grail dark circle diminishing eye cream! The one I am using right now is really nice, but I’m not sure if it’s actually working. I love the fact that it’s non-greasy and hydrates my under-eye area, however I have not noticed a difference in lightening my dark circle area. So I wanted to show you what I am using, however it is not a product I am wow-ed by or want to recommend. So if you have an eye cream that you love and think would work for me, please let me know!

Origins Original Skin Renewal Serum with Willowherb, $39. SEPHORA COLLECTION Mud Mask Purifying & Mattifying, $20.

I love these two products to use every 2-3 days! The first is a serum that is all natural and fixes the texture on your skin. Any small bumps or dry patches are diminished by placing this product over your night cream. I’ve also seen this product make a significant difference in the size of my pores! I love that this product works perfectly in conjunction with the rest of my skincare products and compliments my skin type perfectly. The mask from Sephora is supposed to be a dupe for the Glam Glow Super Mud Mask! I definitely do think these two are comparable! It’s a zinc and copper mud mask that unclogs pores and fades the appearance of blemishes. I personally don’t use this product all over my face and prefer to do a spot treatment application on any bumps or acne I feel that’s coming on! It is a miracle worker and dries up any blemish in one night! It also fades the look of acne scarring, which is really helpful if you have sensitive skin like me and find a lot of fading products break you out! 
Thank you so much for reading this post! I wanted to mention that all of the products I use are Paraben-free! If you have any really great, all-natural skincare favorites, please let me know! I really am in desperate need of a new dark circle diminishing eye cream, so help me out! 😂 Also I really want to do a morning skin care routine, so leave me a comment if you would me interested in that too! 

Creating A Subtle Look With Colorful Eyeliner

I really wanted to do a post on how I wear colorful eyeliner in the most subtle way. Sometimes I want to go out of my comfort zone with makeup, but personally do not feel very confident when I’m wearing bright, attention grabbing looks on a day-to-day basis. If you are like me and want to experiment with a unique eyeliner color, like blue or purple, but also want to keep the overall makeup look understated, then keep reading! 


To start off this makeup look, I begin with my face. I like to make sure that my skin looks as flawless as possible, so my eyes will pop. Of course I use a primer and a full coverage foundation to give myself a smooth, even canvas for my powder products to lay nicely on. I then try to use soft colored blushes and bronzers so my face appears to be the most natural part of my makeup. I find that when you have multiple attention grabbing elements on your face (dark eyeshadow, bright lips, shimmery blushes) you can sometimes overpower the entire look, making it hard to concentrate on your natural features, while appreciating the area you are emphasizing. On my lips, I used a matte, nude liquid lipstick from ColourPop to stay cohesive with the natural vibe I’m going for with this look! 

   
Once you have your face completed, it’s time for the fun part; the eyes! If I’m doing a bold, colorful eyeliner look, I make sure to keep the eyeshadow neutral and understated. I find that this technique makes the eyeliner pop because it stands out when placed on a blank canvas. I usually choose a light, matte eyeshadow color to place all over the lid and blend a neutral tone shade into my crease for slight definition. Next is the fun part! The blue eyeliner I used in this look was in a pencil form so I simply drew a line on my upper eyelid and then a slight wing off of the end. Lastly, I used the mascara routine that I posted about in April, to give my eyes added definition! 

Too Faced, Peanut Butter & Jelly Eyeshadow Palette, $36. ColourPop Creme Gel Liner, In the shade: “Prance”, $5.


This colorful eyeliner look really does come across as understated and simple, even though you’re incorporating a unique color into your makeup. Whenever I wore this out, no one even noticed I was wearing blue eyeliner until I pointed it out! Also even though I used blue, I think you could use any color and it would look equally as cool! I think this periwinkle-blue shade is really beautiful for Spring, so that’s why I used it! 

    
Let me know how you like to incorporate bright makeup products into a subtle look! I’m always looking to try out new ways to give my ordinary makeup a unique pop! Thank you so much for reading!

May Favorites! 

I love reading other bloggers monthly favorites, so I wanted to do one of my own! I included beauty, fashion and lifestyle favorites! Let me know if you enjoy reading posts like this and want me to do other monthly favorites in the future! Thanks for reading! 


Beauty       


Elizabeth and James, Nirvana White Eau de Parfum Spray, $80.

This perfume is described on Sephora’s website as a “blend of delicate peony, chic muget, and tender musk for a feminine scent with dark sophistication.” I have a hard time with most floral perfumes because they tend to give me headaches, however this one does not! It’s really difficult to describe scents, but I will try my best to convey my thoughts! Nirvana White is a very light floral scent that is mixed with a warm note that I can’t pinpoint! I think the idea of such a natural, floral scent gives this perfume more of a refreshing vibe that I haven’t experienced before! It lasts really long into my day and I get compliments every time I wear it! It is by far my favorite daytime scent!


Dermadoctor, KP Duty Dermatologist Formulated AHA Moisturizing Therapy For Dry Skin, $10.

I think this is the perfect product for Summer if you struggle with severe dry skin like I do! Dermadoctor’s products include, “a patented blend of glycolic acid, green tea extract and urea to help exfoliate, calm and hydrate,” which are all great ingredients for sensitive skin! As long as I can remember, I’ve had rough bumps on the backs of my arms. It’s a huge insecurity of mine because in the summertime I’m always wearing short sleeves and tank tops that reveal this problem area. Luckily, I’ve found this lotion that has significantly decreased the look of bumpy skin on my arms! On Ulta’s website it’s listed that this product, “Helps improve the appearance of parched skin and rough chicken skin bumps (like keratosis pilaris).” So good news, if you’ve always struggled with uneven texture on your body, this lotion will fix it for you! 


Loving Tan, Deluxe Bronzing Mousse, in shade “Ultra Dark,” $39.95.

This bronzing mousse by Loving Tan has the best formula by far when compared to my old favorites, St. Tropez and Vita Liberata. The color is FLAWLESS! It’s a deep olive-based, natural looking tan, rather than your standard orange or red undertone formula. The best part about this product is its longevity! On my skin, I can maintain my Loving Tan application for up to 5 days until it starts to fade! With other self tanners, I would notice it wearing off by the second day! I encourage you to check out their Instagram for before and after photos so you can see the difference I’m talking about! 


Becca Cosmetics, Becca x Jaclyn Hill Champagne Collection Shimmering Skin Perfector Pressed, in shade “Champagne Pop,” $38.

If you don’t have this product, you need to go on Sephora’s website and purchase it immediately! If I could only recommend one highlighter to you, I would say Champagne Pop by Becca every time! It is universally flattering on every skin tone and truly unique in color. It’s highly reflective with peachy, champagne undertones. It looks gorgeous for daytime or night looks and lasts all day long! It’s a beautiful, buttery product that I know you’ll enjoy no matter what! I’ve been wearing it non-stop during the month of May! 


Laura Mercier, Translucent Loose Setting Powder, $38. 

This product is something I never want to be without. I never understood the hype over using translucent setting powders because I thought if they didn’t provide any extra coverage, then what was the point? Well, this powder has changed my opinion completely! It’s silky-smooth texture fills in pores and leaves your skin looking matte in areas you would tend to get oily (t-zone). It never looks cakey, which some tinted foundation powders can tend to do! Another reason I love this is because it does not have any flash back! A lot of translucent powders will show up as a white cast on your face in flash photography, but for whatever reason, this powder does not! Believe the hype and go buy this powder for the summer months! 


Too Faced, Melted Liquified Long Wear Lipstick, in shade “Fig,” $21. 

I’m absolutely in love with the formula on these lipsticks! It’s a very comfortable and creamy matte that you apply out of a lipgloss-like tube. I love many of the shades in the range, but in particular, I think the shade “Fig” is perfect for the spring months! It’s a beautiful, violet shade that is surprisingly subtle. These lipsticks are non-drying and leave behind a pretty stain once they’ve worn off! I have worn this lipstick so much throughout May and always receive compliments on the color of this product!


Nivea, Men’s Sensitive Post Shave Balm, $6.49.

If you’re new to makeup and want to build your collection with an inexpensive primer, you need to try this Post Shave Balm instead! Yes, it sounds crazy and this is definitely a product marketed towards men…however, the ingredients in this formula match many of those in high-end face primers! It smooths skin, extends the longevity of your makeup and moisturizes at the same time! I have the one labeled for sensitive skin and haven’t broken out once from this product. The trick to using this product is to rub it into your face long enough to feel it get tacky. You want your skin to feel borderline sticky and then apply your liquid foundation on top! Shout out to NikkieTutorials on YouTube for this amazing drugstore find! 


Fashion 


I wanted to add in some of my fashion favorites for the month of May as well! I’m not going to go into detail about each of these products because this is a beauty blog, but let me know if you would like to see some fashion posts! My Converse are comfortable to wear and go with any outfit! I love wearing these with casual outfits or t shirt dresses! My favorite loose jeans are the Tomgirl style from AE! They are baggy and on trend, without being unflattering. My fringe bag is my new favorite thing! I love crossbody styles and find that this color matches every outfit. I was really happy that I could find an inexpensive, but high quality bag that has this trendy fringe style! These are items that I’m wearing on repeat all month long and wanted to let you know about!    

Converse Chuck Taylor All Star Lo Sneaker, Optical White, $49.99. American Eagle, Tomgirl Jeans, $49.95. Nordstrom, BP. Layered Fringe Crossbody, $28.


Lifestyle     

I also wanted to include some lifestyle favorites of mine that I’m loving! This bottle will keep your water ice cold for 24-hours without melting your ice! I’ve been using this product on a daily basis and never want to be without it during the summer months! My Erin Condren Life Planner keeps me organized every day! It’s durable on the outside and has beautiful colored pages on the inside! Lastly, my snack obsession are the Snap Pea Crisps in the Caesar flavor! I promise you’ll be hooked on these after you try one! They satisfy the need for something crunchy, without being high in carbs and fat! 

S’ip by S’well, Jelly Bean Green Stainless Steel Water Bottle 15oz, $24.99. Purchased from Target! Erin Condren Life Planner, price varies. Snap Pea Crisps, Caesar, $1.99.

My Favorite Blushes!

I have a weakness for blush. As you’ll soon find out, my favorite shade to wear is a very warm toned, peachy-pink. I find these are very complimentary to my olive skin tone and usually match the bronzey makeup looks I do on a regular basis. In my opinion, blush brightens my overall look and provides a natural flush of color to my cheeks that I otherwise do not have. I don’t go a day without it because I feel that it marries my bronzer and highlight together, filling in any gaps of bare skin. Even my “no-makeup” makeup looks incorporate blush application. I think it’s one of the easiest ways to look more awake too! By providing this flush of color, you will liven your complexion and create a youthful glow.


I’ve tried out so many blushes, ranging from inexpensive to very high end. I really think I’ve pinpointed my favorite formulas based on smoothness of application, pigmentation and longevity. By far, the best blushes I’ve tried and own are the Tarte Amazonian Clay Blushes. These babies are in a league of their own! I’ve never found a blush that’s anywhere close to as good as these are. They apply softly on the cheeks and the color does not fade throughout the day! Tarte advertises that they’re a “12-hour wear” formula, but these have definitely lasted on my skin for much longer! It’s really rare that every blush shade in a brands collection is equally as amazing and these truly are! I have no doubt that any color you choose will be your new favorite! I started wearing these blushes five years ago and they are still the ones I keep repurchasing to this day! Here are my absolute favorite shades that I would categorize as must-haves! 

Tarte Amazonian Clay 12-Hour Blush, $28. Top Row Shades: “Peaceful” and “Natural Beauty” Bottom Row Shades: “Tipsy” and “Glisten”


The next blushes that I love are from Too Faced! The Too Faced Love Flush Long-Lasting 16-Hour Blushes are really nice! Very pigmented and apply super evenly on the skin. I personally think the formula is more on the sheer side, which is nice if you prefer to build up color in a natural way. I definitely stand behind the claim that these last for 16 hours! I do think they start to fade after that point, unlike the Tarte blushes! Also I’m obsessed with the packaging of these blushes because they remind me of Polly Pocket, so cute! The next blush I have from Too Faced is their Sweetheart Perfect Flush Blush! These boxed blushes are also in adorable packaging that holds the beautiful, baked, ombré blush inside. I think this color is so pretty when I swirl my brush to pick up all three colors at once. The formula has fine gold shimmer throughout and shows up on the cheeks as a subtle glow that’s perfect for summer! Although Too Faced doesn’t advertise this as a long-lasting blush, this particular color held up for an entire work day on my skin and did not lose any vibrancy over time. I highly recommend you check out the other shades in the range because they have something for every skin tone! 

Too Faced Love Flush Long-Lasting 16-Hour Blush, $26. In the shade: “I Will Always Love You.” Too Faced Sweetheart Perfect Flush Blush, $30. In the shade: “Sparkling Bellini.”


Lastly I wanted to include the Becca Afterglow Palette, which can be found exclusively at Ulta. I found this palette was a great way to try some of Becca’s Mineral Blushes as well as their Shimmering Skin Perfectors! I already owned the white-gold highlight in the palette called “Moonstone” and use it to achieve an intense icy glow on the tops of my cheekbones. The Shimmering Skin Perfector Pressed in “Rose Gold” and “Topaz” are more of a blush topper for me personally! I apply these on top of the blush I’m wearing to give me an all-over illuminated glow. The Mineral Blush in “Wild Honey” and the Mineral Blush in “Flowerchild” are absolutely stunning! Both are extremely different in color, but equally as gorgeous. My personal favorite is “Wild Honey” because it’s unique to any other shade of blush own and is universal enough to match any makeup look! The Becca Mineral Blushes in this palette sadly only last about 6-8 hours on me before I feel like I need to reapply, but with that said, the smooth texture and pigmentation on these products outweigh any cons. I’m so excited to try more of these colors and put them to the test during the Spring and Summer months! 

Becca Afterglow Palette, $39.50. The blushes and highlight in the palette are in the shades: Shimmering Skin Perfector Pressed in “Moonstone.” Shimmering Skin Perfector Pressed in “Rose Gold.” Shimmering Skin Perfector Pressed in “Topaz.” Mineral Blush in “Wild Honey.” Mineral Blush in “Flowerchild.”


I hope I gave you some good suggestions on different brands of blushes to try! I know a lot of the shades are similar, but these peachy-pink tones are my favorite to wear! Let me know your favorite blushes because I’m always willing to step out of my comfort zone and try new ones! Thanks for reading! 

Cream Contour and Highlight Routine 

I wanted to share how I contour and highlight my face for special occasions! I am often asked how I achieve a full coverage, evenly blended, contoured look. On a day-to-day basis, I definitely do not use a cream contour because in my opinion, it’s not necessary. I opt for this routine whenever I have a special occasion, when I need my makeup to last and stand out in photos. 

    
With contouring, you really want to make sure you adapt the placement of lines to your face shape. My face shape is a mix between square and round (so annoying) so I draw lines based on where areas of my face need to appear more sculpted. The darker colors should be placed in the hollows of your cheeks, where you want to create a shadow. If you want to sculpt your chin, draw lines at your jawline and blend underneath. If you want to minimize your forehead, darken your temples and hairline. This is the basic rule of E and 3. Think of drawing an E shape on the right side of your face (temples, under the cheeks and jawline) and a 3 on the left side of your face. This will serve as a guideline on where to place the darker colors you use for contouring. I also like to contour the tip of my nose so it appears more slim. As far as highlighting, you can use a concealer or a light colored highlighting stick to place in the areas you want to bring out in your face. For me, this is underneath my eyes to brighten my dark circles. To even things out, I’ll place some concealer in between my eyebrows and into the center of my forehead and on the tip of my chin. If you want to get a super sculpted appearance, you can place the concealer underneath the contour on your cheekbones to chisel this area out more.

I like using the Smashbox Step-By-Step Contour Stick Trio for my cream contour because you can be very precise with your application. Since they’re in a stick form, you can place the product directly on your face without the need for a brush. The formula is dry enough to stick to your skin, but also creamy enough to blend out seamlessly.

My cream contour and highlight routine begins with the application of primer all over my face and a light layer of foundation. You want to choose a foundation that is light-medium coverage so that you can add the extra layers of cream products and not look cakey. Next I take my “Contour” colored stick and draw lines around my forehead, temples, underneath my cheekbones and jawline. I then place the “Bronzer” shade directly above the “Contour” lines to add warmth to my look. I find that when I blend these colors out together, they create my perfect contour shade. Next I add a concealer that’s 1-2 shades lighter than my foundation in the areas I want to highlight. For extra brightness I apply the “Highlight” shade on top of the concealer. 

     
Once I have the lines placed on my face, it’s time to begin blending! This process can be tricky if you rush through it. The worst mistake you can make is to use the same brush to blend out the dark areas as well as the highlighted places. You’ll end up with a muddy and non-sculpted look. So make sure you take your time and blend out the contour first with a brush and then the highlight with a different brush. I use a Real Techniques buffing brush for my contour and my beauty blender for my highlight. 

Before: With only a light layer of foundation. After: Blended out cream highlight and contour. Set with Kat Von D powder contour kit.

Now that everything is blended out, I set my entire face with a loose translucent powder. My favorite is by Laura Mercier because it’s lightweight and never looks overly powdery on my skin. Since I’m extra, I set the places I cream contoured with a powder contour and do the same with the highlighted sections. I use my Kat Von D contour palette to do so. I think this extends the longevity of my cream products and is especially useful in situations where my skin gets oily. If you haven’t tried using a brightening powder underneath your eyes, I highly recommend it even on a day-to-day basis!

Smashbox Step-By-Step Contour Stick Trio, $45. Kat Von D Shade & Light Contour Palette, $46. These products can both be found at Sephora!

To finish the entire look, I spray a setting mist to lay all of my powder products flat and make sure my makeup lasts all day long. I really hope you enjoyed this post and have a good idea of contouring and highlighting after reading! It can be pretty tricky, but with a lot of practice, you’ll learn the best look for your personal facial structure! Again, I only do this full routine whenever I have a special occasion or an event where photos will be taken, but feel free to do this on a daily basis if you really enjoy the way it looks! Thanks for reading! 

Yay for the finished product!

L’Oreal Glam Bronze Bronzer

This gloomy weather has been making me crave Summer. Since I can’t naturally achieve my desired tan, glowy skin at the moment, I decided to cope the best way I know how and buy a new bronzer. Whenever I walk into any drugstore, I always check out the new makeup collections displayed in the front. I noticed L’Oreal’s new products for Summer right away because they were in sparkly orange packaging. Once I examined the new “Glam Bronze Bronzer Summer Collection,” I noticed there were three different shades in the range to suit light, medium and dark skin tones. I chose the shade “Glam Bronze Medium” because the shade was uniquely the perfect mix between a cool and warm toned brown. I also could see that there was visible gold shimmer on the pan, but I personally like my bronzers to have a sheen to them! Especially in the summertime for an added healthy glow to the skin!     

Glam Bronze Bronzer Summer Collection, Glam Bronze Medium, $14.99.


So now onto the actual review of the product! I’ve only been testing it for about a week, so these opinions are based on my first impressions! Beginning with the packaging, I really feel like for drugstore it’s pretty solid! It doesn’t feel super luxurious, but I also don’t think it’s flimsy like some other drugstore packaging can be. I think the size of the bronzer is amazing! The pan is huge so you can fit any sized brush into the product. Sometimes I like to use a large powder brush to lightly sweep bronzer all over my face for a natural, non-contoured effect, so pan size is important!   

Such a beautiful woven pattern stamped onto the bronzer. Love the attention to detail, L’Oreal!


The consistency of the bronzer is really different, in a good way! It feels like a hybrid between cream and powder. When swatched, this bronzer feels super silky on the skin, which is nice because most powder bronzers can be slightly chalky and have a lot of fallout. This bronzer is very evenly pigmented and doesn’t transfer the visible glitter that is on the pan, onto your face. I have a feeling it is an overspray and once I use the entire top layer of this product, a satin bronzer will be underneath! Overall this bronzer applies in a really natural way once on the skin. I believe the unique silky texture forces this product to blend in with your skin without any harsh likes. Once finished applying this bronzer, it truly just looks like a natural tan. 


As far as the longevity of this product, it lasted throughout an entire work day for me. This time lapse included applying at 7:00 am and arriving home at 6:00 pm. I would say once it was 8-9:00pm, I noticed it was broken up and patchy around my forehead. This is probably due to this area of my face falling victim to oiliness! Other than that, the product lasted nicely throughout my entire day! I did find that setting my entire face with a makeup setting spray (I use Urban Decay All-Nighter) did extend the wear time of this bronzer, but it honestly does that with any bronzer that I wear. 


I think this bronzer is perfect for someone who enjoys a neutral bronze shade. One that isn’t too warm and orange-based, or too cool with a gray undertone. It really looks so natural on the skin and melts in with the rest of your face products seamlessly. At $14.99, it is pricey for drugstore, but L’Oreal tends to be. I think with the amount of product you receive, the price can be justified! Again, you can usually find good deals on L’Oreal and other drugstore brands if you research what weekly sales are happening in your area, so try to get an added discount if you can! I would definitely repurchase this product and it’s now my new favorite bronzer from the drugstore. Also let me know if you would like to see a post about all my favorite drugstore and high-end bronzers! I think I have quite the collection and variety so it could help you find your next bronzer obsession! Thanks for reading!