Eyebrow Routine!


Eyebrows are essential. I seriously fear leaving my house without having them done…they frame my face and compliment the makeup that I put on. I have naturally full eyebrows, but they're totally different shapes and heights…LOL isn't the saying, "eyebrows are sisters, not twins?" Well, mine are like two distant cousins that live on opposite sides of the country. I do have my good brow (right side) and I can always count on it remaining thick and fluffy, but also nicely arched. My ol' bad brow (left side) is quite a troublemaker and always makes me spend extra time trying to make it symmetrical.

I have used countless brow pencils, powders and pomades. After years of trial and error, I feel like I've finally found a combination that gives me the eyebrows that I love most; natural and bushy! I know what you're thinking, what about tweezing/waxing/threading?! I try to maintain some sort of an arch and pluck any stray hairs underneath the brow and in the middle, but I've stayed away from removing any hair above my eyebrow. It's helped me grow out the horribly over-plucked, sperm shaped mess that took years to undo (thank you, 8th grade) and it gives me more of an undone, natural effect. I love 80's supermodel eyebrows, think Brooke Shields and Cindy Crawford. These ladies brushed their hairs straight up and usually sprayed hairspray on their spoolie to keep them in tact. You definitely don't have to go for this look if you don't like it! It is totally fine if you prefer a more precise, clean brow, I think that look is so beautiful too! I've just had a lot of requests to post an eyebrow routine and I wanted to show you how I've been filling them in lately!

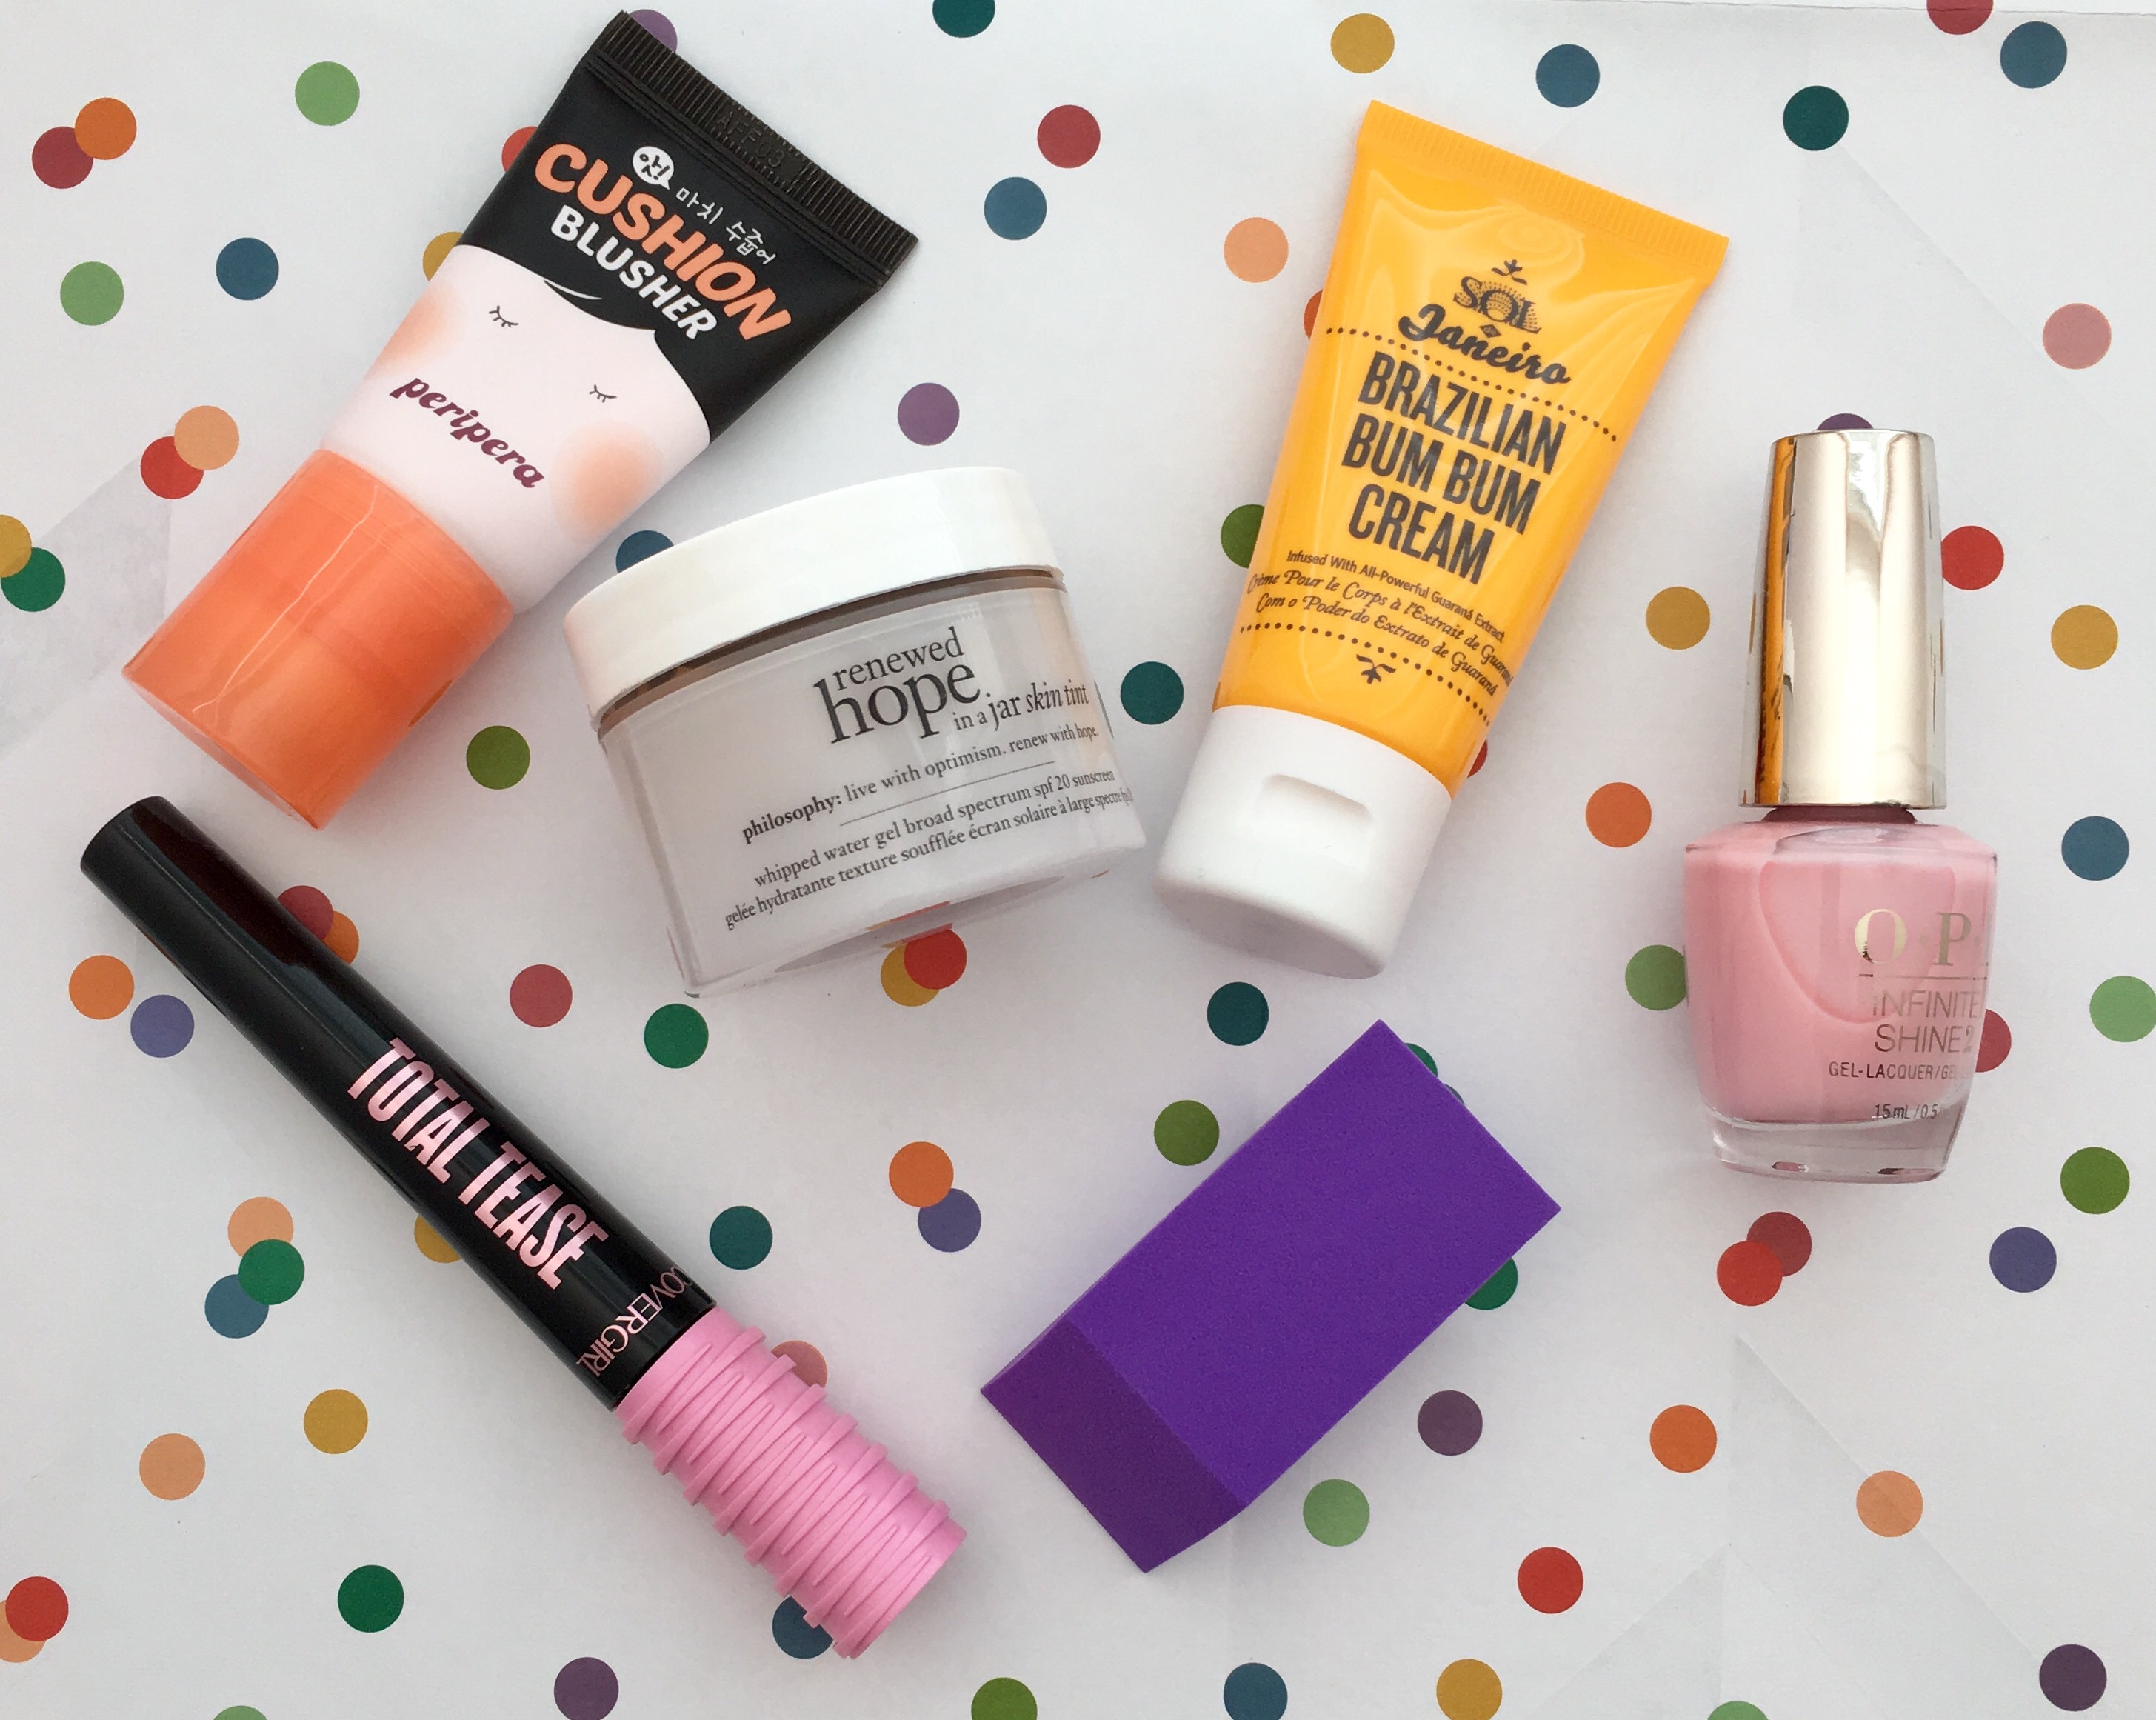
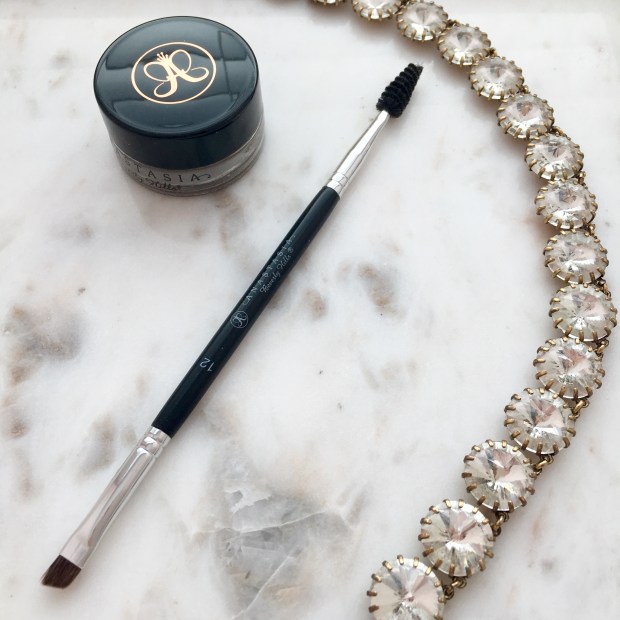
Anastasia Dip Brow Pomade, "Chocolate" and Anastasia #12 Angled Brush.


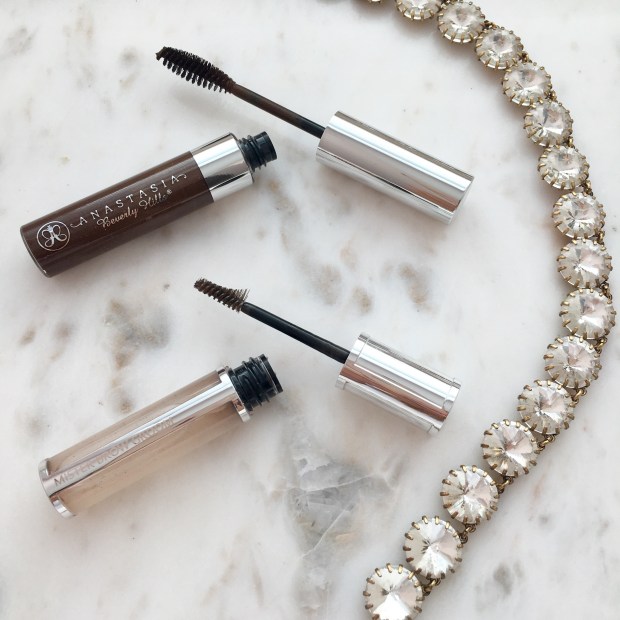
Anastasia Tinted Brow Gel, "Chocolate" and Givenchy Mister Brow Groom.

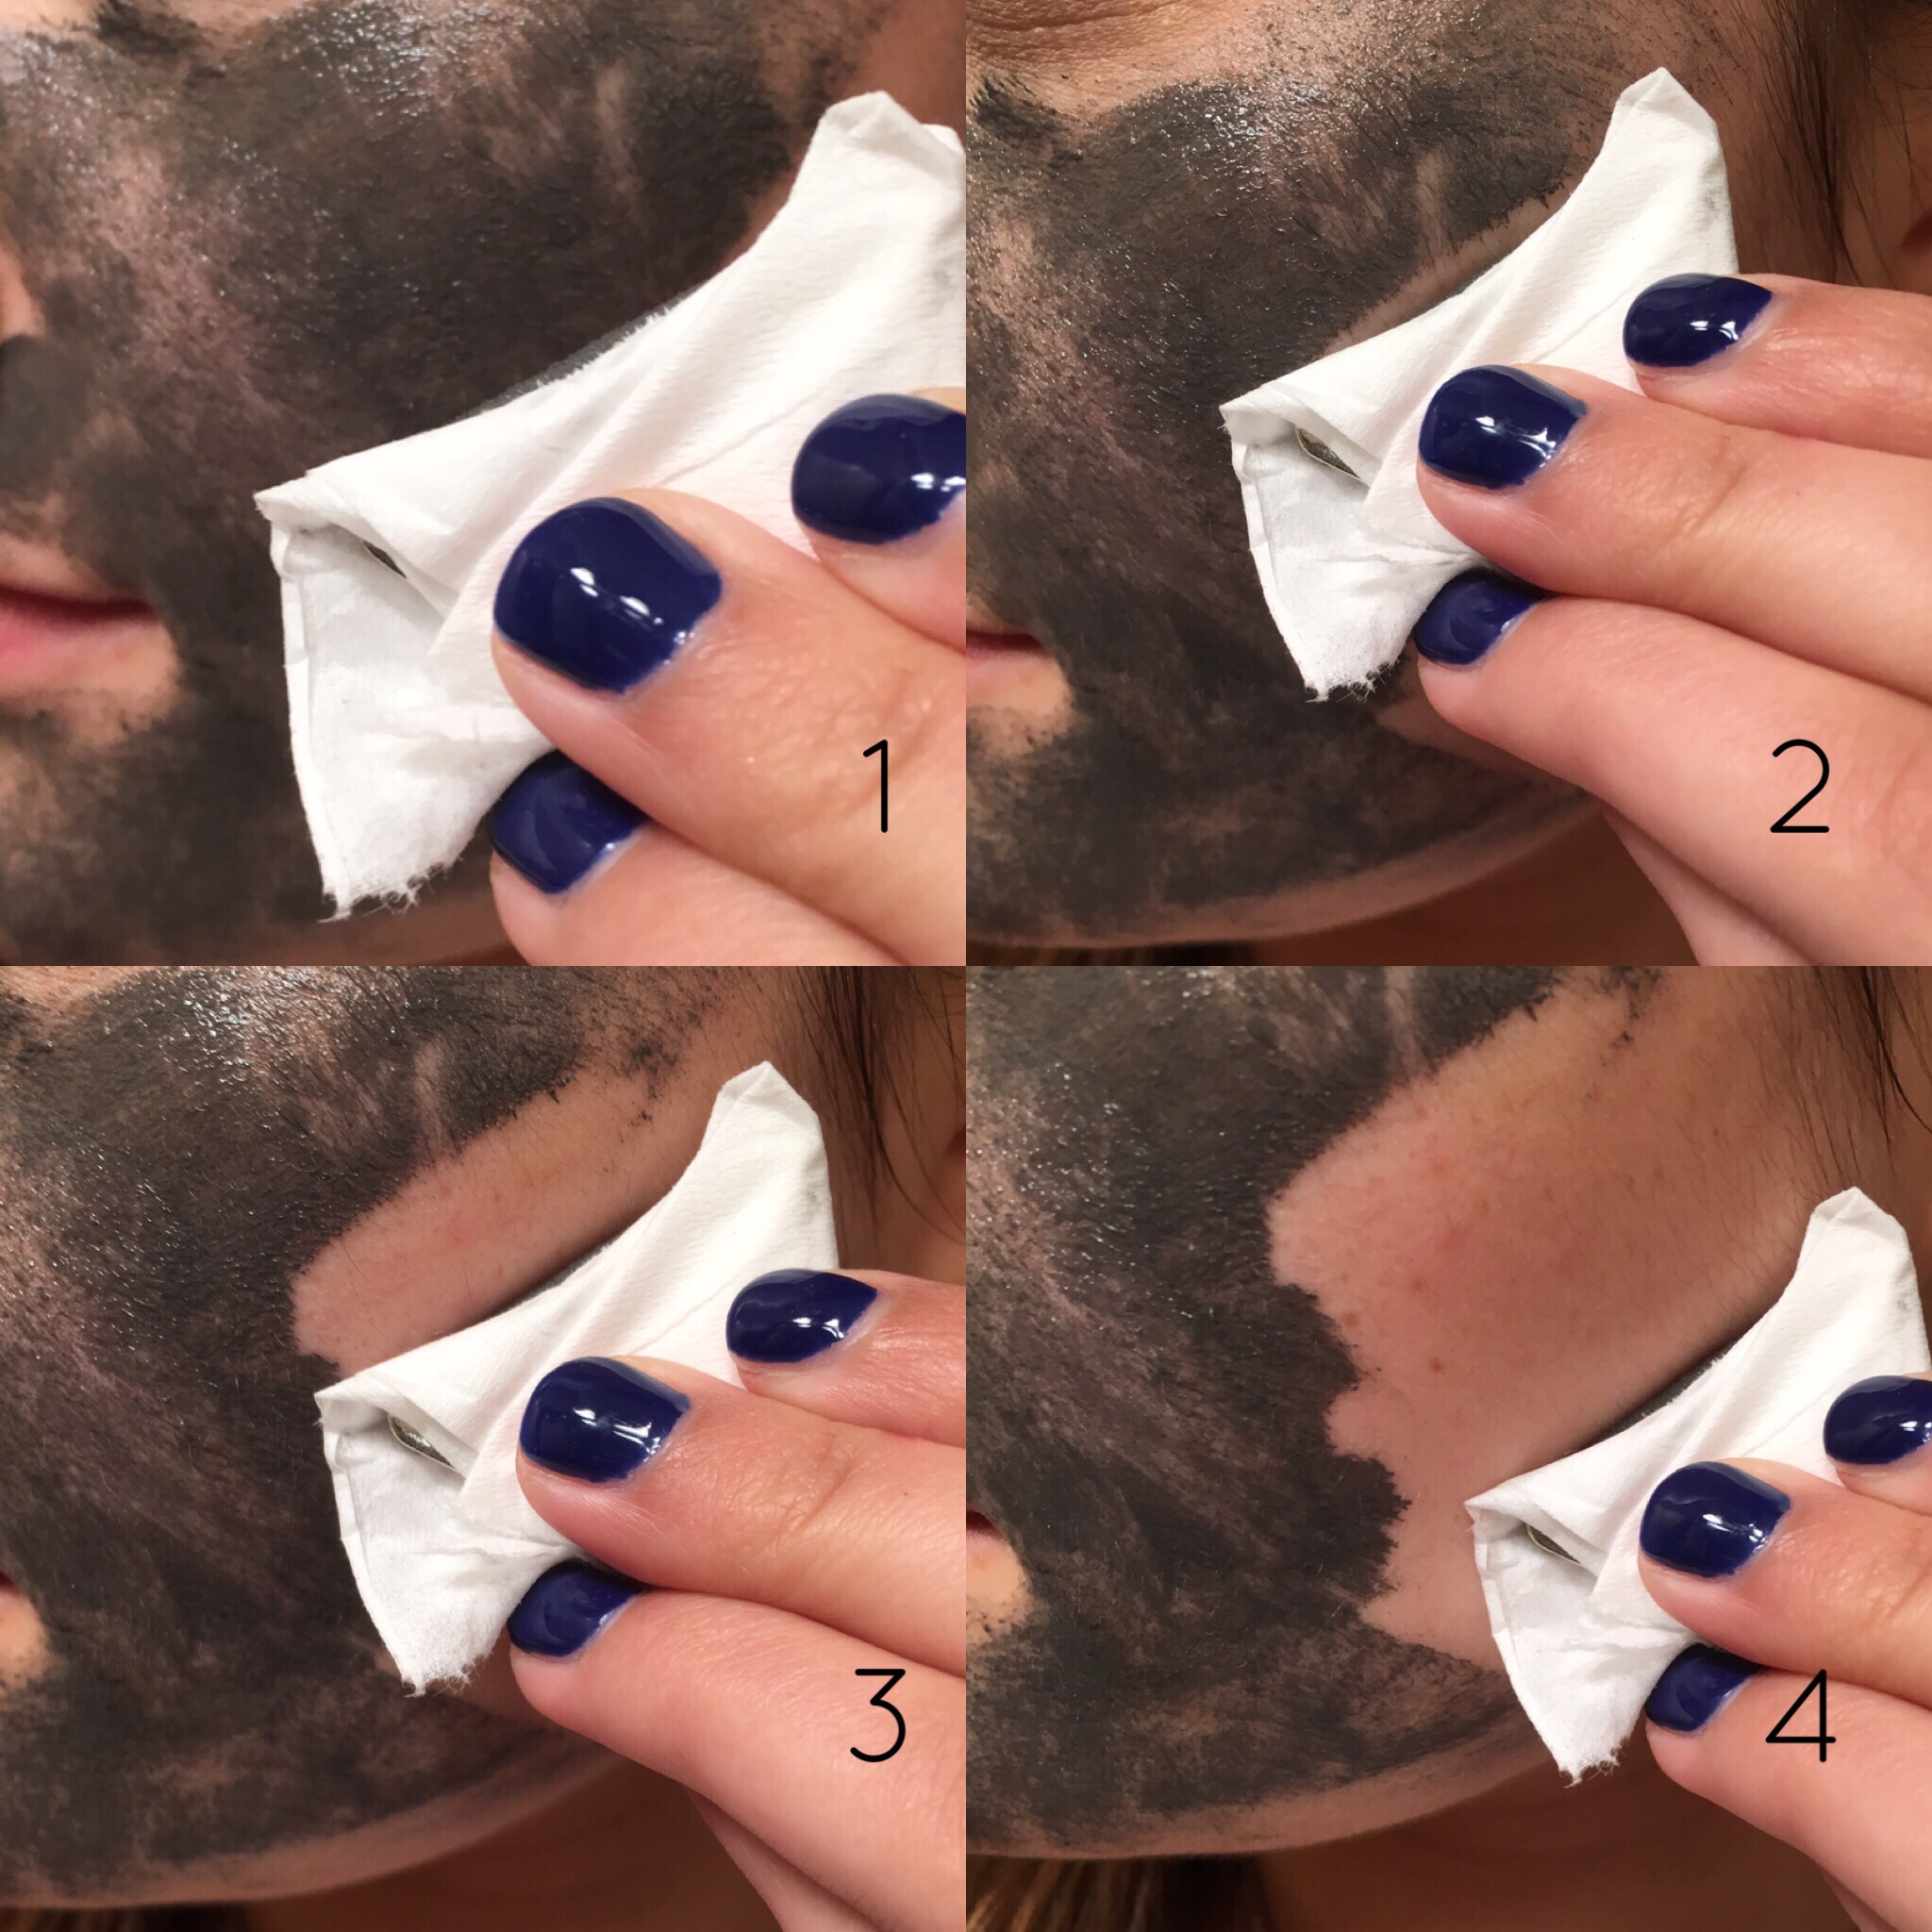
  1. These are just my all-natural eyebrows! Something for you to compare for a before and after! ☺️
  2. I always use my Anastasia Dip Brow Pomade. One little jar of this stuff lasts forever and it will never fade throughout the day. I find that it's just the easiest way for me to fill in my brows in a natural way. Using an angled brush, with a spoolie on the other end, also helps me get this done precisely and quickly! I first draw a line underneath the brow to get a defined shape. I always start on the bottom because you can just brush excess product upwards if you apply too much, it's incredibly harder to correct when you start from the top. I focus on emphasizing my arch and extending the tail of my eyebrow as well. With the spoolie side of my brush, I gently swipe any extra product into the hairs, making sure to cover any blank spots.
  3. Now I move onto the top. You can see that I've drawn a pretty harsh line to carve out my arch. This also helps me create additional symmetry and give an illusion that they're the same height.
  4. I've blended all of the lines into the eyebrow hair and brushed through everything a few times with the spoolie. It is so important during this entire routine to never put excess product towards the front of the brows. That's when things can get very unnatural looking! Instead, I take whatever is left on my brush at the very end of the sculpting process and gently fluff it through the front part to lightly shade it in.
  5. I used the Anastasia Tinted Brow Gel to give some highlights and dimension to the hairs. It also helps warm them up a little and match my current hair color a bit more. I love this eyebrow gel on its own, but of course I'm extra and add another one in the mix.
  6. I applied some of my Givenchy Mister Brow Groom and used the applicator to brush upwards on my hairs. This is a clear gel, so it's totally fine if a little gets on your skin from brushing them straight. This product is so pricey, but if you have hairs that fall or get wild throughout the day, it may be worth it. This stuff is like superglue and I love fluffing the front section of my eyebrows with this product. It also helps separate each hair and will help you look like you just naturally have beautiful, bushy brows!

What is your must-have eyebrow product? Have you ever tried any hair growth products that helped you get thick, full brows? Let me know! The bushier, the better and I just want the type of eyebrows that could make Lily Collins envious! I really appreciate you checking out my blog and reading this post! Feel free to leave me suggestions on what I should write about next!

Follow me on Instagram: @abigaillindsayblog

Email any business inquires to:
abigaillindsayblog@gmail.com

June Favorites! 


June was a month full of new discoveries! I tried a lot of new makeup and skincare, but only a few things made the cut to be considered “favorites.” I wanted to share these products with you because I hadn’t seen many reviews on them before. Most of these items were mostly completely new to me and I’m so relieved they happened to work out! 


Peri Pera, Cushion Blusher


Remember that Korean skincare haul I did a couple posts ago? Well, I also picked up a few popular makeup products (also from Korea) when I placed that order. I’ve been testing out the cream blush from Peri Pera in the shade, “Happy Coral” and I am obsessed! I’m not a huge fan of liquid blushes or bronzers, but this one looks so gorgeous for summertime and gives the most beautiful flush to my skin! It is pretty versatile in the way you can wear it with little-to-no makeup for a fresh, natural look or you can wear it for a dramatic look and even layer a powder blush on top for added intensity! I find that layering a powder on top helps my blush stay vibrant all day long! I’m super happy I decided to go out of my comfort zone and purchase this product! 


Covergirl, Total Tease Mascara

     
Honestly, this mascara initially caught my eye because of the cool packaging. Then when I opened it up, I was surprised at the unique wand and wasn’t sure if it would be something that I could easily use. Luckily, it’s nothing out of the norm in terms of application and you can totally control the little ball on the end of the wand! It actually comes in handy when trying to coat those little lashes towards the inner corner! I like this because the formula is both voluminous and lengthening, but warning: this can get clumpy looking. The secret it to add a second coat immediately after the first. Hardly wait any time at all in between because it dries really quickly and you can get a “spider lash” effect if you don’t work fast enough. 


Philosophy, Renewed Hope In A Jar Skin Tint

       
I haven’t seen this product reviewed or written about before, so I’m excited to report that it’s really, REALLY great! I was browsing the Philosophy section at Ulta and was looking at some of their makeup items. I have been wanting a medium coverage tinted moisturizer for awhile and when I swatched this in the store, I was shocked at how pigmented it was and how little product I needed to completely cover my entire hand. After getting it home and using it for the last couple of weeks, I’m thinking it may become one of my all-time favorite face products! I love that it moisturizes, covers my imperfections and dries to a semi-matte finish. It also lasts throughout the entire day! You barely need any product for your entire face, so that means it’ll last a really long time and you don’t have to constantly repurchase if you plan on using this product daily. With SPF 20, it will also protect me from the sun that I love (thank you for the freckles) but also fear because forehead wrinkles and fine lines. I put this product on like a standard face moisturizer, just by patting it on with my hands, then taking a damp Beauty Blender to even things out and make sure it’s properly distributed over my entire face. You definitely don’t need a powder with this, but you can set it with a light translucent powder or go more full coverage with a powder foundation depending on your preference! I’m in the shade “6.5 Tan” for reference, which I can only use when I’m self-tanned or naturally tanned. 

      
Sol De Janeiro, Brazilian Bum Bum Cream
     

I really didn’t want to like this product…I really wanted to continue my life without justifying the high price of this cream, yet here I am, on Sephora.com purchasing the full size version. I received a deluxe sample size of the popular “Brazilian Bum Bum Cream” and it seriously lives up to the hype. The scent is a really light, natural pistachio caramel so that’s obviously delightful. I ALWAYS get compliments from random strangers when I use this cream! Plus it’s formulated without all the yucky parabens, sulfates and phthalates that many other lotions have. It is supposed to be tightening and firming and I actually notice a difference in my arms and legs after I apply it. At first I thought I was just imagining it, but other people that I have had try it, say the same thing! It also dries super fast so I love putting it on right after I get out of the shower! 


Sephora, Cake and Bake Sponge

        
For the sake of the photo, I used my fresh and new Cake and Bake sponge, but I have been using my other one non-stop this month! I don’t apply my foundation with this product, but I do use it for my under-eye concealer and cream contour and highlight. The shape makes it perfect to get into your inner corners and precisely define your cheekbones and nose. As the name states, its great for applying a translucent powder over the areas you want to bake and get that chiseled, defined effect. It’s a pretty stiff sponge, but I do use it dampened like I would a Beauty Blender. I think the stiffness actually is a benefit to this product because it doesn’t absorb excess product, so you aren’t blending away any extra coverage from your concealer or cream contour. I was so happy that this product worked out for me and I think it’s going to grow in popularity over time! 


O.P.I, Infinite Shine Nail Polish

       
I have mentioned these polishes in previous favorites posts, but I’ve been loving these so much to do at-home manicures! The color, “It’s A Girl” is my current go-to. It’s enough of a neutral pink that it matches any pedicure color and outfit that I’m putting together. I also love that it’s more of a glossy polish that isn’t super creamy and opaque. The formula of the “Infinite Shine” range is super long-lasting and chip-proof! If you’re trying to save some money or want to take a break from gel manicures, I would highly recommend these nail polishes!  

         
I really hope you enjoyed reading about the products I’ve loved in June! These are some really great items that I know I’ll continue to use in the upcoming months as well! As always, I love to read about the makeup and skincare you can’t seem to put down! So please leave me a comment below and we can chat about your June Favorites! 
       

Follow me on Instagram: @abigaillindsayblog


Email any business inquires to:

abigaillindsayblog@gmail.com  

Magnetic Face Mask?!


I recently received the Dr. Brandt MAGNETIGHT Age-Defier Mask as a Sephora free sample and knew I had to document trying it out for the blog! It is described as, “a powerful age-defying facial mask that dramatically transforms the look of your skin by harnessing the power of attraction.” Yes, you read that right, this is a magnetic mask. The formula is created with iron, which helps reduce the signs of stressed, aging skin! It’s good for individuals that suffer from wrinkles/fine lines, elasticity, firmness and uneven texture. Plus, it comes with a triangle magnet that supposedly lifts the mask right off your skin, leaving behind a skin softening oil that has additional skincare ingredients.    


To start this process, I washed my face with soap and water and removed all of my makeup! Then I took the spatula that comes with the mask and spread a thin layer over my clean face, trying to avoid the eye area. As you can see, it doesn’t apply very evenly, but that doesn’t bother me too much! I left it on for about 10 minutes because that was the recommended time! 


Next I took the magnet and wrapped it with a tissue as instructed! It is a surprisingly strong magnet, it’s even advised to not use it if you have a pacemaker or other medical devices/implants! So I smoothed it over my skin and was in shock at how instantly it lifted the mask off my face! It made a clean line of removal and did not smear or move around. I was so impressed with this process, I rushed over the rest of my face, waiting for it to not work, but it removed the entire thing all on the same magnet! 


Once I was finished taking it off, I realized that it left an oily feeling on my face! Reading the directions, it said that you are supposed to massage the remainder in and use it as a skin treatment! So I decided to do that and continued with the rest of my nighttime skincare routine. Overall, I really liked using this mask! I think the process is so much fun and really easy to do! I definitely didn’t see immediate, extremely noticeable results, but that isn’t a total deal breaker for me! My skin felt hydrated and my pores looked smaller, I just didn’t see a huge difference as far as fine lines, but perhaps that happens over time! This is a pretty expensive mask, $75 for the full size, so I’m not sure if I would purchase that, just because I’m not wowed by this product just yet! It was super enjoyable and cool to see, so I would recommend getting your hands on a sample size if you can! Thanks for reading! 

Rahua Voluminous Shampoo Review! 


If you have fine, thin hair that always ends up laying flat and looking lifeless, then you need this shampoo. I would honestly never advocate that you should spend $34 on a shampoo that’s only 9.3oz., however if it actually works and you are tired of wasting money trying to test other shampoos, then I feel like I have to at least share my experience of this product with you. So to preface this review, I received a sample of the shampoo and conditioner with one of my Sephora orders and decided to try it out because why not. As soon as I opened the packet, I noticed a strong herbal/licorice kind of smell, which I was initially not very fond of. I decided to use both the shampoo and conditioner and could immediately feel that the strands of my hair felt more plump. Even once I towel-dried my wet hair and brushed it out, I could visibly tell my hair look lifted and voluminous!   

I shower at night and do not use a blow dryer on my hair. So when I woke up, I was absolutely shocked that my hair had so much volume, but also felt super silky and healthy. My experience with other oil-reducing or clarifying volume shampoos is that they may give lift and body to my hair, but they turn my hair dry and brittle, which is never a cute look. I decided to straighten my hair and still could not get over the lift this gave me at my roots! All I used was a shampoo and conditioner, zero styling products and was able to achieve a voluminous hair effect that I never knew my hair was capable of achieving!


I instantly purchased the shampoo on Sephora’s website because I knew I couldn’t be without this product. I didn’t purchase the conditioner because it is just so unbelievably expensive to get the duo. So fast forward to now, I am still absolutely loving this shampoo. I only use it for special occasions because I’m trying to make it last for as long as humanly possible hehe. I just know how absolutely frustrating it is to have fine, ribbon like hair that never looks full, so whenever I find a product that gives me my dream hair, I have to jump on it and share the good news with my pals!


Also if you want to attempt to justify the high price-point, this shampoo does have an amazing ingredient list that will make you feel luxurious just by reading it. “Organic and 100 percent natural ingredients, formulated with lemongrass and green tea create body, volume, and bounce by balancing and removing excess oils from the hair shaft, without compromising the integrity of the hair. It’s enriched with quinoa, a gluten free super-food indigenous to South America, to promote healing and moisture retention. Citric juices break down oils, extending the time in between washes. Rich in omega-9, the rahua-ungurahua oil restores, heals, moisturizes and strengthens hair follicles and the hair shaft, resulting in stronger, healthier hair.” Like are you kidding me…I’ve never felt more cool than I do when using a 100 percent natural, vegan, cruelty-free, USDA certified organic ingredient based shampoo. Also important to mention it has no parabens, sulfates or phthalates, which are unfortunately found in most lower-priced shampoos and conditioners.


I never would devote an entire post on a hair product, especially a shampoo if it really wasn’t something to rave about. I am of course searching for cheaper alternatives and trying to compare ingredient lists, but it is really hard to find such a natural shampoo that also delivers incredible effects. Plus it will make your hair healthier and stronger the more you use it, which will save you money in the long run because you won’t be spending money on pricey restorative treatments. So definitely let me know if you love this shampoo and if you think the conditioner is totally worth it as well (I have a feeling it may be, ugh) because I am really digging this Rahua brand and their stance on creating sustainable products that really work. Thank you so much for reading!

Easy Summer Makeup Using The Too Faced Chocolate Bar Palette

I wanted to do a quick look for gals who enjoy bronze-taupe shades for every day makeup! My favorite eyeshadow palette of all time is the Too Faced Chocolate Bar Palette! I find the colors are versatile enough to be daytime and nighttime appropriate and there are enough colors included for both cool and warm toned looks. Not to mention, the quality of the eyeshadows are amazing. They’re buttery, pigmented and easy to blend! The most important part is that these eyeshadows actually smell like cocoa powder! You will honestly love this palette and see that it is worth every penny once you begin creating the beautiful variety of looks that you like!   


To begin, I primed my eyes using the Urban Decay Naked Weightless Concealer. I then took the shade “White Chocolate” and applied it all over my eyelid, up to my brown bone to neutralize my skin and help my other eyeshadows blend out easier. I then took “Salted Caramel” with a fluffy blending brush into my crease. I think this warm brown shade can be worn in so many different makeup looks to provide a universally flattering transition, while blending out your lid shades. Next I applied “Milk Chocolate” onto the outside corner of my crease in a V shape. This step will further define your eyes and help blend any darker shades you set down. For my eyelid, I applied “Champagne Truffle” on the inner corner to brighten and widen the look of my eyes. This shade can also work beautifully as a cheekbone highlight if you’re looking to keep the look very cohesive. With a flat shader brush, I took “Marzipan” on my inner third to create an ombré effect to my eye look. Next I placed “Creme Brûlée” on my middle third to give a gold sparkle effect. Lastly, I placed “Hazelnut” on my outer third to darken the corner and give a cat-eye effect to my lids. 


I did also give myself a black winged eyeliner because I love the way this defines my lash line and elongates my naturally round eyes. On the lower lash line, I smudged the Stila Stay-All-Day Eyeliner pencil in Lionfish. I also took the shadow color “Hazelnut” and further blended out this area for no harsh lines. Of course I added plenty of mascara for this look because I love the look of full and thick eyelashes! Below is a photo featuring the remaining makeup products I used to create this look! 


I think this is super easy and pretty for summertime because it incorporates soft shimmer shades in a warm, bronze color family. It’s not too dark or smokey, but it does define the eyelids in a flattering way. I would recommend this eye look to anyone because I think it’s universally wearable and gorgeous for day or night! I also want to add that although I chose a neutral lip color, this eyeshadow look is simple enough to pair with a red or violet colored lippie too! I want to create more looks using this palette, so let me know what you would like to see next! I’m thinking of an olive-green look with bronzed skin…the possibilities are endless! Thank you so much for reading! 

Too Faced Chocolate Bar Palette, $49.


Follow me on Instagram: @abigaillindsayblog

Email any business inquires to: abigaillindsayblog@gmail.com  

The Best Cream and Liquid Highlights! 

Clinique Chubby Stick Sculpting Highlight, $22. Benefit Cosmetics Girl Meets Pearl, $30. Benefit Cosmetics Watt’s Up! Cream-to-Powder Highlighter, $30. Becca Shimmering Skin Perfector, in the shade Opal, $19.


As you know, it is super on trend to have glowing, dewy skin this Summer! I love powder highlighters, but I can achieve an intense glow effect when I use liquids! I have a few different purposes for these products and wanted to share how I use them to achieve a flawless, lit-from-within complexion!       


First up is the Clinique Chubby Stick Sculpting Highlight! This cream-to-powder formula is applied best with your fingers or a damp beauty blender depending on your desired intensity. I would describe the color as a shimmery, pink-toned, silver highlight. It gives a subtle effect to light skin tones because it’s such a fine shimmer. If you have a medium to tan skin tone, then it will be a bit more noticeable since it doesn’t have warm undertones! The only con to this product would be its ability to fade throughout the day. That is why I like this product to layer with my powder highlights to give them an extra boost and prolong the longevity of both products. My favorite powder highlight to wear with this cream highlight is the “Mary Lou Manizer” by TheBalm. I find that using a powder highlight with a champagne shimmer counteracts the sometimes unflattering cool tones of the Clinque highlight formula! 


My next favorite is the Benefit Cosmetics Girl Meets Pearl liquid highlighter! I love this product to mix in with my liquid foundation to give my skin a natural glow effect. I find this product is perfect to add into any foundation because it won’t change the color. Some liquid highlights can turn your foundation more yellow or more pink, the Girl Meets Pearl gives a natural, subtle champagne glow that is universally flattering. I only use this product to mix in because it does not look good when I try to use it like a cream highlight. Whenever I place it on top of my cheeks and down the bridge of my nose, it causes the foundation to break up and look patchy. Of course, Benefit packaging is so cute, which is another reason to check this product out! The twist up container it comes in makes sure your product stays as hygienic as possible and ensures no leaking if you do want to travel with this product! 


My absolute favorite cream highlight is Benefit Cosmetics Watt’s Up! It has a perfect golden shimmer that gives your skin that intense, almost wet looking effect! This product makes me feel like I’m actually J-Lo (which is the best feeling ever) and it will last all day long! Since it’s a cream-to-powder formula, it will not break up when placed on top of your foundation. It also looks beautiful when layered with a powder highlight on top! I love using Champagne Pop by Becca to layer on top of this because the warm-peach undertones compliment the Watt’s Up golden tone in such a gorgeous way! 


The Becca Shimmering Skin Perfector, in the shade Opal is a gorgeous product to blend on your bare skin, before foundation, so that it peaks through when the light hits your face! This is a very pigmented, intense glow so I use this product very sparingly. I have tried to use this product over top of foundation and find that it only works if used with a damp beauty blender because it will break up your foundation if patted in with your fingers. I love the subtle champagne shimmer this product gives and it is highly reflective, which makes it so unique in my collection. I love to layer Becca’s Shimmering Skin Perfector Pressed on top of the liquid version because it just intensifies it even further and will ensure your highlight lasts all night long, even through the Summer heat! 


Liquid and cream highlights can be intimidating because they do require a lot of blending to look good, however I do find that they give a unique, intense glow effect that cannot be replicated with powders! I want to share my favorite powder highlights soon because I have quite the collection, so let me know if you would like to see that! Thank you so much for reading! 


Follow me on Instagram: @abigaillindsayblog

Email any business inquires to: abigaillindsayblog@gmail.com  

Review and Swatches of Becca X Jaclyn Hill Champagne Collection – Face and Eyeshadow Palette!

The limited-edition Becca X Jaclyn Hill Champagne Collection was highly anticipated by all! Once I found out the collection was being released online on May 26, I set my alarm for 12pm and ordered immediately! Acting like a crazy woman paid off because this entire collection sold out within the first hour! If you don’t already know about Jaclyn Hill, she’s a very popular beauty YouTuber and is one of my favorite girls to watch! She’s extremely knowledgeable about products, genuine in her approach, artistically talented and just absolutely beautiful! I highly recommend you subscribe to her channel! I already own a full-size Becca Champagne Pop highlighter (and love it), so I knew I wanted to purchase the limited-edition Face Palette and Eyeshadow Palette to add to my collection! If you didn’t get your hands on the products you wanted from this limited-edition set, have no fear! The full collection will be available in Sephora stores for purchase on June 16th! 

Becca x Jaclyn Hill Champagne Collection, Champagne Collection Face Palette, $52 ($132 value)


The Face Palette has two shades of highlighter and 3 shades of blush to illuminate your entire face look! The formula of the highlights are extremely pigmented and can be layered to create an intense glowing effect. They are both extremely long-lasting as well! The original Champagne Pop is a very peachy-toned, champagne colored highlight, while the new Prosecco Pop is a light gold, warm-toned shimmer. Both are absolutist beautiful and will be a must have for the summer months! The blush shades are Rosé Spritz, Amaretto and Pamplemousse. My current favorite way to wear these shades is to take Pamplemousse on my cheeks and Rosé Spritz right on the apples. I find that because Rosé Spritz is a shimmery blush, it really looks beautiful dusted on the front of whatever blush color you’re wearing to bring out that all over face glow, without emphasizing pores, as some shimmery blushes tend to do when applied all over the cheek area. These blushes are very sheer in formula and look beautiful layered on top of each other. They aren’t the longest lasting blushes I own, but I would consider them to last about 5 hours until fading, which isn’t terrible! I also think the shades are going to look really beautiful on every skin-tone, which is awesome that Becca and Jaclyn Hill took that into consideration when choosing these colors!

Becca x Jaclyn Hill Champagne Collection, Champagne Collection Eyeshadow Palette, $40.


The Eye Palette includes the shades Chardonnay, Champagne Toast, Cordial, Cognac and Bordeaux! This palette of both shimmer and matte shades is very versatile, making it wearable for daytime and nighttime looks! To be completely honest, these are not the best quality of eyeshadows I own. Yes, they are pigmented and blend out beautifully on the eye, but I noticed they fade pretty quickly even with a primer. My favorite color is Champagne Toast because it’s a beautiful warm bronze shade (my favorite) and it was unfortunately the most disappointing shadow in this palette. It faded from my eyes within the first couple hours and by the end of the day had completely disappeared. The matte shades are longer lasting in pigmentation and didn’t fade as terribly on my eyes. I am going to keep using this palette and try to find ways to make it work because the colors are so beautiful, but I definitely would recommend other eyeshadow palettes before this one. 

Becca x Jaclyn Hill Champagne Collection, Champagne Collection Face Palette, $52 ($132 value) Becca x Jaclyn Hill Champagne Collection, Champagne Collection Eyeshadow Palette, $40.

   
If you only want to buy one item from this collection, I would highly recommend the Face Palette. It’s highly pigmented with beautiful shades selected for any skin tone. I think you will really love how this product layers on your skin, making it versatile enough to compliment many makeup looks. This Face Palette will be the perfect traveling companion for summer beach trips when you want your makeup to be pretty and glowy, without having to pack multiple products! Unfortunately, I wouldn’t recommend the Eyeshadow Palette because it just fades so bad! The sheer pigmentation of these shadows just doesn’t work for me. Let me know if you have a primer or special secret to applying these because I truly do want to make them work! Thank you so much for reading this post, leave me a comment below if you have this collection and what your thoughts are on these products! 

Creating A Subtle Look With Colorful Eyeliner

I really wanted to do a post on how I wear colorful eyeliner in the most subtle way. Sometimes I want to go out of my comfort zone with makeup, but personally do not feel very confident when I’m wearing bright, attention grabbing looks on a day-to-day basis. If you are like me and want to experiment with a unique eyeliner color, like blue or purple, but also want to keep the overall makeup look understated, then keep reading! 


To start off this makeup look, I begin with my face. I like to make sure that my skin looks as flawless as possible, so my eyes will pop. Of course I use a primer and a full coverage foundation to give myself a smooth, even canvas for my powder products to lay nicely on. I then try to use soft colored blushes and bronzers so my face appears to be the most natural part of my makeup. I find that when you have multiple attention grabbing elements on your face (dark eyeshadow, bright lips, shimmery blushes) you can sometimes overpower the entire look, making it hard to concentrate on your natural features, while appreciating the area you are emphasizing. On my lips, I used a matte, nude liquid lipstick from ColourPop to stay cohesive with the natural vibe I’m going for with this look! 

   
Once you have your face completed, it’s time for the fun part; the eyes! If I’m doing a bold, colorful eyeliner look, I make sure to keep the eyeshadow neutral and understated. I find that this technique makes the eyeliner pop because it stands out when placed on a blank canvas. I usually choose a light, matte eyeshadow color to place all over the lid and blend a neutral tone shade into my crease for slight definition. Next is the fun part! The blue eyeliner I used in this look was in a pencil form so I simply drew a line on my upper eyelid and then a slight wing off of the end. Lastly, I used the mascara routine that I posted about in April, to give my eyes added definition! 

Too Faced, Peanut Butter & Jelly Eyeshadow Palette, $36. ColourPop Creme Gel Liner, In the shade: “Prance”, $5.


This colorful eyeliner look really does come across as understated and simple, even though you’re incorporating a unique color into your makeup. Whenever I wore this out, no one even noticed I was wearing blue eyeliner until I pointed it out! Also even though I used blue, I think you could use any color and it would look equally as cool! I think this periwinkle-blue shade is really beautiful for Spring, so that’s why I used it! 

    
Let me know how you like to incorporate bright makeup products into a subtle look! I’m always looking to try out new ways to give my ordinary makeup a unique pop! Thank you so much for reading!

Cream Contour and Highlight Routine 

I wanted to share how I contour and highlight my face for special occasions! I am often asked how I achieve a full coverage, evenly blended, contoured look. On a day-to-day basis, I definitely do not use a cream contour because in my opinion, it’s not necessary. I opt for this routine whenever I have a special occasion, when I need my makeup to last and stand out in photos. 

    
With contouring, you really want to make sure you adapt the placement of lines to your face shape. My face shape is a mix between square and round (so annoying) so I draw lines based on where areas of my face need to appear more sculpted. The darker colors should be placed in the hollows of your cheeks, where you want to create a shadow. If you want to sculpt your chin, draw lines at your jawline and blend underneath. If you want to minimize your forehead, darken your temples and hairline. This is the basic rule of E and 3. Think of drawing an E shape on the right side of your face (temples, under the cheeks and jawline) and a 3 on the left side of your face. This will serve as a guideline on where to place the darker colors you use for contouring. I also like to contour the tip of my nose so it appears more slim. As far as highlighting, you can use a concealer or a light colored highlighting stick to place in the areas you want to bring out in your face. For me, this is underneath my eyes to brighten my dark circles. To even things out, I’ll place some concealer in between my eyebrows and into the center of my forehead and on the tip of my chin. If you want to get a super sculpted appearance, you can place the concealer underneath the contour on your cheekbones to chisel this area out more.

I like using the Smashbox Step-By-Step Contour Stick Trio for my cream contour because you can be very precise with your application. Since they’re in a stick form, you can place the product directly on your face without the need for a brush. The formula is dry enough to stick to your skin, but also creamy enough to blend out seamlessly.

My cream contour and highlight routine begins with the application of primer all over my face and a light layer of foundation. You want to choose a foundation that is light-medium coverage so that you can add the extra layers of cream products and not look cakey. Next I take my “Contour” colored stick and draw lines around my forehead, temples, underneath my cheekbones and jawline. I then place the “Bronzer” shade directly above the “Contour” lines to add warmth to my look. I find that when I blend these colors out together, they create my perfect contour shade. Next I add a concealer that’s 1-2 shades lighter than my foundation in the areas I want to highlight. For extra brightness I apply the “Highlight” shade on top of the concealer. 

     
Once I have the lines placed on my face, it’s time to begin blending! This process can be tricky if you rush through it. The worst mistake you can make is to use the same brush to blend out the dark areas as well as the highlighted places. You’ll end up with a muddy and non-sculpted look. So make sure you take your time and blend out the contour first with a brush and then the highlight with a different brush. I use a Real Techniques buffing brush for my contour and my beauty blender for my highlight. 

Before: With only a light layer of foundation. After: Blended out cream highlight and contour. Set with Kat Von D powder contour kit.

Now that everything is blended out, I set my entire face with a loose translucent powder. My favorite is by Laura Mercier because it’s lightweight and never looks overly powdery on my skin. Since I’m extra, I set the places I cream contoured with a powder contour and do the same with the highlighted sections. I use my Kat Von D contour palette to do so. I think this extends the longevity of my cream products and is especially useful in situations where my skin gets oily. If you haven’t tried using a brightening powder underneath your eyes, I highly recommend it even on a day-to-day basis!

Smashbox Step-By-Step Contour Stick Trio, $45. Kat Von D Shade & Light Contour Palette, $46. These products can both be found at Sephora!

To finish the entire look, I spray a setting mist to lay all of my powder products flat and make sure my makeup lasts all day long. I really hope you enjoyed this post and have a good idea of contouring and highlighting after reading! It can be pretty tricky, but with a lot of practice, you’ll learn the best look for your personal facial structure! Again, I only do this full routine whenever I have a special occasion or an event where photos will be taken, but feel free to do this on a daily basis if you really enjoy the way it looks! Thanks for reading! 

Yay for the finished product!