Effortless Beachy Waves 

As someone who has naturally straight hair, I’ve always envied wavy, voluminous locks. With straight hair, there comes sacrifice in the form of not being able to hold a curl. I’ve gone through dozens of styling products that claim to give grip and hold to my hair. I have bought various curling wands from stores like Target and Sephora. Nothing seemed to work for me, until now! I wanted to share the products and curling wand I use because I think a lot of hair styling has to do with the way you prep your hair! 

What you’ll need: 

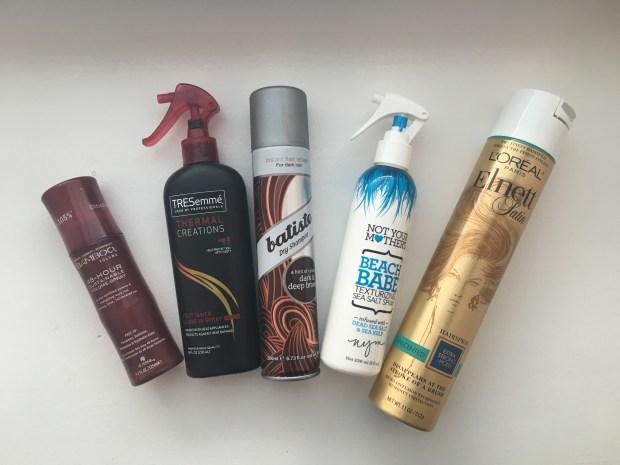
Alterna Bamboo Volume 48 Hour Sustainable Volume Spray, $25. Tresemme Thermal Creations Heat Tamer Spray, $5.49. Batiste Hint of Color Dry Shampoo, $8.99. Not Your Mother’s Beach Babe Texturizing Sea Salt Spray, $6.19. L’Oreal Elnett Satin Extra Strong Hold Unscented Hairspray, $14.99.

Wigo Color Teasing Boar Bristle Brush, $3.99. Tangle Teezer, $15.


Conair Infiniti Curling Wand Styler, $19.99.


To begin, I take my Alterna Bamboo 48 Hour Sustainable Volume Spray and distribute the product evenly through my hair. I like to do this step when my hair is still damp from washing so I can blow dry for extra volume. 

     
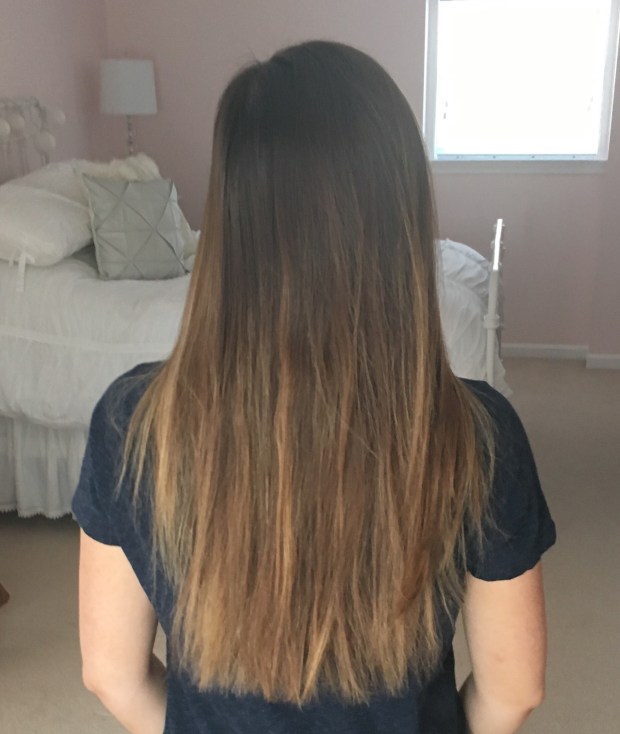
Once my hair is dry, I spray the Tresemme Thermal Creations Heat Tamer Spray from root to tip to prevent any damage from heat styling. Then I brush through my hair with the Tangle Teezer to get rid of any knots. Now that you’ve completed this step, your hair (only if it’s straight, like mine) should look something like this…


To begin curling, I section my hair into thirds and start with the lower third section. I could best describe this as my hair that’s beneath the bottom of my ear. Next, I take my curling wand and begin on my left side. When working on this side, I curl all of the pieces in the same direction and away from my face. I personally like the hair to face outwards, rather than inwards, but feel free to curl in the direction you most prefer. I repeat this step on the right side and obviously switch up the direction in order to continue curling away from my face. Lately I have been leaving out an inch of hair at the end of my curl to make my hair look longer and also give an overall beachy, undone vibe to my look. 

   
Next, I repeat the curling steps on the middle third section and the upper third section of my hair. It is tempting to not brush out your curls at this step, but try to let them set for at least 10 minutes to ensure longevity in your style. Once cooled, I take my Tangle Teezer and gently brush out the tight curls. 

    
Lastly, I tease the top of my hair with my Wigo Color Teasing Boar Bristle Brush. A step I like to do to give my hair more volume is to use Batiste Hint of Color Dry Shampoo and spray directly at the teased roots. I then use my Not Your Mother’s Beach Babe Texturizing Sea Salt Spray all over my hair and scrunch it in. This will provide great texture if you have straight and thin hair, like me!

After the sea salt spray has set, I use my L’Oreal Elnett Satin Extra Strong Hold Unscented Hairspray to lock in the whole look. This hairspray is amazing! If you do not enjoy the crunchy look of hairspray, you will really enjoy this particular formula. Just make sure to get the unscented because the original one smells terrible! 

Yay for the final product!

That Glow Though!

A major Spring beauty trend is to look glowy and fresh! By using products that have shimmer and other light reflecting properties, you can give your skin a “lit from within” look. Sometimes it’s hard to maintain a glow without looking greasy throughout the day. If you have combination to oily skin, you may find it hard to incorporate this trend into your daily routine. However, I have some strategies to help you create that healthy, natural glow without looking oily.

  
For this entire makeup look, I am using the new Anastasia Glow Kit in the color “That Glow.” This is an incredible value when you break it down and realize that for only $40 you are getting FOUR very different, but wearable highlighters! The formula on this product is amazing! The smooth texture gives more of a dewy effect, rather than straight shimmer on your face, which is nice if you want to go for a more natural look! 


Anastasia Beverly Hills Glow Kit, $40


Swatches of each shade on my olive skin tone!


To begin this look, you need to start by priming your face. This will create a smooth canvas for foundation and powder to lay on. Some highlighters are problematic in the sense that they cling to texture on the face. If you have a breakout or enlarged pores, you may find that your unprimed face will emphasize these areas with added shimmer. 

   
I choose to use a combination of a hydrating primer and a mattifying, pore minimizing primer. My favorite combination is to use the Too Faced Hangover Replenishing Face Primer all over my face and the NYX Angel Veil Primer in my oily t-zone and the places I have enlarged pores.

     
With a damp beauty blender, I begin applying a mattifying foundation all over my face to make sure my natural oils do not break through the rest of my makeup throughout the day. A great, inexpensive foundation is the L’Oreal Infallible Pro Matte Foundation. This will make sure your highlight doesn’t turn into a slippery mess within a couple hours of wear.

     
The most important step, is to set your face with a translucent powder! My favorite is the Laura Mercier Translucent Loose Setting Powder because it never looks cakey and does not alter the color of your foundation. This will lock in all of the liquids applied to the face and create a soft canvas to blend powders on! 

      
The next step is totally optional, but it’s what makes my highlight last all day long. With my fingertips, I place some of Benefit Cosmetics Watt’s Up cream highlighter on my cheekbones, down the bridge of my nose, underneath my eyebrows and on my Cupid’s bow. These are the areas on the face you want to highlight, since they naturally catch sunlight. I set those places I placed the cream highlight with whatever powder highlight I choose for the day! I’ve noticed I receive the most compliments and questions on the highlighter I’m wearing whenever I do this extra step! 

Too Faced Hangover Replenishing Face Primer, $32. NYX Angel Veil Skin Perfecting Primer, $15.99. L’Oreal Infallible Pro-Matte 24HR Foundation, $12.99. Laura Mercier Translucent Loose Setting Powder, $38. Benefit Cosmetics Watt’s Up! Cream Highlighter, $30.

Now check out these awkward photos of me trying to capture the difference between an all matte face and a highlighted one! 

Before


After


I hope you enjoyed this in depth look at highlighting and learned some great tips along the way! And I know when that highlight bling, that can only mean one thing…(that you did in fact read this blog post.)