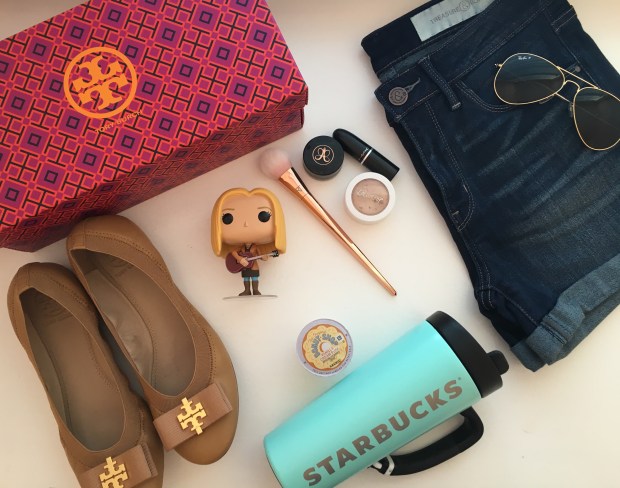
M.A.C Cosmetics Lipstick, “Del Rio,” $17. Anastasia Beverly Hills DIPBROW Pomade, “Ash Brown,” $18. ColourPop Highlight Super Shock Cheek Pearlized, “Wisp,” $8. Real Techniques Bold Metals 300 Tapered Blush Brush, $18.99. Starbucks, Stainless Steel Clip Handle Tumbler – Mint, 16 fl oz., $22.95. Keurig K-Cup Pack 18-Count The Original Donut Shop Vanilla Cream Puff Coffee, $11.99. FunKo Pop Figure, Phoebe Buffay, $11.99. Nordstrom, Treasure&Bond Cuffed Denim Boyfriend Shorts, $39.90. Nordstrom, Ray-Ban ‘Original Aviator’ 58mm Polarized Sunglasses, $200. Tory Burch, Sedgewick Ballet Flat, Blond, $175 (On Sale).
Beauty
M.A.C Cosmetics Lipstick, “Del Rio”
My first favorite is the M.A.C Cosmetics Lipstick in the shade Del Rio. The color is described online as a muted plum-brown, but I find that on my lips, it looks more red-brown. I bought this product thinking it was going to be a dark mauve color that looks like the rest of my favorite every day lipsticks, but instead it stands out for its unique terracotta hue. I love that this is a satin finish that feels hydrating, without being sticky like a standard lip gloss. Since my lips do tend to dry out during the summer months, I try to branch out from the popular matte formulas. This lipstick is also amazing because once it stains your lips once wearing off, leaving a pretty natural flush to your lips.
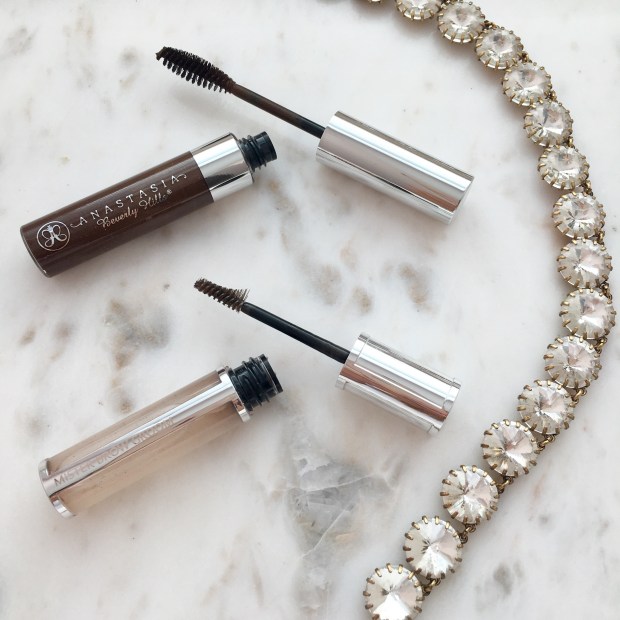
Anastasia Beverly Hills DIPBROW Pomade, “Ash Brown”
Known as the queen of eyebrows, Anastasia always creates the best brow products! The DIPBROW pomade is known as a product that will fill in your eyebrows and provide a natural looking color to any sparse areas. The formula is waterproof and performs amazing in the hot weather. One of my biggest fears is to sweat an eyebrow off, so knowing that they will stay in place through sweating and random summer rain showers gives me peace of mind. I love the shade “Ash Brown” because it’s dark enough for definition, but does not look harsh in natural settings. The best way to apply this product is with a very thin, angled brush to create natural-like hair strokes. It took me about a week to get the hang of using this product, but once I mastered the application technique, I don’t think I’ll ever go back to a standard brow pencil! Not to mention, since using the DIPBROW pomade, I have cut down the time it takes me to do my eyebrows in half, which also makes this product very valuable to my makeup routine!
ColourPop Highlight Super Shock Cheek Pearlized, “Wisp”
Since it’s June favorites, I had to include the highlight shade I’ve been loving on the tops of my cheeks all month! It is only $8 and of course, from ColourPop! Their Super Shock Cheek in the shade, “Wisp” is amazing! The color is described as a golden champagne with pearlized gold duo chrome finishes. It is seriously such amazing quality for the price since it is so smooth and shiny on the cheeks, rather than glittery (which is common with less-expensive highlights). I have swatched this shade side-by-side with the Becca highlight in “Opal” and it is an exact dupe! Not to mention, this formula is extremely long lasting throughout the summer heat, which is always a bonus. I would mention that if you are extremely fair skinned, you may find that this highlight is too golden on you! I would recommend ColourPop’s highlight in the shade “Lunch Money” or “Spoon” if you have fair-to-light skin tones because they are very bright and light shades that will compliment your complexion beautifully.
Real Techniques Bold Metals 300 Tapered Blush Brush
I have a brush to include as well! The Real Techniques Bold Metals 300 Tapered Blush Brush is an amazing, affordable brush for any powder makeup product. My favorite way to use this brush is to press my loose translucent powder into my under eye area and set my liquid concealer before it creases. The brush is very soft and dense, making it ideal to blend powder products seamlessly on the face. Since the dome-shape of the brush is more ideal for sweeping product onto the skin, your liquid makeup will not be disturbed from excessive blending. I also love this brush for blush because it picks up just the right amount of product and is awesome at shading in the apples of your cheeks. For the price, this brush looks and feels extremely luxurious, which is an additional bonus!

Lifestyle
Starbucks, Stainless Steel Clip Handle Tumbler
This coffee mug is SO GOOD! I had previously been using a Tervis Tumbler as a coffee cup because they’re known for being remarkably insulated and keeping hot liquids, hot! This cup from Starbucks puts my old Tervis to shame! It truly keeps my coffee hot (not warm; hot) for hours! I usually brew my K-Cup at 7:30am and my coffee will remain at that initial temp until 11am. It is really that good! I also love the mint color because it’s muted, but stands out amongst the other silver and black coffee cups. Plus this one has a flexible rubber handle because that has a clip attached so you can attach it to your purse or backpack. You need this cup if you are a coffee lover!
Keurig K-Cup Pack 18-Count The Original Donut Shop Vanilla Cream Puff Coffee
Since I am mentioning my favorite coffee cup, I also wanted to mention my favorite coffee! I am currently obsessed with the “Vanilla Cream Puff” medium roasted coffee from The Original Donut Shop because it has a hint of sweetness, that isn’t artificial or over-the-top. I don’t like adding creamer or sugar to my coffee on an every day basis, so it’s nice to have a mild and flavorful coffee that I can brew and go during the mornings when I’m rushing off to work!
FunKo Pop Figure, Phoebe Buffay
I wanted to include this in my June Favorites because it is something that makes me smile whenever I look at it! Friends is one of my all-time favorite television series and Phoebe is my favorite character, so having this on my desk makes me feel like a true fan girl! I recently started re-watching the seasons on Netflix and I just wanted to throw it out there that if you haven’t watched Friends yet, you really should! It is a show that will brighten any bad days and make you laugh out loud, which sometimes is necessary amongst the craziness of current popular television series. This show is just relaxing and uplifting to watch, so Friends and my Phoebe Buffay figure are definitely favorites every month of the year!
Fashion
Nordstrom, Treasure&Bond Cuffed Denim Boyfriend Shorts
Finally, I’ve found the perfect denim shorts! Recently, I’ve been having a tough time finding shorts that are an appropriate length for a 24 year-old, but also have a trendy look to them. These are amazing! The 4 inch inseam ensures you aren’t showing your butt cheeks throughout the day, but also is short enough to look like shorts. The material is denim, but it is noticeably stretchy, which makes them extremely comfortable to wear through any circumstance. I love that the cuffs around the thighs are sewn to stay folded, so you don’t have to worry about them falling down and having to constantly re-fold. If you are in between sizes, I recommend the larger size because they are a bit small around the thighs (depending on your body shape) and would probably be more comfortable a bit looser, than tight! I already ordered two other washes in these shorts because they are that great, so you need them!
Nordstrom, Ray-Ban ‘Original Aviator’ 58mm Polarized Sunglasses
I love these sunglasses so much because they’re not only a classic style, but they also provide serious sun protection! The polarized lenses definitely make a huge difference, so trust me when I say it’s worth the extra money to get the polarized styles! My first pair of Ray-Ban’s were not polarized and I never knew what made them so special from other cheaper sunglasses (besides the brand name) but now that I have used the polarized for a couple years, I think they are a must have for anyone who cares about protecting their eyes and are particularly sensitive to light! I wear these with casual and dressy outfits and find that the aviator style truly goes with everything. The metal frames are such nice quality and feel more comfortable than plastic frames, which can tend to be tight on my big head. I want to continue buying polarized Ray-Bans, so let me know your favorite style so I can add to my collection!
Tory Burch, Sedgewick Ballet Flat, Blond
These flats were a major splurge for me! I don’t like spending a lot on shoes, but I could justify buying a pair in a neutral color that I could wear every day to work. I was expecting these flats to look beautiful, since they’re Tory Burch, but I was shocked at how comfortable they are too! I did not have to break them in after buying them, nor did they leave any bruises or blisters on my feet, like most shoes do on my feet! They go perfectly with all of my work outfits and I am always receiving compliments on them! Luckily I picked them up when they were on sale and could use an extra 10% off coupon code too! I just checked the website and they are now an additional 30% off and still in stock!
Thank you so much for taking the time to read about my monthly favorites for June! These posts are so much fun for me to write, so I hope you enjoyed! Let me know the products you have been loving all month long!


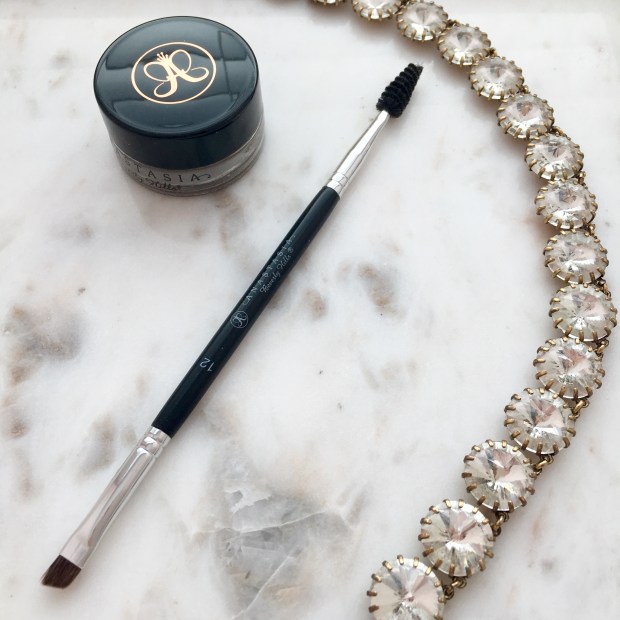 Anastasia Dip Brow Pomade, "Chocolate" and Anastasia #12 Angled Brush.