
Mauve and blush tones are very on-trend this year and seem to be popping up all over various Instagram makeup accounts. I feel like these rose-toned shadows look super natural, without being the same-old browns and gold tones I usually stick to. This makeup look would pair well with your standard neutral shades, like gray, cream and black, but I think it would look gorgeous with a blush-toned ensemble for a monochromatic, trendy vibe. I used the Naked 3 palette to complete the eye look and I loved the way it turned out. I re-discovered my love for these eye shadows and would highly recommend this palette if you love mauve-toned makeup looks.

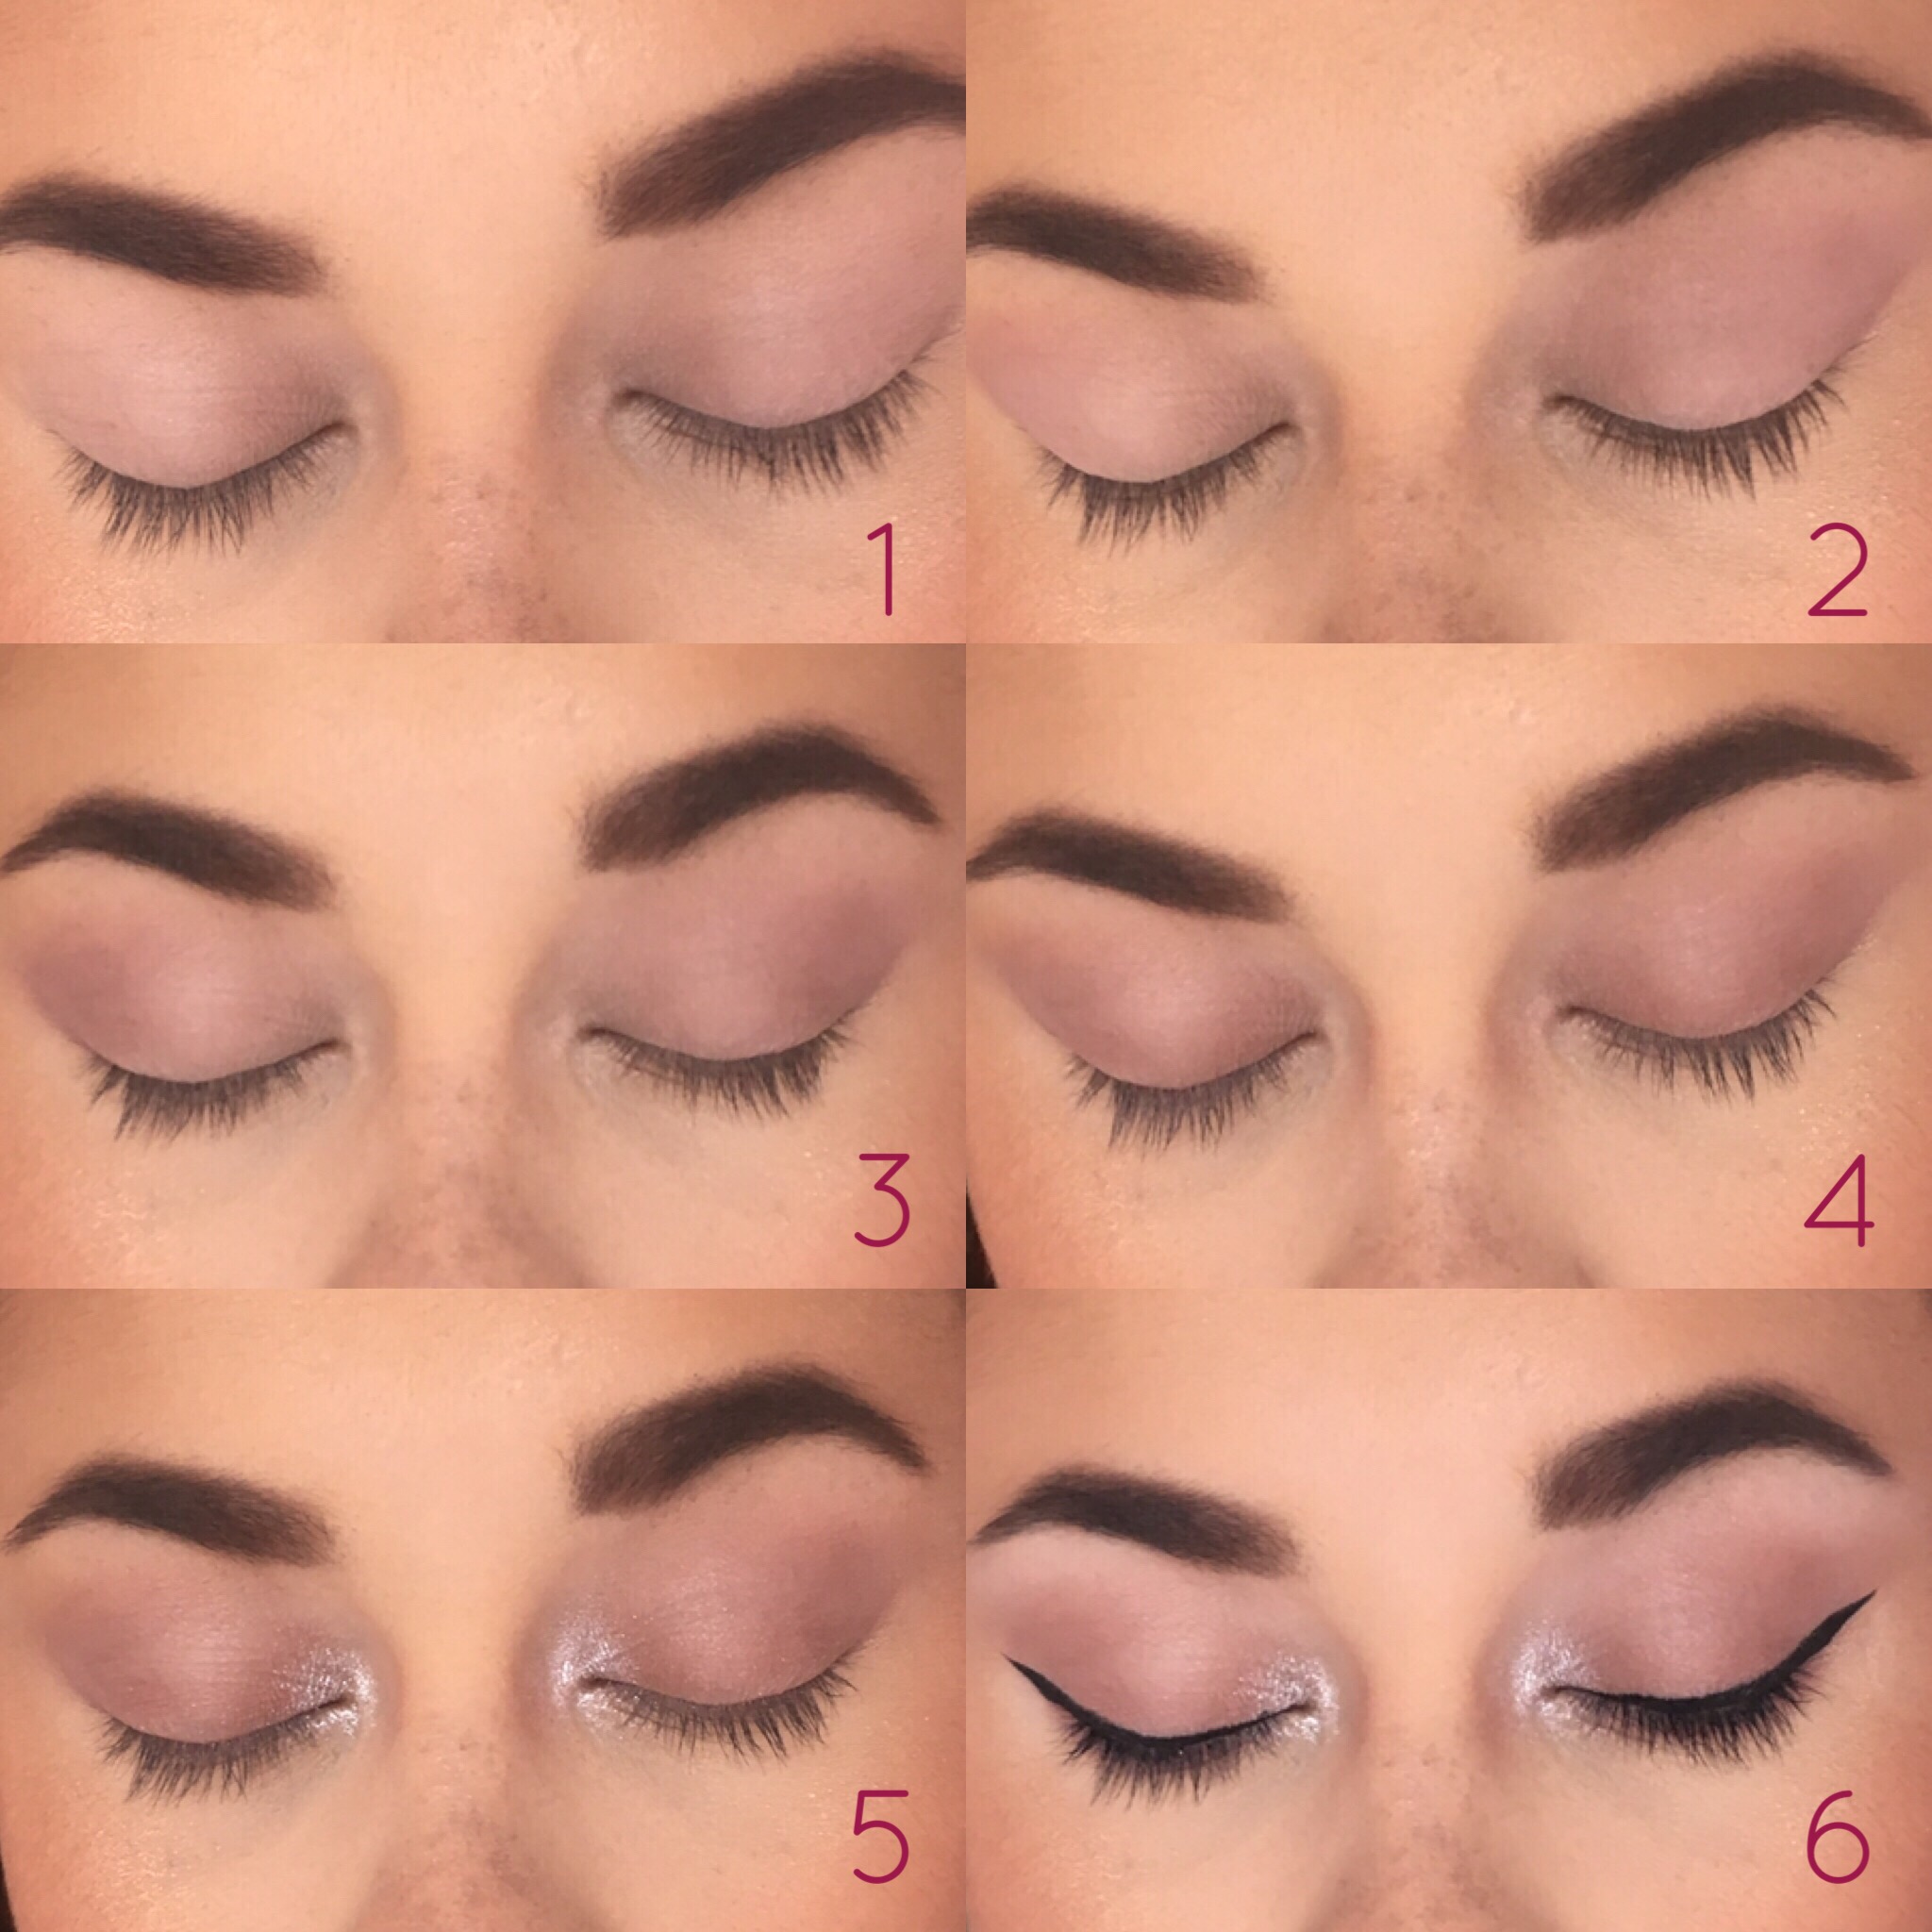
- I started off by priming my eye lids with my new favorite Wet N’ Wild Eyelid primer and then sweeping the color “Strange” from lash line to brow bone. I love using a matte, light color to set my primer and allow the other shades I place on top blend easier.
- Next, I blended “Limit” throughout my crease as a transitional color.
- Taking the matte shade, “Nooner,” I deepened my outer crease. I love doing this gradient effect to make my eyes appear larger and more defined.
- I used a combination of “Burnout” and “Liar” for my lid shade. I made sure to pack on this color with a flat shader brush to decrease the likelihood of glitter fallout!
- I used ColourPop’s “Tassel” on my inner corner to provide an intense highlight effect and further widen the look of my eyes. I loved the pop of sparkle that this step added to the overall look!
- Lastly, I lined my upper lash line using the Stila “Stay All Day” felt tip eyeliner pen and used the Tarte “Tartiest” mascara to prep my eyelashes for falsies.
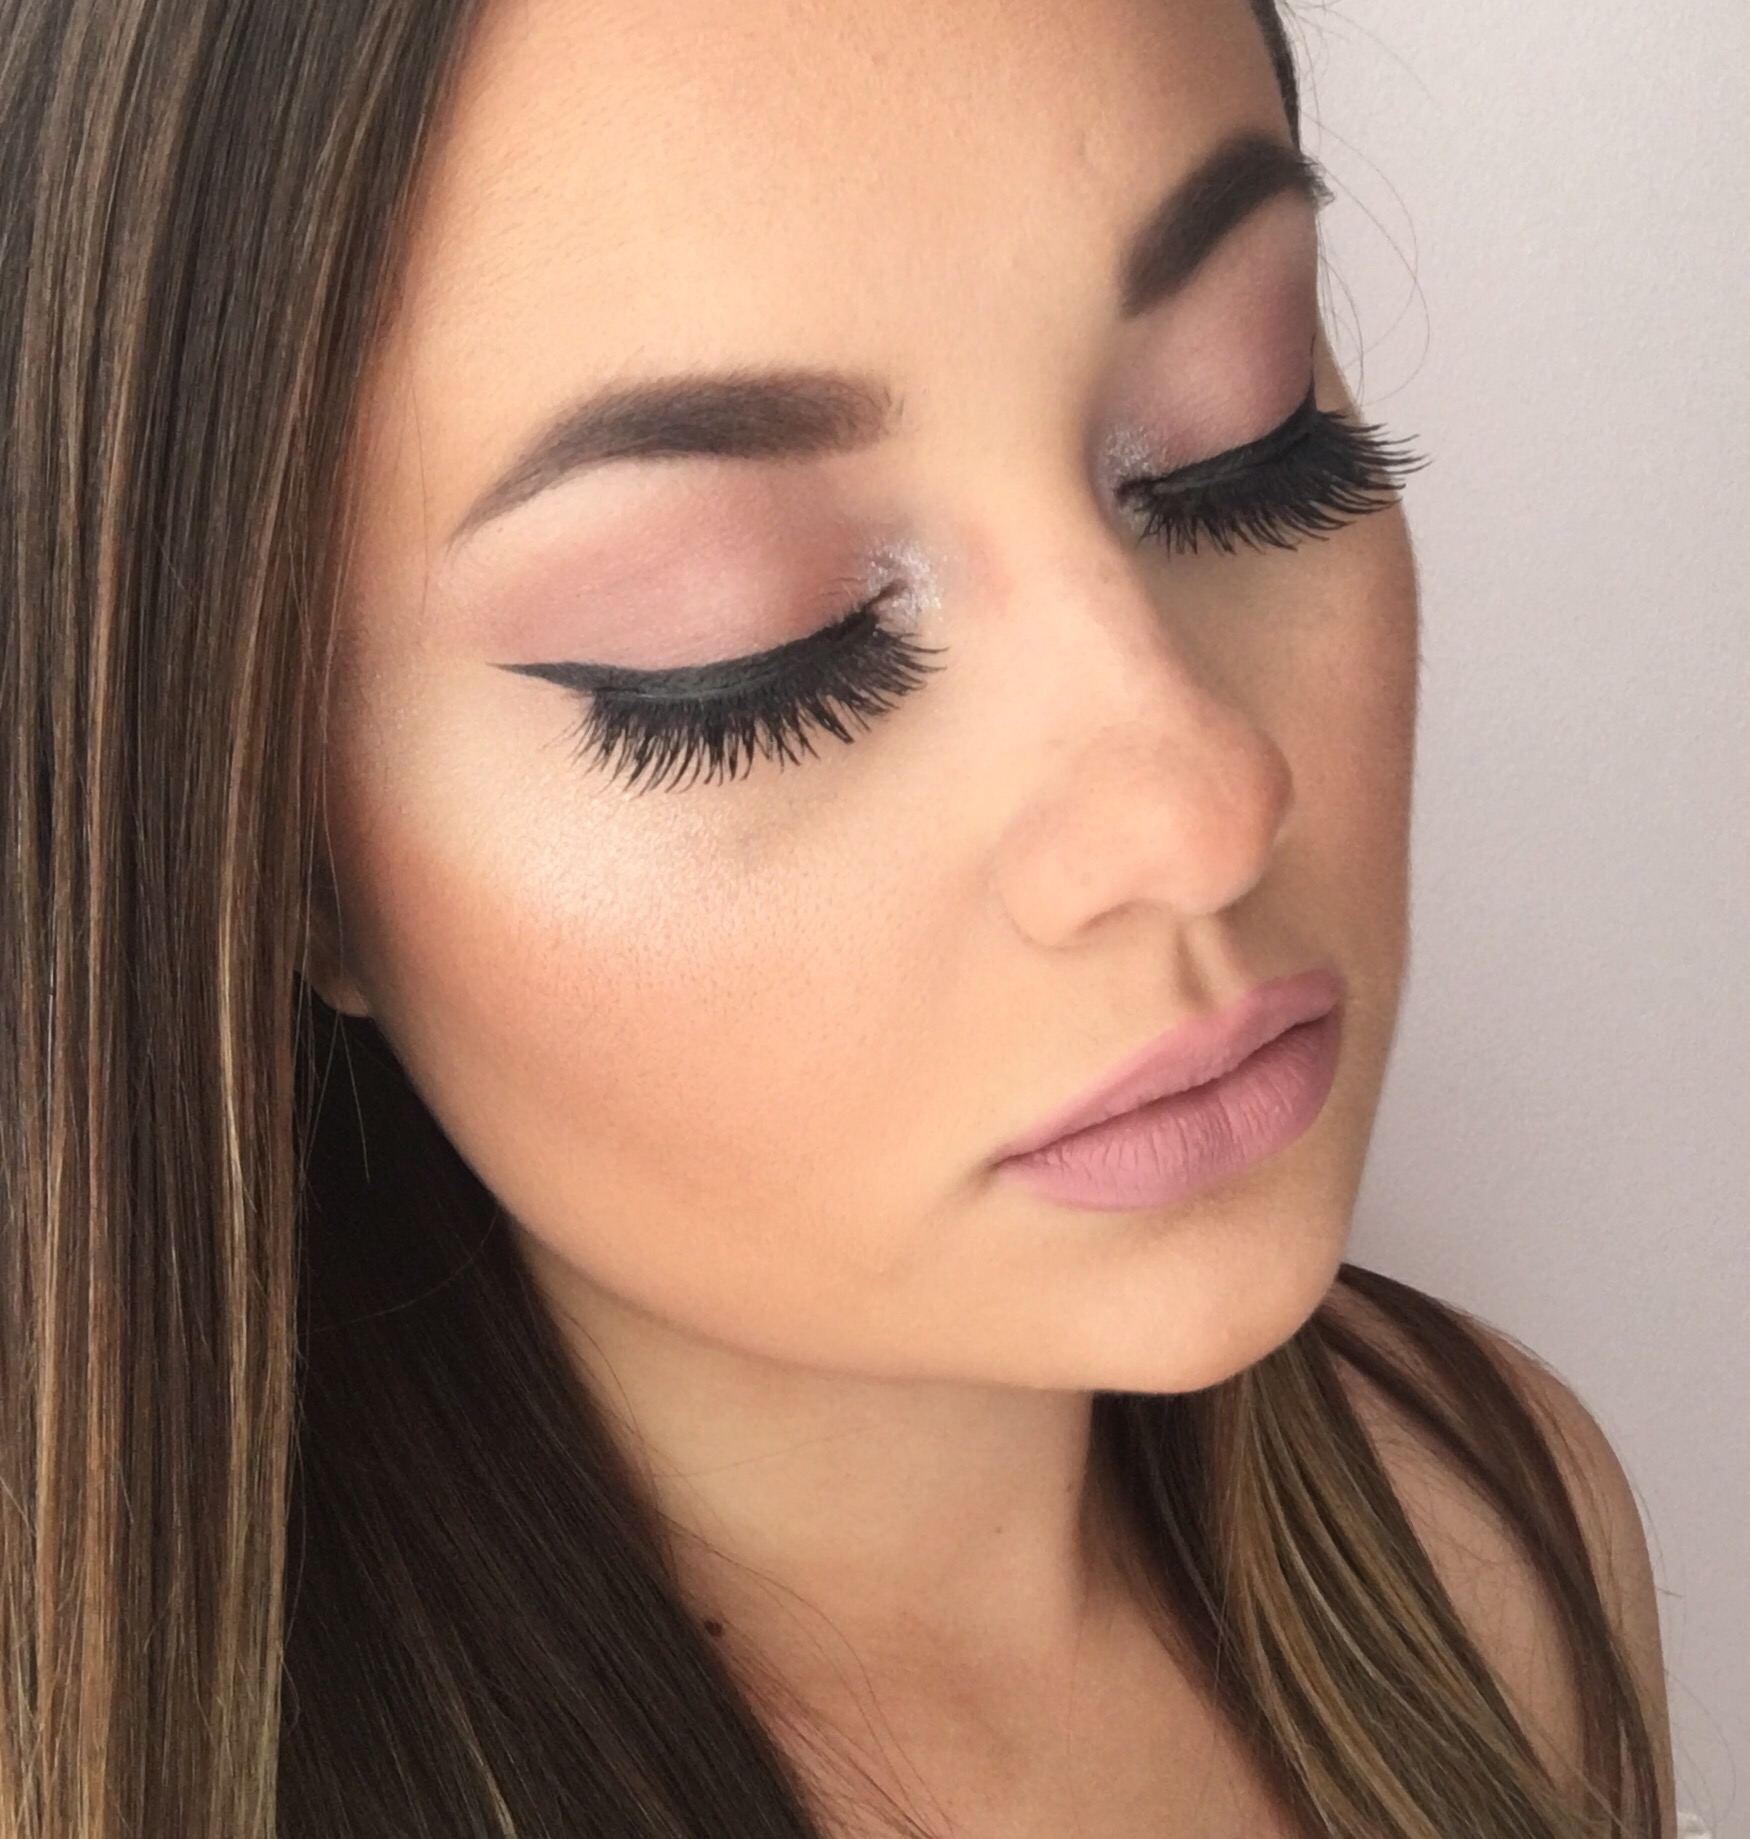
I used the shades “Bubbly” and “Dripping In Gold” from the Anastasia “That Glow” Glow Kit for my highlight! I love the glossy look of this product when applied to my cheekbones, which is rare to find in a powder formula! For the lips, I used ColourPop Ultra-Matte Liquid Lipstick in the shade, “Midi,” which is a cool-toned, dusty pink shade that compliments the eyes really well. I would definitely recommend wearing a chapstick or lip primer underneath these lippies because they’re very drying and borderline chalky otherwise! The only aspect of this look that I wasn’t too fond of was the lashes…not only were they extremely uncomfortable, they would not adhere to my natural lash line! They were the Ardell “Double Up” Wispies, but I wanted to mention the Ardell “Demi Wispies Natural” are my favorite lashes and are so light to wear! I tried two different lash glues with the “Double Up” style and neither of them would help this thick band stay in place on my eyes, which resulted in covering the band with lots of gel eyeliner and trying to make it work! They look beautiful when your eyes are open, but unfortunately it is pretty visible and not cute whenever you close them.

Let me know if you enjoy these simple makeup looks and would like for me to do more! I know it would be much easier to film a tutorial from beginning to end, rather than meticulously explain each detail of the process, so let me know if you would be interested in seeing that instead! Thank you so much for reading!
Follow me on Instagram: @abigaillindsayblog
Email any business inquires to:
abigaillindsayblog@gmail.com

I love this look 💗
LikeLiked by 2 people
Thank you so much! ❤️
LikeLiked by 2 people
So much love for this look!💗
LikeLiked by 2 people
Aw I appreciate that so much! Thank you for the sweet comment girl! 🌸
LikeLike
Gorgeous look! 🙂
LikeLiked by 2 people
You’re too kind! Thank you so much! ☺️
LikeLike
So pretty. You make makeuping look easy!
LikeLiked by 2 people
You’re so sweet, thanks girl! ☺️
LikeLike
Beautiful look, I think it looks really soft and pretty. Beautiful lashes and it’s too bad that the band was so thick and wouldn’t stay on! Thanks for sharing 🙂
LikeLiked by 1 person
Aw your sweet words mean so much to me! Thank you ☺️ it is too bad about the lashes, but at least I know not to buy those again 🙈 Demi Wispies for life!
LikeLiked by 1 person
The demi wispies are just beautiful! I totally agree
LikeLiked by 1 person
I love this look! You look so pretty ❤ xx
LikeLiked by 1 person
Thank you so much! ☺️
LikeLike
I adore this look! I’m such a fan of pink eyeshadow looks at the moment, you pull it off so well!
Followed 🙂
Georgia ♡
http://www.chasingnewyork.co.uk
LikeLiked by 1 person
Thank you so much, you’re so sweet girl!
LikeLiked by 1 person
Aww gorgeous!! Love your eye make up xx
LikeLiked by 1 person
Thank you so much! ☺️ you’re so sweet!
LikeLiked by 1 person
Your makeup look is gorg!
LikeLiked by 1 person
Thank you so much girl!
LikeLike
Your eyeliner is soooo good 😍
LikeLiked by 1 person
Aw you’re so sweet, thank you!
LikeLike
You look really pretty, and I love the eyes! 😍
LikeLiked by 1 person
Thank you! ☺️
LikeLiked by 1 person
Amazing! A must try! 😍
LikeLiked by 1 person
Definitely! 💛
LikeLike
You’re so pretty! Cheekbones to die for 😍
LikeLiked by 1 person
Aw thanks girl! You are too kind! ☺️
LikeLike
Omg ur gorgeous girl😍
LikeLiked by 1 person
You too! Thank you so much! ☺️
LikeLike
You’re stunning! ❤ Beautiful look
https://emstyles.wordpress.com/
LikeLiked by 1 person
Thank you so much!
LikeLike
Loving this look! Thanks for the tips! Keep inspiring others. 😀
LikeLiked by 1 person
You’re so sweet! That’s the plan! ☺️ thank you for reading!
LikeLike
Your makeup looks so good ❤
But I wanted to ask if all the colorpop liquid lipsticks chalked up like you said or it was just with this particular shade ?
LikeLiked by 1 person
Thanks girl!
LikeLike
This is so good!! I love it
LikeLiked by 1 person
Thanks girl!
LikeLiked by 1 person
Perfect eyeliner wing!!! X Ali”Fox”
LikeLiked by 1 person
Thanks girl! That’s always the goal! 🙏🏽
LikeLiked by 1 person
Beautiful look!💘
LikeLiked by 1 person
Thanks girl!
LikeLiked by 1 person
You’re so stunning!! trying to get started with a basic lifestyle blog and you are such an inspiration to me!!!!!!
LikeLiked by 1 person
Aw you’re so sweet! Thank you so much girl! ☺️ that means a lot to me!
LikeLiked by 1 person
Ahhhhh I’m in love with these colours as well! This looks absolutely stunning! 😍❤️
LikeLiked by 1 person
You are so sweet! Thank you so much! ☺️
LikeLike
I love this, you look so pretty, do you have any tips for blending? Xx
LikeLiked by 1 person
Aw you’re so sweet! Thank you! Always apply a primer, whether it’s for your face or eyes! I make sure to apply a nude shade all over my eyelids whenever I’m blending shadows on top to make sure nothing is too sticky, preventing patchiness!
LikeLiked by 1 person
Okay I’ll give it a try, Thankyou
LikeLike